
This guide provides Queue Managers with detailed instructions for managing call queues within the Omnia Portal. It includes steps for logging agents in and out, listening to and coaching during active calls, picking up waiting calls, and accessing live stats. The document covers creating and managing custom live stat dashboards and using various widgets to monitor and optimize queue performance.
1. The Queue Manager Role:
The Queue Manager role includes strategic queue management actions but is otherwise the same as a queue agent. For more details, see the relevant document: Call Queues (Agent).
Agent Activity - Queue Agents
2. Logging Agents In and Out:
-
Select the Queue: Navigate to the dropdown menu at the top of the screen and select the desired queue (e.g., "Ops Queue").
-
Filter Agents by Status: Use the status filter dropdown on the right to filter agents by All, Logged In, or Logged Out.
-
Toggle Agent Status: In the Queue Agents section, find the agent and
toggle the status switch next to the agent’s name to Logged In or Logged Out.

3. Pause/Unpause an Agent:
-
You can pause an agent by selecting a status such as Account Review, Break, Lunch, Meeting, Personal, or Other.
-
Unpause an Agent: Select Unpause.

4. Make a Call:
- To make a call, click on the agent and select Call.

5. Disable Do Not Disturb (DND):
- To disable DND, click on the agent and select Disable DND.

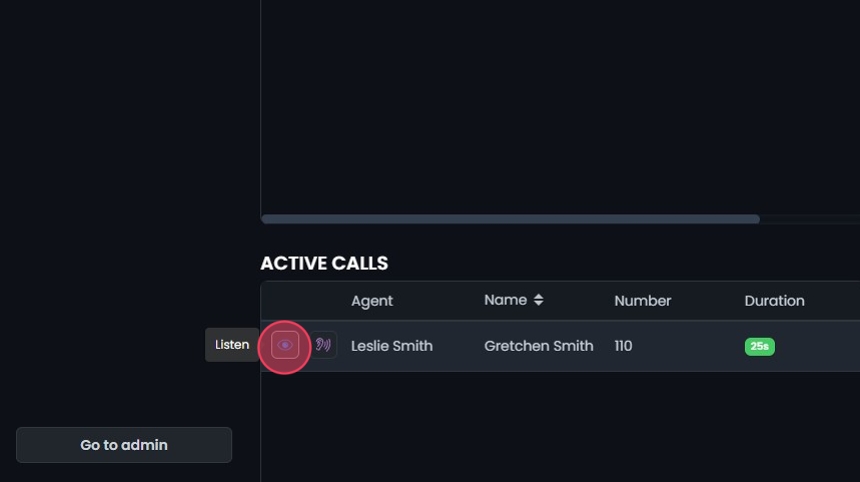
Active Calls - Listen & Coach
6. Listening to an Active Call:
- Click Listen to monitor an active call without either party knowing.
7. Coaching During an Active Call:
- Click Coach to interact with the agent while the caller cannot hear the queue manager. This allows the manager to provide guidance to the agent discreetly.

Calls Waiting
8. Pick up a Waiting Call:
- Go to the Calls Waiting section: Navigate to the Calls Waiting section in the interface.
- Pick up the call: Click on Pickup next to the call you want to answer.

Live Stats
9. Accessing Live Stats:
- Go to Call Queues then select Live Stats.
- This feature enables you to create custom live stat dashboards for queues in your accounts using drag-and-drop functionality.

10. Create Layout:
- Click on the gear icon next to the layout dropdown at the top of the dashboard and select Create layout.
- Enter the name and select the queues you wish to be included.
- Click Submit then OK.
- After submitting, your layout will be created, and you can start adding widgets.

Widgets Types and Glossary
11. Table Widgets:
- Queues:
- Displays a searchable table view of all queues selected in the current layout, showing statistics for each queue.
- Includes sort functionality and column filtering to customize the table to display only the desired statistics.
- Agents By Queue:
- Provides a searchable table view of all agents across all queues in the current layout, showing user statistics, and information about their logged in/out and pause/unpause status.
- Allows logging agents in/out and pausing/unpausing.
- Includes sort functionality and column filtering to customize the table statistics to your needs.
- Allows exporting the agent data by clicking the Export button.
- Agent Totals:
- Displays a searchable table view for all agents similar to the Agents By Queue Table, but without breaking down data by queue for agents who are members of multiple queues.
- Allows logging agents in/out and pausing/unpausing in all queues they are members of.
- Includes sort functionality and column filtering to customize the table statistics to your needs.
- Allows exporting the agent data by clicking the Export button.
- Waiting Calls List:
- Shows a table view with caller information and wait time for all calls currently waiting in the queue.
- Active Calls List:
- Displays a searchable table view with caller information and duration for all calls currently connected to agents.
- Table Widget Column Filtering:
- Click the filter button to select and deselect the columns of your choice.

12. Stat Widgets:
- Abandoned Calls:
- Shows the total count of abandoned calls, the overall abandon rate, and the average wait time before an abandon occurs. An abandoned call is one where the caller hangs up before connecting with an agent.
- Active Calls:
- Displays the total count of active calls in a queue, representing calls currently connected in the queue. This does not include calls an agent might be participating in outside of the queue.
- Agent Outbound:
- Shows the total outbound call counts for agents servicing the queue, with a breakdown of answer and no-answer counts.
- Average Answer Time:
- Displays the average answer time across all selected queues, representing the average amount of time a caller waits before an agent connects with them.
- Complete Callbacks:
- Shows the total number of callbacks completed for the selected queues, broken down into successful callbacks and those that timed out.
- Exits:
- Displays the total number of times callers exit the queue by pressing a key or reaching the queue timeout setting, broken down by timeout and key counts.
- Inbound Answered:
- Shows the inbound complete counts for the selected queues, representing queue calls that successfully connected to an agent, including calls transferred out of the queue.
- Queued Callbacks:
- Provides a count of calls waiting for callbacks in the selected queues.
- Total Inbound:
- Provides a count of the total inbound traffic to a queue, including Inbound Answered, Exits, and Abandoned counts.
- Transfers:
- Displays the total number of calls completed as a result of blind and attended transfers out of the queue.
- Waiting Calls:
- Shows the number of calls currently waiting in the queue to connect to an agent, including the longest wait times for calls currently in the queue.
- Each stat widget displays the total counts for all queues by default. You can filter which queue totals you would like to see by using the checkboxes in the table.

13. Add Widgets:
- Click Add Widget located at the top right corner of the dashboard.
- Select from the list of available widgets to add. Once selected, these widgets will be displayed on the screen. You can add as many widgets as you like.
- Drag a widget anywhere on the screen to arrange your desired layout.
- Release the widget to place it in the chosen position.
- Resize the widget by clicking and dragging the corner of the widget.
- Click the delete button next to the widget to remove it.

Managing Layouts
14. Access Layout Options:
- Click on the gear icon next to the layout dropdown at the top of the dashboard.

15. Edit Layout:
-
Use the dropdown menu to select the desired layout.
-
Click on the gear icon next to the layout dropdown at the top of the dashboard.
-
Select Edit Layout to rename the layout or modify the selected queues.
-
Make your changes.
-
Click Submit, then OK to confirm.

16. Remove Layout:
- Use the dropdown menu to select the desired layout.
- Click on the gear icon next to the layout dropdown at the top of the dashboard.
- Select Remove Layout to delete the current layout.
- Confirm the removal when prompted.

17. Create Layout:
- Click on the gear icon next to the layout dropdown at the top of the dashboard.
- Select Create Layout to start a new layout.

18. Duplicate Layout:
- Use the dropdown menu to select the desired layout.
- Click on the gear icon next to the layout dropdown at the top of the dashboard.
- Select Duplicate Layout to make a copy of the current layout.

Accessing Queue Management Functions
19. Navigate to the Admin Portal:
- Click the Go to admin button at the bottom of the user panel menu.

20. Locate the Call Queues Tab:
- Click on the Phone System tab to expand it.
- Select the Call Queues tab to view a list of call queues that you have access to view and manage as a Queue Manager.

Call Queues List
21. Call Queues:
- Use the Search bar to find specific call queues.
- Click the Export button to download the list of call queues in CSV format.
- The table displays the following column headers, which can be sorted:
- Name: The name of the call queue.
- Number: The number assigned to the call queue.
- Ring Strategy: The strategy used for ringing, such as "Ring all" or "Round robin."
- Recording: Indicates whether call recording is enabled or not.

View/Edit Call Queue
22. Edit a Queue:
- Click the edit button next to the queue, or click on the queue you want to edit.
- In the Agent Settings section, you can:
- Add agents by clicking Add Agent, typing the agent's name, and then selecting the agent from the list.
- Remove agents by clicking the Remove Agent button next to the agent's name.
- Reorder agents by using the Reorder button next to the agent's name.
- Save Changes: Click Save.

23. Update Agent Extensions:
- After selecting Save, you will receive the following message:
- For any selected agents, update the following:
- Update extension branch to match the branch assigned to this queue.
- Update busy, no answer, and offline destinations to point to the selected destination.
- For any selected agents, update the following:
- Select Skip to save without completing this, then click Yes to confirm.
- Select agents from the dropdown. Choose the Destination type and Select destination for busy, no answer, and offline settings.
- Click Submit, then click Yes to confirm.

Accessing Reports
24. Navigate to Reports:
- Click on the Reports tab to expand it.
- Here you will see a list of available reports. For specific details on reports, see the Omnia Admin Reports User Guide.
Note: Access to reports is based on your user role. You may not be able to access and view a specific report and all of its features if your role does not permit it.
