
The "Omnia Admin Reports: Queue Summary" guide provides administrators with comprehensive instructions on accessing and utilizing the Queue Summary report within the Omnia Admin Portal. This document details how to navigate to the reports section, understand the records table, and use sorting and filtering options to customize the data view. Additionally, it explains how to export records and schedule reports for regular updates.
Alert: Access to this Report:
- Access to this report is based on your user role. You may not be able to access and view a specific report and all of its features if your role does not permit it.
Accessing Queue Summary
1. Navigate to the Reports Section:
- Go to the Admin Portal and sign in.
- Click the Reports tab to expand it.
- Select Queues, then Queue Summary.

Viewing Queue Summary Records
2. Understanding the Records Table:
- The records table provides detailed information about the queue performance metrics. The columns include:
- Name: The name of the queue.
- Inbound Complete: The number of completed inbound calls.
- Abandoned: The number of abandoned calls.
- Refused: The number of refused calls.
- Blind Transfers: The number of blind transfers.
- Attended Transfers: The number of attended transfers.
- Total Transfers: The total number of transfers.
- Total Wait Time: The total wait time for all calls.
- Average Wait Time Per Call: The average wait time per call.
- Shortest Wait: The shortest wait time.
- Longest Wait: The longest wait time.
- Percent Answered Under 30 Seconds: The percentage of calls answered within 30 seconds.
- Total Talk Time: The total talk time for all calls.
- Average Talk Time Per Call: The average talk time per call.
- Exits with Key Press: The number of exits triggered by key press.
- Exits By Timeout: The number of exits due to timeout.
- Total Inbound: The total number of inbound calls.
- Unique Inbound: The number of unique inbound calls.
- Answer Rate Minus Abandons: The answer rate excluding abandoned calls.
- Average Abandon Time Per Call: The average abandon time per call.
- Complete Callbacks: The number of completed callbacks.
- Successful Callbacks: The number of successful callbacks.
- Failed Callbacks: The number of failed callbacks.
- Hold Time Under 0.5 Minutes: The hold time under 0.5 minutes.
- Hold Time Over 0.5 Minutes: The hold time over 0.5 minutes.
- Total Outbound: The total number of outbound calls.
- The initial results shown will be for today's date.

3. Sorting Columns:
- All column headers can be sorted. Click on a column header to sort the records based on that column.

Filtering Queue Summary Records
4. Using Quick Filters:
- You can quickly filter records by date using the buttons at the top of the page:
- Yesterday
- Last 10 Days
- Last 30 Days

5. Accessing Filter Settings:
- Click on the Filter button to open the filter settings.

6. Selecting Date and Time Range:
- In the filter settings, you can select a specific date and time range:
- Use the calendar to pick start and end dates.
- Adjust the time settings as needed.
- You can also choose from predefined date ranges such as: Last week, Last month, Last 3 months, Last 6 months, Last year.

7. Selecting Distribution:
- You can filter the records by distribution: Hourly, Daily, Monthly, Agents, or None.

8. Filtering by Hold Time:
- Enter a specific hold time in minutes to filter the records.

9. Filtering by Additional Criteria:
- You can further filter the records by additional criteria:
- Queues: Select specific queues.
- Tag: Enter a specific tag to filter by.
- After setting your desired filters, click Update to apply them and update the records table.

10. Reset Filters:
- Click Reset to remove your filters and start over if needed.

Exporting Records
11. Export Records:
- To export the displayed records, click on the Export button located at the top right of the records table.

Scheduling Queue Summary Reports
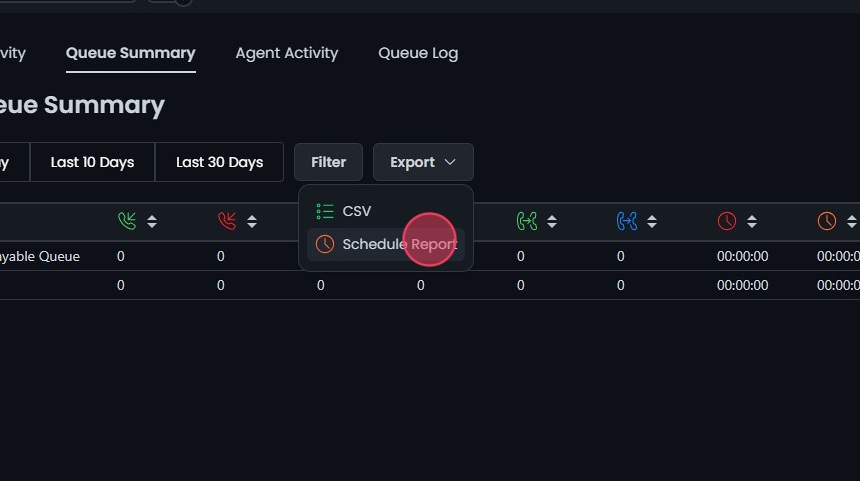
12. Schedule a Report:
- Click the Export button.
- Select Schedule Report from the dropdown.
13. Configure Report Settings:
- Enter a name for the report.
- Add recipient email addresses. Use commas to separate multiple emails.
- Select the report frequency: Daily, Weekly, or Monthly.
- Review the current filter settings.
- Click Schedule to save the report schedule.
- For more information, see the Scheduled Reports section.
