
This guide provides step-by-step instructions for number porting in the Omnia Admin portal. It explains how to access and view port requests, filter them, create new port requests, check number portability, edit port requests, activate ports, cancel port requests, and create toll-free port requests. The guide also includes information on attaching documents, verifying email notifications, and accessing order details.
Alert: This document applies to the following user roles within Omnia:
- Account Administrator
- Partner Administrator
Accessing Port Requests
1. Navigate to Port Requests:
-
Go to the Admin Portal and sign in.
-
Click the Account tab to expand it, then select Number Porting.

Viewing Port Requests
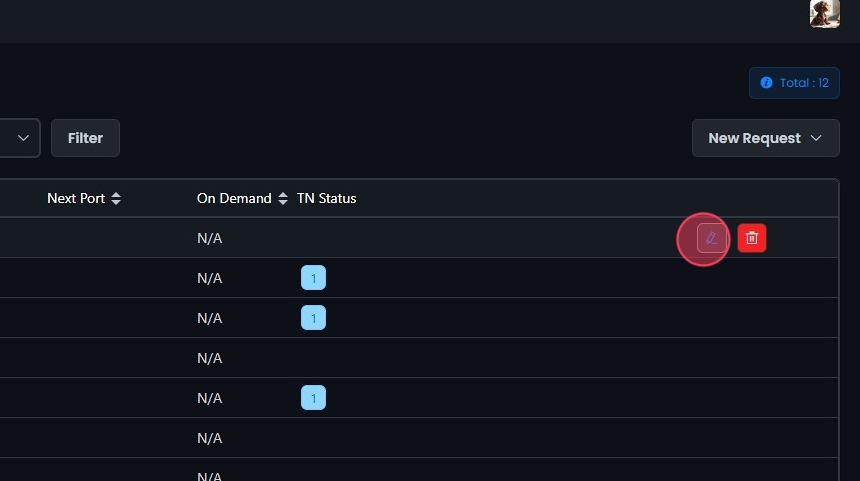
2. View Port Requests:
- The table displays the following columns:
- Order Id: The unique identifier for the port request.
- PON: The Port Order Number associated with the request.
- Order Date: The date the port order was submitted.
- Status: The current status of the port request.
- Req Date: The port date requested.
- Type: The type of port request (e.g., Normal, Toll Free).
- Next Port: FOC Date (Firm Order Commitment Date). This is the date and time for the port.
- On Demand: Indicates if the port is on-demand. An on-demand port allows an admin to activate the port anytime on the port date. If you do not activate the numbers on the port date, they will automatically activate at 11:00 PM CST on the date of the port.
- TN Status: The status of the telephone number(s) in the port request, indicated by various color codes. This also includes the total number of telephone numbers for each status.
- Click the sort icons next to the column headers to arrange items in ascending or descending order.

Filtering Port Requests
3. Filter Port Requests:
- You can use the search bar to find specific port requests and the filter dropdown to view requests by type (All, Normal, Toll Free).
- Click the Filter button to open the filter settings.
- You can filter port requests by:
- Date Range: Select the start and end dates for the port requests you want to view.
- Status: Select the status of the port requests (e.g., Canceled, Closed, Incomplete, Pending, Pending Cancel).

4. Apply Filters:
- After selecting the desired filters, click Update to view the filtered port requests.

Creating a New Port Request
5. New Port Request - Phone Numbers:
- Click the New Request button.
- Select Phone Number for standard phone number port requests.

6. Enter Telephone Numbers:
- Type the phone numbers you wish to port, one per line.
- Click Submit once you have entered all the numbers.

Checking Number Portability
7. View Portable Number Summary:
- The system will check the portability of the entered numbers.
- A summary of the portable numbers will be displayed, including the provider information.

8. View Unportable Numbers:
- The system will also display any numbers that are not portable and the reason why.
- You can go back to modify the list if needed.

9. Proceed with Portable Numbers:
- After reviewing the portability, click Next to continue with the portable numbers.

Account Details - Automated CSR Lookup
10. Automated CSR Lookup:
- If the system can automatically retrieve the CSR, the available data will be populated automatically.
- A CSR (Customer Service Record) contains important information about your account with your current phone service provider, such as the authorized person, account number, and service address.

11. Complete All Necessary fields:
- Ensure the details are correct and fill in any missing information.
Fields include:
-
Authorized Person: The person authorized to make changes on the account.
-
Account Number: The account number is only required if it is displayed on your monthly bill.
-
Account PIN: The PIN number for the account. Your account may or may not have an account PIN. Please check with your provider.
-
Company Name: The name of the company associated with the account.
-
BTN: The Billing Telephone Number, which is the primary number associated with the account.
-
Port Date: The date you want the port to occur. A calendar will be provided to select the date, with unavailable dates grayed out.
-
Physical Address: The address you enter should be the location where your numbers are registered with your current provider.
-
You can click Back to Number Summary if needed to review or change the numbers to be ported.
Note: When porting multiple numbers, if they are split into separate groups, you must complete the required information for each group separately.

Account Details - Manual CSR Entry
12. Manual CSR Entry:
- If the system cannot automatically retrieve the CSR, you will need to enter the details manually.

Submitting the Port Request
13. Submit the Port Request:
-
Once all the information is completed and verified, click the Submit button to finalize the port request.
-
A confirmation warning will appear asking you to confirm the submission with the desired port date.
-
Click Yes to confirm and submit the port request.

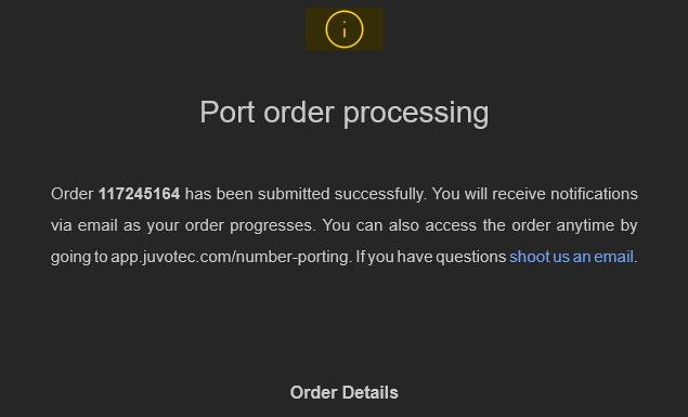
14. Confirmation:
- After submitting the request, you will see the port request listed in the Port Requests table with its status set to Pending.
- Some carriers may need a recent phone bill or other verification. If so, we'll help you provide the necessary information. Once verified, we'll coordinate with your existing carrier to port your number(s).

15. Email Verification:
-
A confirmation email with port request details will be sent to your email address.
-
You will receive email notifications about the status of your order as it progresses (e.g., Canceled, Closed, Incomplete, Pending, Pending Cancel).
-
You can check the status of your order anytime by visiting the Number Porting section in the Omnia Admin Portal.
View/Edit Port Request
16. Accessing the Edit Option:
- Click on the edit button next to the specific port request you want to edit.
- Alternatively, you can click on the specific port request to open the edit view.

17. Order Number Summary:
- In the View/Edit Port Request screen, you can see the summary of the order, including the order number and status.
- To edit the details, click the edit button next to the summary.

18. Edit Order Details:
- You can modify details such as the authorized person, account number, company name, BTN, service address, and Account PIN.
- Click Submit Edits when finished, then Yes to confirm.

19. Add Order Notes:
- You can add notes to the order by clicking on Add order note.
- Enter the relevant notes in the provided text box.

20. View Order Notes:
- Click on the View order notes button to see any notes pertaining to the port request.
- The notes will display detailed information about the port request, including any actions taken, rejections, and reasons for rejections.
- This information can be useful for troubleshooting and understanding the status of the port request.

21. Edit Requested Port Date:
- You can update the requested port date by clicking on New desired port date and selecting a new date from the calendar.

22. Attach Documents:
- Click Click to upload to attach files. Some carriers may require a recent phone bill or other verification information.

23. Submit Edits:
- After making the necessary changes, click the Submit button to save your changes, then select Update to confirm.
- A confirmation message will appear to confirm that your changes have been successfully submitted.

Activating an On Demand Port
24. Activating a Port:
-
Once your port date is confirmed, you will receive an email with the port date and instructions. If you do not activate the numbers on the port date, they will automatically activate at 11:00 PM CST.
-
Steps to activate the port:
- Log in to the admin portal.
- Go to Account > Number Porting.
- Find your order ID (e.g., 117429509).
- Click Activate Numbers.
-
After activation, you will receive two emails confirming the activation and completion of your port order, including all relevant details and a link to access the order.

Canceling a Port Request
25. Deleting/Canceling a Port Request:
- To cancel a port request, click the Delete button (red icon) next to the specific request.
- A confirmation dialog will appear. Click Yes to confirm the cancellation.
- A success message will appear confirming the order has been deleted.

Creating a New Toll-Free Port Request
26. New Request - Toll-Free Numbers:
- Click the New Request button.
- Select Toll Free for toll-free number port requests.

27. Enter Toll-Free Numbers:
- Type the toll-free numbers you wish to port, one per line.

28. Attach Required Documents:
- Attach LOA (Letter of Authorization):
- Click the Click to upload button under Attach LOA to upload the LOA document. Note: Uploading a LOA is required (only PNG, JPEG, PDF, and DOCX formats are supported).
- A Letter of Authorization authorizes VOXO to port your numbers from your current provider. Contact VOXO support for any questions regarding the LOA.

29. Attach Recent Bill:
- Click the Click to upload button under Attach Recent Bill to upload a recent bill from your current service provider.

30. Submit the Toll-Free Port Request:
- After entering the numbers and attaching the required documents, click the Submit button to proceed.
- After submitting the request, you will see the port request listed in the Port Requests table with its status set to Pending.

31. Email Verification:
- A confirmation email with port request details will be sent to your email address.
- You will receive email notifications about the status of your order as it progresses (e.g., Canceled, Closed, Incomplete, Pending, Pending Cancel).
- You can check the status of your order anytime by visiting the Number Porting section in the Omnia Admin Portal.

Viewing and Editing Toll-Free Port Requests
32. View Toll-Free Port Request:
- Locate your toll-free port request in the Port Requests table.
- Click the Edit button to view the details of the request.
- Alternatively, you can click on the specific port request to open the edit view.
33. Order Number Summary:
- In the View/Edit Port Request screen, you can see the summary of the order, including the order number and status.
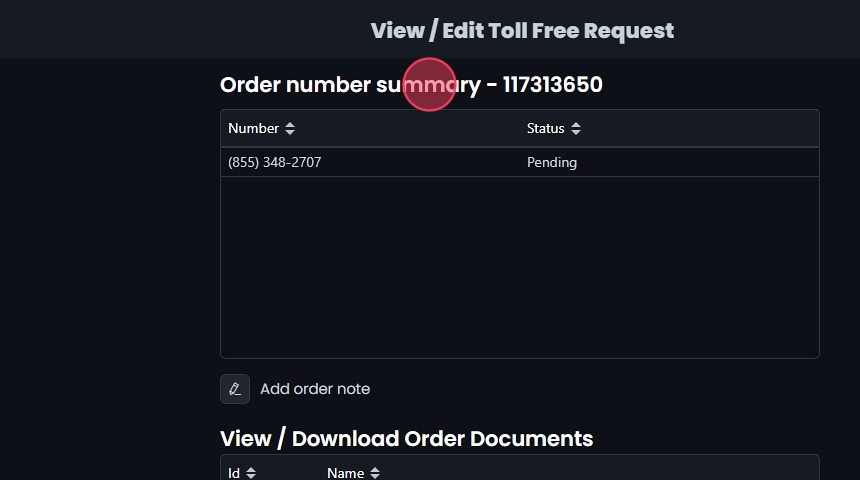
34. Add Order Notes:
- You can add notes to the order by clicking on Add order note.
- Enter the relevant notes in the provided text box.

35. View Order Notes:
- Click on the View order notes button to see any notes pertaining to the port request.
- The notes will display detailed information about the port request, including any actions taken, rejections, and reasons for rejections.
- This information can be useful for troubleshooting and understanding the status of the port request.

36. View and Download Order Documents:
- You can view and download the attached documents from the request.
- Click to upload additional documents, such as the Letter of Authorization (LOA) and a recent bill.

37. Submit Edits:
- After making necessary changes, click the Submit button at the top right of the screen.
- Confirm the update by clicking Update in the warning prompt.
- A success message will appear confirming that the edited order was submitted.

Deleting/Canceling a Toll-Free Port Request
38. Deleting/Canceling a Toll-Free Port Request:
- Click the delete icon next to the specific toll-free port request you want to cancel in the port requests table.
- Confirm the deletion by clicking Yes in the warning dialog.
- You will see a success message indicating the order was deleted successfully.
