
This guide provides instructions for accessing, viewing, managing, and editing extensions in the Omnia Admin Portal. It covers actions like searching, filtering, exporting, adding, editing, and deleting extensions. Additionally, it includes details on adding fax ATAs, paging, and SIP trunk extensions, as well as bulk creating and editing extensions.
Alert: This document applies to the following user roles within Omnia:
- Account Administrator
- Partner Administrator
Accessing Extensions
1. Navigate to Extensions:
-
Go to the Admin Portal and sign in.
-
Click the Phone System tab to expand it, then select Extensions.

Viewing and Managing Extensions
2. Extensions List:
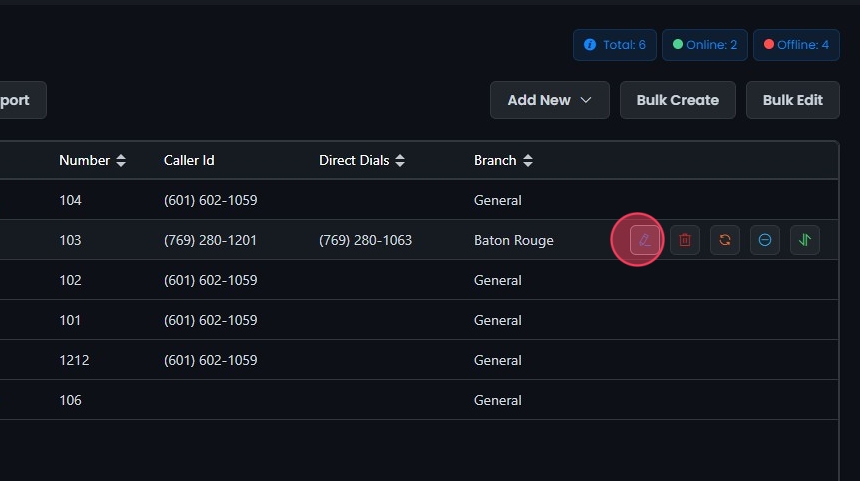
- The main screen displays a list of extensions with details such as Name, Email, Number, Caller ID, Direct Dials, and Branch.

3. Extensions Count:
-
Total: Displays the total number of extensions.
-
Online: Shows the number of extensions that are currently online.
-
Offline: Indicates the number of extensions that are currently offline.

4. Status Indicators:
- Extensions with a green icon are online.
- Extensions with a red icon are offline.

5. Search and Filter:
- Search Extensions: Use the Search bar to quickly find specific extensions by typing the name or a keyword. The system will filter the list based on your search input, displaying relevant results.
- Filter Extensions: Use the dropdown menu to filter the extensions by type (All, Extension, Fax ATA, Paging, SIP Trunk).
- Sort: Click the sort icons next to column headers to arrange items in ascending or descending order.

6. Export Button:
- Click the Export button to download a list of the extensions in CSV format.

7. Add New Extension:
- Click the Add New button to add a new Extension, Fax ATA, Paging, or SIP Trunk.

8. Bulk Create:
- Click the Bulk Create button to add multiple extensions.

9. Bulk Edit:
- Click the Bulk Edit button to edit options such as Send Invite, Call Waiting, e911 Location, Branch, Outbound Recording, Outbound Caller ID, Outbound Faxing, Do Not Calls for multiple extensions.

Extensions Actions
10. The actions available for each extension are represented by icons/buttons next to each extension:
- Edit Extension: Click the Edit button to edit the extension.
- Delete Extension: Click the Delete button to remove the extension.
- Reset Status: Click the Reset Status button to reset the extension.
- Reboot Devices: Click the Reboot Devices button to reboot associated devices.
- Wiretap: Click the Wiretap button to initiate a wiretap.

Adding a New Extension
11. Add New Extension:
- Click the Add New button and select Extension from the dropdown menu.

12. Enter General Information:
- Enable Video Meetings: Check to enable video meetings for this extension.
- Extension Number: Enter the extension number.
- Extension Name: Enter the name for the extension.
- Email: Enter the email address.
- This automatically creates a User account for access to the Omnia Portal.
- To manage user accounts, go to Users. Here, you can manage options like resetting passwords, enabling/disabling the Operator Panel, adjusting time zones, assigning roles, managing reporting features, and assigning users to queues.
- Send Invite: Check to send an invite for the Omnia portal to the provided email.

13. Select e911 Location:
- Choose the e911 location from the dropdown menu. This is a required field and must be completed to save the extension.
- Enter specific room or building details for e911 purposes.

14. Branch:
- Select the branch associated with this extension if applicable.

15. Outbound Recording:
- Select the option for outbound recording (Yes, No, or No, but allow start/stop).
- To enable inbound call recording, edit the phone numbers.
- Email Recording: Enter the email addresses to receive recorded call files.

16. Outbound Caller ID:
- Select the caller ID for outbound calls.

17. Advanced Settings:
- Include in Dial by Name Directory: Check this box if you want the extension to be included in the dial by name directory.
- Include in Default Phonebook: Check this box if you want the extension to be included in the default phonebook.
- Account Number: Enter the associated account number.
- Department: Enter the department if applicable.
- Assign Do Not Call Lists: Select the applicable do not call lists, containing numbers the extension may not dial.
- 7-digit Dialing: Enter the area code to enable calls without dialing the area code first.

18. Devices:
- Navigate to the Devices tab.
- Click the New Device button.
- Select Phone Model: Choose the phone model from the dropdown menu.
- Enter Device Name: Enter the name for the device.
- Enter Device MAC: Enter the MAC address for the device.
- Once added, the settings for this device must be edited in the Devices section of the portal.

19. Never Miss A Call:
-
Navigate to the Never Miss A Call tab.
-
Additional Destinations: Select the type of destination (Call Group, Call Queue, Time of Day, Virtual Receptionist) and choose the specific destination.
-
This selection sets the offline, busy, and no answer destinations for the extension. If left blank, these default to voicemail, which is created automatically for the extension.
-
If an additional destination is chosen, a voicemail will not be created automatically.
-
To manage and create voicemails, go to Voicemails.

20. Faxing:
-
Navigate to the Faxing tab.
-
Enable Outbound Faxing: Check this box to enable outbound faxing.
-
Enable Direct Fax: Check this box to enable direct fax. Note that an email must be provided to enable faxing features.
-
Fax Outbound Caller ID: Select the caller ID for outbound faxes.
-
Incoming faxes are managed through assigned phone numbers.

21. Save the Extension:
- Click Create to add the new extension.
- If the outbound caller ID chosen for the extension is an unrouted number, a popup will appear asking to assign it as the direct dial number.
- Click Yes to route the phone number to the extension.
- Click No to skip this step.

Editing an Extension
22. Edit Extension:
- Once an extension is created, you can view and modify additional features and settings. You can also update existing information.
23. General Settings:
- Enable Do Not Disturb: Check this box to enable the Do Not Disturb feature.
- Enable Voicemail Message Waiting Indicator: Check this box to turn on the voicemail message waiting indicator for this extension.

24. Invite and Update Email:
- Updating an extension's email address automatically creates a new user account for the updated email address if Send Invite is selected. Otherwise, you must manually create the user account.
- Manage user accounts in Users to reset passwords, enable/disable the Operator Panel, adjust time zones, assign roles, manage reporting features, and assign users to queues.
- Send Invite: Check this to send an Omnia portal invite to the updated email.
Note: If you update the email address associated with the extension, you will need to delete the user account associated with the old email address. To delete the user account, go to Users.

25. Update Email Address:
- If the extension has Voicemail set up, updating the email address for the extension will automatically update the email address for the Voicemail. To manage Voicemail, go to Voicemails.
- If the email address tied to the extension is set up to receive incoming faxes, go to the phone number associated with the fax and update or remove the email address.

26. Advanced Settings:
- Max Inbound Rings: Set the maximum number of inbound rings (default can be edited after creation).
- Hold Music: Select the hold music option (default can be edited after creation).
- Call Waiting: Enable or disable call waiting (default can be edited here).
- Routing Profile: Select the routing profile from the dropdown menu (default can be edited here).

27. Devices:
- Manual Provision Settings: Hover over the blue question mark icon next to Devices to view the manual provision settings. This includes details like:
- SIP Proxy
- DNS Type
- SIP Username
- SIP Password
- Register Expires
- Codec Support

28. Viewing Online Devices:
- Click Load online devices to refresh and see the latest online devices.
Options Include:
- User Agent: Displays the device type and model.
- Address: Shows the SIP address.
- Expires: Time for which the registration is valid.
- Received: IP address and port from which the registration was received.
- Path: Routing path of the SIP messages.
- Last Keep Alive: Timestamp of the last keep-alive message.
- Server Id: Identifier of the server handling the registration.

29. Remove Device:
- Phone Model: Use the dropdown menu to select the phone model.
- Remove Device: Check this box if you want to remove the device from the extension.

30. Never Miss A Call Settings:
-
Enable Simultaneous Ring: Check this box to enable simultaneous ring.
- This feature allows incoming calls to ring on all the user's devices simultaneously.
-
Enable Forwarding All Calls: Check the box next to Enable forwarding all calls to forward all calls to a specified number.
- Destination Type: Choose the type (e.g., Extension, Voicemail).
- Select Destination: Choose the specific destination.
- Add a Destination: Click Add a destination to include multiple destinations.
- Uncheck the box to remove call forwarding.

31. Save the Changes:
- Complete all edits.
- Click Save.
- Click Yes to apply the changes.

Deleting an Extension
32. Delete an Extension:
- Deleting an extension will automatically delete its associated voicemail.
- Deleting an extension will not delete the user account or the device assigned to the extension.
- The device will remain active and available to reassign to another user. To delete a device, go to Devices.
- To delete the user account, go to Users.

33. Remove Email from Fax Settings:
- If the email address tied to the extension is set up to receive incoming faxes, go to the phone number associated with the fax and remove the email address.

Adding a Fax ATA
34. Add New Fax ATA:
- Click the Add New button.
- Select Fax ATA: From the dropdown menu, select Fax ATA.

35. General Settings:
- Extension Number: Enter the extension number.
- Extension Name: Enter the name for the extension.
- Select e911 Location: Choose the e911 location from the dropdown menu.
- e911 Specific Room/Building: Enter specific room or building details for e911 purposes.
- Branch (Optional): Select the branch associated with this extension.
- Outbound Caller ID: Select the caller ID for outbound calls.

36. Advanced Settings:
- Include in Dial by Name Directory: Check this box if you want the extension to be included in the dial by name directory.
- Include in Default Phonebook: Check this box if you want the extension to be included in the default phonebook.
- Account Number: Enter the account number associated with this extension.
- Department: Enter the department if applicable.
- 7-digit Dialing: Enter your area code to allow making calls without dialing the area code first.

37. Configure Devices:
- New Device: Click the New Device button.
- Phone Model: Select the phone model from the dropdown menu (e.g., Grandstream).
- Enter Device Name: Enter the name for the device.
- Enter Device MAC: Enter the MAC address for the device.
- Once added, the settings for this device must be edited in the Devices section of the portal.

38. Save the Fax ATA:
- Click Create to add the new Fax ATA.
- Click Yes to confirm the creation.

Editing a Fax ATA
39. Edit Fax ATA:
Once a Fax ATA Extension is created, you can view and modify additional features and settings. You can also update existing information.

40. Advanced Settings:
- Max Inbound Rings: Set the maximum number of inbound rings (default can be edited after creation).
- Hold Music: Select the hold music option (default can be edited after creation).
- Call Waiting: Enable or disable call waiting (default can be edited here).
- Routing Profile: Select the routing profile from the dropdown menu (default can be edited here).

41. Devices:
- Manual Provision Settings: Hover over the blue question mark icon next to Devices to view the manual provision settings. This includes details like:
- SIP Proxy
- DNS Type
- SIP Username
- SIP Password
- Register Expires
- Codec Support

42. Viewing Online Devices:
- Click Load online devices to refresh and see the latest online devices.
Options Include:
- User Agent: Displays the device type and model.
- Address: Shows the SIP address.
- Expires: Time for which the registration is valid.
- Received: IP address and port from which the registration was received.
- Path: Routing path of the SIP messages.
- Last Keep Alive: Timestamp of the last keep-alive message.
- Server Id: Identifier of the server handling the registration.

43. Remove Device:
- Phone Model: Use the dropdown menu to select the phone model.
- Remove Device: Check this box if you want to remove the device from the extension.

44. Save the Changes:
- Complete all edits.
- Click Save.
- Click Yes to apply the changes.

Adding Paging
45. Add New Extension:
- Add New Extension: Click the Add New button.
- Select Paging: From the dropdown menu, select Paging.

46. General Settings:
- Include in Dial by Name Directory: Check this box if you want the extension to be included in the dial by name directory.
- Include in Default Phonebook: Check this box if you want the extension to be included in the default phonebook.
- Account Number: Enter the account number associated with this extension.
- Extension Number: Enter the extension number for the paging extension.
- Extension Name: Enter the name for the extension.
- e911 Location: Enter the specific e911 location details for this extension.

47. Create the Extension:
- Click Create to add the new paging extension.
- Click Yes to confirm the creation.

Editing a Paging Extension
48. Edit Paging:
- Once a paging extension is created, you can view and modify additional features and settings. You can also update existing information.

49. Devices:
- Manual Provision Settings: View the manual provision settings for the device.
- Click the Load online devices button to refresh and view the latest online devices.

50. Save the Changes:
- Complete all edits.
- Click Save.
- Click Yes to apply the changes.

Adding a SIP Trunk
51. Add New SIP Trunk:
- Click the Add New button and select SIP Trunk from the dropdown menu.

52. Enter the Required Information:
- Enable e911 Override: Check this box if you want to enable e911 override.
- Extension Number: Enter the extension number.
- Extension Name: Enter the name for the extension.
- Select e911 Location: Choose the e911 location from the dropdown menu.
- e911 Specific Room/Building: Enter specific room or building details for e911 purposes.
- Branch (Optional): Select the branch associated with this extension.

53. Authentication Method:
- Normal Auth: Use normal authentication.
- IP Based Auth: Select IP-based authentication and enter the public IP.

54. Call Paths:
- Enter the number of call paths.

55. CID Source:
- Select the CID Source from the dropdown menu (e.g., PAI, RPID, FROM).

56. Outbound Caller ID:
- Select the caller ID for outbound calls.

57. Advanced Settings:
- Include in Dial by Name Directory: Check this box if you want the extension to be included in the dial by name directory.
- Include in Default Phonebook: Check this box if you want the extension to be included in the default phonebook.
- Account Number: Enter the account number associated with this extension.
- Department: Enter the department if applicable.
- 7-digit Dialing: Enter your area code to allow making calls without dialing the area code first.

58. Save the SIP Trunk:
- Click Create to add the new SIP Trunk.
- Click Yes to confirm the creation.

Editing a SIP Trunk
59. Edit SIP Trunk:
- Once a SIP Trunk is created, you can access and modify additional settings.

60. Authentication method:
- Manual Provision Settings: Hover over the blue question mark icon next to Devices to view the manual provision settings. This includes details like:
- SIP Proxy
- DNS Type
- SIP Username
- SIP Password
- Register Expires
- Codec Support

61. Advanced Settings:
- Max Inbound Rings: Set the maximum number of inbound rings (default can be edited after creation).
- Hold Music: Select the hold music option (default can be edited after creation).
- Call Waiting: Enable or disable call waiting (default can be edited here).
- Routing Profile: Select the routing profile from the dropdown menu (default can be edited here).

62. Save Changes:
- Click Save.
- Click Yes to confirm and save the changes.

Creating Extensions in Bulk
63. Bulk Create Extensions:
Click the Bulk Create button.

64. Import from CSV:
- Hover over Import from CSV and click Download Example CSV to get a template.
- Complete the template, save it, and click Import from CSV to upload the spreadsheet.

65. Map CSV Columns:
- Send User Invites: Check this box if you want to send invites to the users upon creating their extensions.
- Map CSV Columns: Match each CSV column to the corresponding field (Number, Name, Email, Branch, Department, Account Number, Device Name, Do Not Call List, Caller ID Number, E911 Location, E911 Location Override, Additional Destination Type, Additional Destination Name, MAC, Description, and Phonebook).
- Ensure all listed fields are selected to continue.
- Click Reset to remove the CSV and reupload if needed.
- Click the Add button to complete the bulk upload.
- Added entries will appear in the list below.

66. Remove an Entry:
- If you need to remove an entry from the list after selecting add, clicking Remove (-) will remove an extension entry before saving.

67. Save Extensions:
- Click Create.
- Click Yes to confirm and save.

Editing Extensions in Bulk
68. Bulk Edit:
- Click Bulk Edit.

69. General Tab:
- Select a Branch: Use the dropdown menu to choose the branch for editing extensions. If you do not utilize the branch feature, select General, which is assigned by default.
- Apply to All Extensions: Choose this option if the changes should be applied across all extensions in the selected branch.

70. Available and Assigned Extensions:
- Select Extensions:
- In the Available section, check the boxes next to the extensions you want to edit.
- Check the Available box to select all extensions in this column.
- Move Extensions:
- Click the right arrow to move selected extensions to the Assigned section.
- Remove Extensions:
- To remove an extension from the Assigned section, select it and click the left arrow.
- Check the Assigned box to select all extensions in this column and move them back to the Available section.
- Filter Extensions:
- Use keywords to filter available extensions.
- Verify Selection:
- Ensure all desired extensions are listed in the Assigned section for editing.

71. Edit Fields:
- Modify settings like Send Invite, Call Waiting, e911 location, Branch, Department, Outbound recording, Caller ID, Faxing, Do Not Calls, and Additional Destinations.

72. Save Changes:
- Click Edit, then Yes to save the changes.
