A Call Campaign allows you to systematically contact a list of numbers, managing details like scheduling, caller ID, and call handling. This is useful for sales, customer service follow-ups, and other organized call needs. This guide provides step-by-step instructions for accessing and managing call campaigns in the Omnia Admin Portal, including adding, scheduling, defining calling hours, handling connections, managing numbers, editing, searching, and exporting campaigns.
Alert: This document applies to the following user roles within Omnia:
- Account Administrator
- Partner Administrator
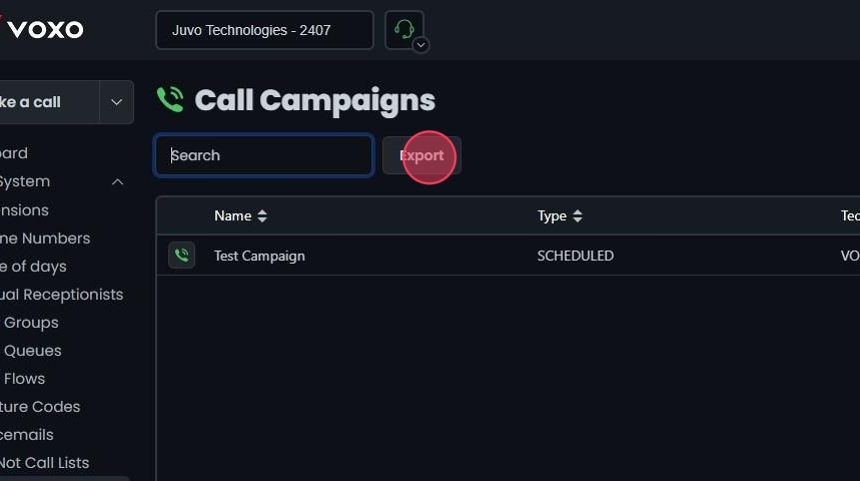
Accessing Call Campaigns
1. Navigate to Call Campaigns:
-
Go to the Admin Portal and sign in.
-
Click the Phone System tab to expand it, then select Campaigns.

Adding a New Call Campaign
2. Add a New Call Campaign:
- Click Add New.
- Click Voice.

General Settings
3. General Settings:
-
Always record: Check this box if you want to record all calls in this campaign.
-
Enter name: Type a descriptive name for your campaign (e.g., "June Sales Outreach").
-
State: Set the initial state of the campaign (e.g., READY, PAUSED).
-
Time zone: Select the appropriate time zone for your campaign. Default is "Use account default."
-
Select caller ID: Choose the caller ID that will be displayed to call recipients.

Schedule the Campaign
4. Schedule the Campaign
- Start Date / Time: Set the start date and time for the campaign.
- End Date / Time: Set the end date and time for the campaign.
Note: Don't forget to select a time!

Define Calling Hours
5. Define Calling Hours:
- Start time: Select the time when calling should begin each day.
- End time: Select the time when calling should stop each day.
- Enter call frequency: Specify the frequency of calls, including how many seconds to wait between calls. This helps manage the pacing of the campaign.

Handle Call Connections
6. Handle Call Connections:
- Enable Voicemail Detection: Check this box to have the system detect and handle voicemail when a call connects.
- Destination Type(s): Select the action to take when a call connects (e.g., play a message, forward to an agent).
- Select Destination: Choose the specific action or endpoint for the connected call based on the selected destination type(s).

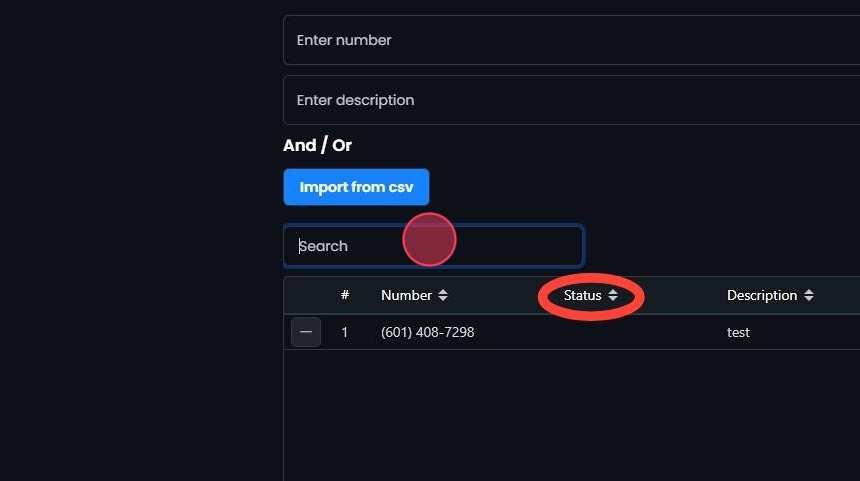
Manage Numbers
7. Add Individual Numbers:
- Click Manage Numbers.
- Number: Enter a phone number you wish to include in the campaign.
- Description: Enter a description for the number. This could include the contact's name or any relevant notes.
- Click Reset to remove an entry.
- Click Add number "+" to add the number.
- Continue to add multiple numbers by following this process. Added entries will appear in the list below.

8. Remove an Entry:
- If you need to remove a number from the list after selecting add, clicking Remove number (-) will remove an entry before saving.

9. Search the List:
- Enter a number or description in the Search field to find a specific entry.
- Sort: Click the sort icons next to column headers to arrange items in ascending or descending order.
10. Save the Call Campaign:
- Once you have completed adding entries, click Create.
- Click Yes to confirm and save.

Import Numbers from a CSV File
11. Import from CSV:
- Hover over Import from csv and click Download example csv to get a template. Complete the template, save it, and click Import from csv to upload the spreadsheet.

12. Map CSV Fields:
- Select Number and Description from the dropdown menus for each corresponding column.
- All listed fields must be selected to continue.
- Click Reset to remove the CSV and reupload if needed.
- Click Add.
- Added entries will appear in the list below.

13. Remove an Entry:
- If you need to remove a phone number entry from the list after selecting add, clicking Remove number (-) will remove an entry before saving.

14. Save the Call Campaign:
- Once you have completed adding entries, click Create.
- Click Yes to confirm and save.

Set Campaign State to READY
15. Set Campaign State to READY:
- Click READY to ensure the campaign is ready to begin.

Edit a Call Campaign
16. Edit a Call Campaign:
- Click on the campaign you want to edit or click the Edit button next to it.
- Make your edits.
- Click Save.
- Click Yes to confirm.

Deleting Call Campaigns
17. Delete a Call Campaign:
- Click the Delete button next to the Call Campaign.
- Confirm the deletion by clicking Yes.

Search and Sort
18. Search for a Call Campaign:
- Search Bar: Quickly find specific items by typing the name or a keyword in the search field. The system will filter the list based on your search input, displaying the relevant results.
- Sort: Click the sort icons next to column headers to arrange items in ascending or descending order.

Export Call Campaigns
19. Export Call Campaign List:
- Click the Export button next to the search field.
- The system will download a list of the items in CSV format.