
This guide provides step-by-step instructions for accessing, adding, editing, duplicating, and deleting button layouts in the Omnia Admin Portal. Button layouts configure programmable keys on VoIP phones for functions like speed dialing, parking calls, or monitoring extensions.
Alert: This document applies to the following user roles within Omnia:
- Account Administrator
- Partner Administrator
Accessing Button Layouts
1. Navigate to Button Layouts:
-
Go to the Admin Portal and sign in.
-
Click the Phone System tab to expand it, then select Button Layouts.

Adding a New Button Layout
2. Add a New Button Layout:
- Click Add New.
- Enter a name for the button layout in the Name field.

3. Set the Key Range:
- Enter the Start Key number. This is the first button you want to configure.
- Enter the End Key number. This should be greater than the start key number, covering all buttons you want to configure.

Tip: #### Notes:
-
The End Key must be greater than the Start Key to create a valid range for button configuration.
-
The Key type field is required for Yealink devices. Ensure this field is filled to avoid configuration errors.
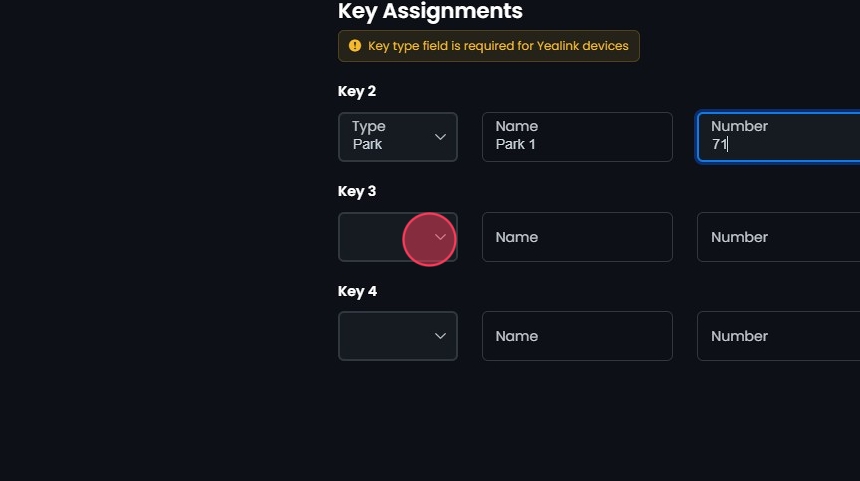
Key Assignments
4. Assign Functions to Keys:
- Type:
- Click on the dropdown menu to select the function for the key. Options include:
- BLF (Busy Lamp Field): Monitors the status of another extension (busy or available).
- Park: Allows you to park a call on a specific number.
- Speed Dial: Provides quick dialing of a predefined number.
- BLF (Grandstream): Specific to Grandstream devices, similar to BLF.
- Speed Dial (Grandstream): Speed dial for Grandstream devices.
- Park (Grandstream): Park call for Grandstream devices.
- Click on the dropdown menu to select the function for the key. Options include:
- Name:
- Enter a descriptive name for the key (e.g., "Park 1" or "Voicemail").
- Number:
- Select or enter the number associated with the function. This could be an extension number, a park slot number, or a speed dial number.

5. Repeat for Additional Keys:
- Continue assigning Types, Names, and Numbers for each key within the range specified.
6. Save Changes:
- After configuring all necessary keys, review your entries to ensure accuracy.
- Click Create then Yes to apply the changes.

Duplicating a Button Layout
7. Duplicate layout:
- Click the Duplicate button next to a button layout to duplicate.
- Click Yes to confirm the duplication.

Editing a Button Layout
8. Edit Layout:
- Click on the button layout you want to edit or click the Edit button next to it.
- Make your edits
- Click Edit, then Yes to confirm and save your changes.

Deleting a Button Layout
9. Delete Layout:
- Click the Delete button next to the Button Layout.
- Confirm the deletion by clicking Yes.

Search and Sort
10. Search Button Layouts:
- Search Bar: Quickly find specific items by typing the name or a keyword in the search field. The system will filter the list based on your search input, displaying the relevant results.
- Sort: Click the sort icons next to column headers to arrange items in ascending or descending order.
