# Create Announcement
Source: https://docs.voxo.co/api-reference/announcements/create-announcement
https://api.voxo.co/v2/docs/openapi.json post /v2/admin/announcements/
Create an announcement and optionally attach it to IVRs
# Delete Announcement
Source: https://docs.voxo.co/api-reference/announcements/delete-announcement
https://api.voxo.co/v2/docs/openapi.json delete /v2/admin/announcements/{id}
Delete an announcement and its IVR attachments
# Get Announcement
Source: https://docs.voxo.co/api-reference/announcements/get-announcement
https://api.voxo.co/v2/docs/openapi.json get /v2/admin/announcements/{id}
Get a single announcement by ID
# List Announcements
Source: https://docs.voxo.co/api-reference/announcements/list-announcements
https://api.voxo.co/v2/docs/openapi.json get /v2/admin/announcements/
List announcements for a tenant with optional pagination, sorting, and search
# Update Announcement
Source: https://docs.voxo.co/api-reference/announcements/update-announcement
https://api.voxo.co/v2/docs/openapi.json patch /v2/admin/announcements/{id}
Update an announcement (partial update)
# Answered call
Source: https://docs.voxo.co/api-reference/answered-call
/openapi/webhooks.json webhook ANSWEREDCALL
This webhook fires when a new call is answered in your account.
# Get Entity Audit Log
Source: https://docs.voxo.co/api-reference/audit-log/get-entity-audit-log
https://api.voxo.co/v2/docs/openapi.json get /v2/admin/audit-log/{entityType}/{entityId}
List audit log entries for a specific entity
# List Audit Logs
Source: https://docs.voxo.co/api-reference/audit-log/list-audit-logs
https://api.voxo.co/v2/docs/openapi.json get /v2/admin/audit-log/
List audit log entries for a tenant within a date range, with optional entity/action/user filters, sorting, and pagination
# Login
Source: https://docs.voxo.co/api-reference/authentication/login
https://api.voxo.co/v2/docs/openapi.json post /v2/authentication/
Authenticate with email and password
# Login with MFA
Source: https://docs.voxo.co/api-reference/authentication/login-with-mfa
https://api.voxo.co/v2/docs/openapi.json post /v2/authentication/mfa
Authenticate with email and password (MFA flow). Returns an MFA challenge if MFA is enabled, or the user if not.
# Verify JWT
Source: https://docs.voxo.co/api-reference/authentication/verify-jwt
https://api.voxo.co/v2/docs/openapi.json post /v2/authentication/jwt
Verify a JWT access token and return the associated user
# Create Branch
Source: https://docs.voxo.co/api-reference/branches/create-branch
https://api.voxo.co/v2/docs/openapi.json post /v2/admin/branches/
Create a new branch
# Delete Branch
Source: https://docs.voxo.co/api-reference/branches/delete-branch
https://api.voxo.co/v2/docs/openapi.json delete /v2/admin/branches/{id}
Delete a branch
# Get Branch
Source: https://docs.voxo.co/api-reference/branches/get-branch
https://api.voxo.co/v2/docs/openapi.json get /v2/admin/branches/{id}
Get a single branch by ID
# List Branches
Source: https://docs.voxo.co/api-reference/branches/list-branches
https://api.voxo.co/v2/docs/openapi.json get /v2/admin/branches/
List branches for a tenant with optional pagination and name filter
# Update Branch
Source: https://docs.voxo.co/api-reference/branches/update-branch
https://api.voxo.co/v2/docs/openapi.json patch /v2/admin/branches/{id}
Update an existing branch
# Create Business Hour
Source: https://docs.voxo.co/api-reference/business-hours/create-business-hour
https://api.voxo.co/v2/docs/openapi.json post /v2/admin/business-hours/
Create a business hour with default holidays and destinations
# Delete Business Hour
Source: https://docs.voxo.co/api-reference/business-hours/delete-business-hour
https://api.voxo.co/v2/docs/openapi.json delete /v2/admin/business-hours/{id}
Delete a business hour and its destinations and holidays
# Get Business Hour
Source: https://docs.voxo.co/api-reference/business-hours/get-business-hour
https://api.voxo.co/v2/docs/openapi.json get /v2/admin/business-hours/{id}
Get a business hour by ID, including routing destinations
# List Business Hours
Source: https://docs.voxo.co/api-reference/business-hours/list-business-hours
https://api.voxo.co/v2/docs/openapi.json get /v2/admin/business-hours/
List business hours for a tenant with optional pagination, sorting, and search
# Update Business Hour
Source: https://docs.voxo.co/api-reference/business-hours/update-business-hour
https://api.voxo.co/v2/docs/openapi.json patch /v2/admin/business-hours/{id}
Update an existing business hour
# Create Button Layout
Source: https://docs.voxo.co/api-reference/button-layouts/create-button-layout
https://api.voxo.co/v2/docs/openapi.json post /v2/admin/button-layouts/
Create a new button layout and (optionally) seed its autoprovision button configuration.
# Delete Button Layout
Source: https://docs.voxo.co/api-reference/button-layouts/delete-button-layout
https://api.voxo.co/v2/docs/openapi.json delete /v2/admin/button-layouts/{id}
Delete a button layout. Phone-button-layout assignments and autoprovision rows are cleaned up after the response is sent.
# Get Button Layout
Source: https://docs.voxo.co/api-reference/button-layouts/get-button-layout
https://api.voxo.co/v2/docs/openapi.json get /v2/admin/button-layouts/{id}
Get a button layout by ID with its full button configuration.
# List Button Layouts
Source: https://docs.voxo.co/api-reference/button-layouts/list-button-layouts
https://api.voxo.co/v2/docs/openapi.json get /v2/admin/button-layouts/
List button layouts for a tenant. Supports pagination and substring search by name.
# Update Button Layout
Source: https://docs.voxo.co/api-reference/button-layouts/update-button-layout
https://api.voxo.co/v2/docs/openapi.json patch /v2/admin/button-layouts/{id}
Sparse-update a button layout. When `config` is provided, existing autoprovision rows are fully replaced.
# Add Campaign Numbers
Source: https://docs.voxo.co/api-reference/call-campaigns/add-campaign-numbers
https://api.voxo.co/v2/docs/openapi.json patch /v2/admin/call-campaigns/add-numbers/{campaignId}
Add phone numbers to a call campaign
# Create Campaign
Source: https://docs.voxo.co/api-reference/call-campaigns/create-campaign
https://api.voxo.co/v2/docs/openapi.json post /v2/admin/call-campaigns/
Create a new call campaign
# Delete Campaign
Source: https://docs.voxo.co/api-reference/call-campaigns/delete-campaign
https://api.voxo.co/v2/docs/openapi.json delete /v2/admin/call-campaigns/{campaignId}
Delete a call campaign and all associated data
# Get Campaign
Source: https://docs.voxo.co/api-reference/call-campaigns/get-campaign
https://api.voxo.co/v2/docs/openapi.json get /v2/admin/call-campaigns/{campaignId}
Get a call campaign by ID with numbers and destinations
# List Campaigns
Source: https://docs.voxo.co/api-reference/call-campaigns/list-campaigns
https://api.voxo.co/v2/docs/openapi.json get /v2/admin/call-campaigns/
List call campaigns for a tenant with optional pagination and search
# Pause Campaign
Source: https://docs.voxo.co/api-reference/call-campaigns/pause-campaign
https://api.voxo.co/v2/docs/openapi.json patch /v2/admin/call-campaigns/pause/{campaignId}
Pause a running or ready call campaign
# Remove Campaign Numbers
Source: https://docs.voxo.co/api-reference/call-campaigns/remove-campaign-numbers
https://api.voxo.co/v2/docs/openapi.json patch /v2/admin/call-campaigns/remove-numbers/{campaignId}
Remove phone numbers from a call campaign
# Schedule Campaign
Source: https://docs.voxo.co/api-reference/call-campaigns/schedule-campaign
https://api.voxo.co/v2/docs/openapi.json patch /v2/admin/call-campaigns/schedule/{campaignId}
Set a call campaign state to ready
# Update Campaign
Source: https://docs.voxo.co/api-reference/call-campaigns/update-campaign
https://api.voxo.co/v2/docs/openapi.json patch /v2/admin/call-campaigns/{campaignId}
Update an existing call campaign
# Create Call Group
Source: https://docs.voxo.co/api-reference/call-groups/create-call-group
https://api.voxo.co/v2/docs/openapi.json post /v2/admin/call-groups/
Create a call group with routing destinations
# Delete Call Group
Source: https://docs.voxo.co/api-reference/call-groups/delete-call-group
https://api.voxo.co/v2/docs/openapi.json delete /v2/admin/call-groups/{id}
Delete a call group and its destinations
# Get Call Group
Source: https://docs.voxo.co/api-reference/call-groups/get-call-group
https://api.voxo.co/v2/docs/openapi.json get /v2/admin/call-groups/{id}
Get a call group by ID, including routing destinations
# List Call Groups
Source: https://docs.voxo.co/api-reference/call-groups/list-call-groups
https://api.voxo.co/v2/docs/openapi.json get /v2/admin/call-groups/
List call groups for a tenant with optional pagination, sorting, and search
# Update Call Group
Source: https://docs.voxo.co/api-reference/call-groups/update-call-group
https://api.voxo.co/v2/docs/openapi.json patch /v2/admin/call-groups/{id}
Update an existing call group
# Create Call Outcome
Source: https://docs.voxo.co/api-reference/call-outcomes/create-call-outcome
https://api.voxo.co/v2/docs/openapi.json post /v2/admin/call-outcomes/
Create a call outcome for a tenant
# Delete Call Outcome
Source: https://docs.voxo.co/api-reference/call-outcomes/delete-call-outcome
https://api.voxo.co/v2/docs/openapi.json delete /v2/admin/call-outcomes/{id}
Soft-delete a call outcome
# Get Call Outcome
Source: https://docs.voxo.co/api-reference/call-outcomes/get-call-outcome
https://api.voxo.co/v2/docs/openapi.json get /v2/admin/call-outcomes/{id}
Get a single call outcome by ID
# List Call Outcomes
Source: https://docs.voxo.co/api-reference/call-outcomes/list-call-outcomes
https://api.voxo.co/v2/docs/openapi.json get /v2/admin/call-outcomes/
List a tenant's call outcomes with pagination, sorting, and name search
# Update Call Outcome
Source: https://docs.voxo.co/api-reference/call-outcomes/update-call-outcome
https://api.voxo.co/v2/docs/openapi.json patch /v2/admin/call-outcomes/{id}
Update a call outcome's name or description
# Call recording
Source: https://docs.voxo.co/api-reference/call-recording
/openapi/webhooks.json webhook CALLRECORDING
This webhook fires when a new recording is available in your account.
# Get Recording
Source: https://docs.voxo.co/api-reference/call-recordings/get-recording
https://api.voxo.co/v2/docs/openapi.json get /v2/admin/call-recordings/{callId}
Get a call recording by call ID
# Call and Play
Source: https://docs.voxo.co/api-reference/calling/call-and-play
https://api.voxo.co/v2/docs/openapi.json post /v2/admin/calling/call-and-play
Initiate an outbound call and play text-to-speech audio to the recipient
# List Destination Types
Source: https://docs.voxo.co/api-reference/destinations/list-destination-types
https://api.voxo.co/v2/docs/openapi.json get /v2/admin/destinations/list-types
List all available destination types
# Create Device Model
Source: https://docs.voxo.co/api-reference/device-models/create-device-model
https://api.voxo.co/v2/docs/openapi.json post /v2/admin/device-models/
Create a device model. Returns the model with its parsed autoprovision field schema.
# Delete Device Model
Source: https://docs.voxo.co/api-reference/device-models/delete-device-model
https://api.voxo.co/v2/docs/openapi.json delete /v2/admin/device-models/{id}
Hard-delete a device model by ID. Rejected with 409 if any device still references the model.
# Get Device Model
Source: https://docs.voxo.co/api-reference/device-models/get-device-model
https://api.voxo.co/v2/docs/openapi.json get /v2/admin/device-models/{id}
Get a single device model including its parsed autoprovision field schema (types, defaults, and value->label options).
# List Device Models
Source: https://docs.voxo.co/api-reference/device-models/list-device-models
https://api.voxo.co/v2/docs/openapi.json get /v2/admin/device-models/
List device models with pagination and filtering
# Update Device Model
Source: https://docs.voxo.co/api-reference/device-models/update-device-model
https://api.voxo.co/v2/docs/openapi.json patch /v2/admin/device-models/{id}
Sparse update: only keys present in the body are touched. Returns the updated model with its parsed autoprovision field schema.
# Create Device
Source: https://docs.voxo.co/api-reference/devices/create-device
https://api.voxo.co/v2/docs/openapi.json post /v2/admin/devices/
Create a device. Validates MAC uniqueness, phonebook/button-layout ownership, and writes default autoprovision values from the phone model template.
# Delete Device
Source: https://docs.voxo.co/api-reference/devices/delete-device
https://api.voxo.co/v2/docs/openapi.json delete /v2/admin/devices/{id}
Hard-delete a device by ID. Returns the full pre-delete profile. Autoprovision values for the device are removed asynchronously after the response is sent.
# Get Device
Source: https://docs.voxo.co/api-reference/devices/get-device
https://api.voxo.co/v2/docs/openapi.json get /v2/admin/devices/{id}
Get a single device with full settings profile
# List Devices
Source: https://docs.voxo.co/api-reference/devices/list-devices
https://api.voxo.co/v2/docs/openapi.json get /v2/admin/devices/
List all devices for a tenant with pagination
# Search Devices
Source: https://docs.voxo.co/api-reference/devices/search-devices
https://api.voxo.co/v2/docs/openapi.json get /v2/admin/devices/search
Search devices by name or MAC across the accounts the caller can access, scoped by permission
# Update Device
Source: https://docs.voxo.co/api-reference/devices/update-device
https://api.voxo.co/v2/docs/openapi.json patch /v2/admin/devices/{id}
Sparse update at the top level: only keys present in the body are touched. Each present key is treated literally (full replacement of that collection). Extensions also rewrite the device's LINE-type autoprovision values for peername and sip_password.
# Create Emergency Location
Source: https://docs.voxo.co/api-reference/emergency-locations/create-emergency-location
https://api.voxo.co/v2/docs/openapi.json post /v2/admin/emergency-locations/
Create a new E911 emergency location
# Delete Emergency Location
Source: https://docs.voxo.co/api-reference/emergency-locations/delete-emergency-location
https://api.voxo.co/v2/docs/openapi.json delete /v2/admin/emergency-locations/{id}
Delete an E911 emergency location
# Get Emergency Location
Source: https://docs.voxo.co/api-reference/emergency-locations/get-emergency-location
https://api.voxo.co/v2/docs/openapi.json get /v2/admin/emergency-locations/{id}
Get a single emergency location by ID
# List Emergency Locations
Source: https://docs.voxo.co/api-reference/emergency-locations/list-emergency-locations
https://api.voxo.co/v2/docs/openapi.json get /v2/admin/emergency-locations/
List emergency locations for a tenant with optional name filter and pagination
# Update Emergency Location
Source: https://docs.voxo.co/api-reference/emergency-locations/update-emergency-location
https://api.voxo.co/v2/docs/openapi.json patch /v2/admin/emergency-locations/{id}
Update an existing E911 emergency location
# Validate Address
Source: https://docs.voxo.co/api-reference/emergency-locations/validate-address
https://api.voxo.co/v2/docs/openapi.json post /v2/admin/emergency-locations/validate-address
Validate an address for E911 registration
# End call
Source: https://docs.voxo.co/api-reference/end-call
/openapi/webhooks.json webhook ENDCALL
This webhook fires when a call ends for your account.
# Extension created
Source: https://docs.voxo.co/api-reference/extension-created
/openapi/webhooks.json webhook EXTENSIONCREATED
This webhook fires when a new extension is created in your account.
# Extension deleted
Source: https://docs.voxo.co/api-reference/extension-deleted
/openapi/webhooks.json webhook EXTENSIONDELETED
This webhook fires when an extension is deleted from your account.
# Clear Stuck Channels
Source: https://docs.voxo.co/api-reference/extensions/clear-stuck-channels
https://api.voxo.co/v2/docs/openapi.json patch /v2/admin/extensions/reset/{id}
Clear stuck live channels for an extension
# Create Fax Extension
Source: https://docs.voxo.co/api-reference/extensions/create-fax-extension
https://api.voxo.co/v2/docs/openapi.json post /v2/admin/extensions/fax/
Create a fax extension (with optional device)
# Create Paging Extension
Source: https://docs.voxo.co/api-reference/extensions/create-paging-extension
https://api.voxo.co/v2/docs/openapi.json post /v2/admin/extensions/paging/
Create a paging extension
# Create SIP Extension
Source: https://docs.voxo.co/api-reference/extensions/create-sip-extension
https://api.voxo.co/v2/docs/openapi.json post /v2/admin/extensions/sip/
Create a SIP (trunk) extension
# Create Voice Extension
Source: https://docs.voxo.co/api-reference/extensions/create-voice-extension
https://api.voxo.co/v2/docs/openapi.json post /v2/admin/extensions/voice/
Create a voice extension (with optional device, fax, and user invite)
# Delete Fax Extension
Source: https://docs.voxo.co/api-reference/extensions/delete-fax-extension
https://api.voxo.co/v2/docs/openapi.json delete /v2/admin/extensions/fax/{id}
Delete a fax extension and clean up its inbound routing destinations and device assignment
# Delete Paging Extension
Source: https://docs.voxo.co/api-reference/extensions/delete-paging-extension
https://api.voxo.co/v2/docs/openapi.json delete /v2/admin/extensions/paging/{id}
Delete a paging extension and clean up its inbound routing destinations
# Delete SIP Extension
Source: https://docs.voxo.co/api-reference/extensions/delete-sip-extension
https://api.voxo.co/v2/docs/openapi.json delete /v2/admin/extensions/sip/{id}
Delete a SIP (trunk) extension and clean up its dial-by-name entries, device assignment, and inbound routing destinations
# Delete Voice Extension
Source: https://docs.voxo.co/api-reference/extensions/delete-voice-extension
https://api.voxo.co/v2/docs/openapi.json delete /v2/admin/extensions/voice/{id}
Delete a voice extension and clean up its related records (routing destinations, voicemail, device assignment, queue membership, eFax)
# Edit Fax Extension
Source: https://docs.voxo.co/api-reference/extensions/edit-fax-extension
https://api.voxo.co/v2/docs/openapi.json patch /v2/admin/extensions/fax/{id}
Update a fax extension (partial update)
# Edit Paging Extension
Source: https://docs.voxo.co/api-reference/extensions/edit-paging-extension
https://api.voxo.co/v2/docs/openapi.json patch /v2/admin/extensions/paging/{id}
Update a paging extension (partial update)
# Edit SIP Extension
Source: https://docs.voxo.co/api-reference/extensions/edit-sip-extension
https://api.voxo.co/v2/docs/openapi.json patch /v2/admin/extensions/sip/{id}
Update a SIP (trunk) extension (partial update)
# Edit Voice Extension
Source: https://docs.voxo.co/api-reference/extensions/edit-voice-extension
https://api.voxo.co/v2/docs/openapi.json patch /v2/admin/extensions/voice/{id}
Update a voice extension and its routing destinations (partial update)
# Extension Summary
Source: https://docs.voxo.co/api-reference/extensions/extension-summary
https://api.voxo.co/v2/docs/openapi.json get /v2/admin/extensions/summary
Online/offline extension counts for a tenant (registration-based)
# Get Extension Profile
Source: https://docs.voxo.co/api-reference/extensions/get-extension-profile
https://api.voxo.co/v2/docs/openapi.json get /v2/admin/extensions/{id}
Get a single extension of any type by ID, including routing destinations
# Get Extension Registrations
Source: https://docs.voxo.co/api-reference/extensions/get-extension-registrations
https://api.voxo.co/v2/docs/openapi.json get /v2/admin/extensions/{id}/registrations
List active SIP registrations for an extension
# Get Fax Extension
Source: https://docs.voxo.co/api-reference/extensions/get-fax-extension
https://api.voxo.co/v2/docs/openapi.json get /v2/admin/extensions/fax/{id}
Get a single fax extension by ID
# Get Paging Extension
Source: https://docs.voxo.co/api-reference/extensions/get-paging-extension
https://api.voxo.co/v2/docs/openapi.json get /v2/admin/extensions/paging/{id}
Get a single paging extension by ID
# Get SIP Extension
Source: https://docs.voxo.co/api-reference/extensions/get-sip-extension
https://api.voxo.co/v2/docs/openapi.json get /v2/admin/extensions/sip/{id}
Get a single SIP (trunk) extension by ID
# Get Voice Extension
Source: https://docs.voxo.co/api-reference/extensions/get-voice-extension
https://api.voxo.co/v2/docs/openapi.json get /v2/admin/extensions/voice/{id}
Get a single voice extension by ID, including routing destinations
# List Account Extensions
Source: https://docs.voxo.co/api-reference/extensions/list-account-extensions
https://api.voxo.co/v2/docs/openapi.json get /v2/admin/extensions/
List all extensions for a tenant across types, with optional pagination, sorting, search, and type filter
# List Fax Extensions
Source: https://docs.voxo.co/api-reference/extensions/list-fax-extensions
https://api.voxo.co/v2/docs/openapi.json get /v2/admin/extensions/fax/
List fax extensions for a tenant with optional pagination, sorting, and search
# List Paging Extensions
Source: https://docs.voxo.co/api-reference/extensions/list-paging-extensions
https://api.voxo.co/v2/docs/openapi.json get /v2/admin/extensions/paging/
List paging extensions for a tenant with optional pagination, sorting, and search
# List SIP Extensions
Source: https://docs.voxo.co/api-reference/extensions/list-sip-extensions
https://api.voxo.co/v2/docs/openapi.json get /v2/admin/extensions/sip/
List sip extensions for a tenant with optional pagination, sorting, and search
# List Voice Extensions
Source: https://docs.voxo.co/api-reference/extensions/list-voice-extensions
https://api.voxo.co/v2/docs/openapi.json get /v2/admin/extensions/voice/
List voice extensions for a tenant with optional pagination, sorting, and search
# Reboot Extension Devices
Source: https://docs.voxo.co/api-reference/extensions/reboot-extension-devices
https://api.voxo.co/v2/docs/openapi.json post /v2/admin/extensions/{id}/reboot
Send a check-sync SIP NOTIFY to every registered device on the extension, instructing them to resync/reboot
# Fax received
Source: https://docs.voxo.co/api-reference/fax-received
/openapi/webhooks.json webhook FAXRECEIVED
This webhook fires when a new fax is received to your account.
# Delete Fax
Source: https://docs.voxo.co/api-reference/faxes/delete-fax
https://api.voxo.co/v2/docs/openapi.json delete /v2/admin/faxes/{id}
Delete a fax record
# Download Fax
Source: https://docs.voxo.co/api-reference/faxes/download-fax
https://api.voxo.co/v2/docs/openapi.json get /v2/admin/faxes/download/{id}
Get presigned download and preview links for a fax
# List Faxes
Source: https://docs.voxo.co/api-reference/faxes/list-faxes
https://api.voxo.co/v2/docs/openapi.json get /v2/admin/faxes/
List faxes for a tenant with pagination, sorting, search, and optional workflow-status stats
# Retry Fax
Source: https://docs.voxo.co/api-reference/faxes/retry-fax
https://api.voxo.co/v2/docs/openapi.json get /v2/admin/faxes/retry/{id}
Re-queue a failed outbound fax for delivery
# Create Feature Code
Source: https://docs.voxo.co/api-reference/feature-codes/create-feature-code
https://api.voxo.co/v2/docs/openapi.json post /v2/admin/feature-codes/
Create a feature code and its routing destinations
# Delete Feature Code
Source: https://docs.voxo.co/api-reference/feature-codes/delete-feature-code
https://api.voxo.co/v2/docs/openapi.json delete /v2/admin/feature-codes/{id}
Delete a feature code and its routing destinations
# Get Feature Code
Source: https://docs.voxo.co/api-reference/feature-codes/get-feature-code
https://api.voxo.co/v2/docs/openapi.json get /v2/admin/feature-codes/{id}
Get a single feature code by ID, including routing destinations
# List Feature Codes
Source: https://docs.voxo.co/api-reference/feature-codes/list-feature-codes
https://api.voxo.co/v2/docs/openapi.json get /v2/admin/feature-codes/
List feature codes for a tenant (plus global codes) with pagination, sorting, and search
# Update Feature Code
Source: https://docs.voxo.co/api-reference/feature-codes/update-feature-code
https://api.voxo.co/v2/docs/openapi.json patch /v2/admin/feature-codes/{id}
Update a feature code (partial update)
# Create Holiday
Source: https://docs.voxo.co/api-reference/holidays/create-holiday
https://api.voxo.co/v2/docs/openapi.json post /v2/admin/holidays/
Create a holiday (recurring or fixed-date) for a business hour
# Delete Holiday
Source: https://docs.voxo.co/api-reference/holidays/delete-holiday
https://api.voxo.co/v2/docs/openapi.json delete /v2/admin/holidays/{id}
Delete a holiday
# Get Holiday
Source: https://docs.voxo.co/api-reference/holidays/get-holiday
https://api.voxo.co/v2/docs/openapi.json get /v2/admin/holidays/{id}
Get a holiday by ID
# List Holidays
Source: https://docs.voxo.co/api-reference/holidays/list-holidays
https://api.voxo.co/v2/docs/openapi.json get /v2/admin/holidays/
List holidays for a tenant with optional business-hours filter, pagination, sorting, and search
# Update Holiday
Source: https://docs.voxo.co/api-reference/holidays/update-holiday
https://api.voxo.co/v2/docs/openapi.json patch /v2/admin/holidays/{id}
Update an existing holiday
# Create Media File
Source: https://docs.voxo.co/api-reference/media-files/create-media-file
https://api.voxo.co/v2/docs/openapi.json post /v2/admin/media-files/
Create a media file, uploading an audio file (converted to WAV)
# Delete Media File
Source: https://docs.voxo.co/api-reference/media-files/delete-media-file
https://api.voxo.co/v2/docs/openapi.json delete /v2/admin/media-files/{id}
Delete a media file and deactivate any announcements that reference it
# Get Media File
Source: https://docs.voxo.co/api-reference/media-files/get-media-file
https://api.voxo.co/v2/docs/openapi.json get /v2/admin/media-files/{id}
Get a single media file by ID with a presigned playback URL
# List Media Files
Source: https://docs.voxo.co/api-reference/media-files/list-media-files
https://api.voxo.co/v2/docs/openapi.json get /v2/admin/media-files/
List a tenant's media files with pagination, sorting, and name search
# List System Media Files
Source: https://docs.voxo.co/api-reference/media-files/list-system-media-files
https://api.voxo.co/v2/docs/openapi.json get /v2/admin/media-files/system
List system (global) media files with pagination, sorting, and name search
# Update Media File
Source: https://docs.voxo.co/api-reference/media-files/update-media-file
https://api.voxo.co/v2/docs/openapi.json patch /v2/admin/media-files/{id}
Update a media file's metadata and optionally replace its audio
# Get Conversation
Source: https://docs.voxo.co/api-reference/messaging/get-conversation
https://api.voxo.co/v2/docs/openapi.json get /v2/messaging/conversations/{conversationId}
Get a conversation by ID
# Get Conversation by Participants
Source: https://docs.voxo.co/api-reference/messaging/get-conversation-by-participants
https://api.voxo.co/v2/docs/openapi.json get /v2/messaging/conversations/conversation-by-participants
Find a conversation by source DID and participant numbers
# Get Provisioned Numbers
Source: https://docs.voxo.co/api-reference/messaging/get-provisioned-numbers
https://api.voxo.co/v2/docs/openapi.json get /v2/messaging/get-provisioned-numbers
Get SMS-provisioned phone numbers for the authenticated user
# Hide Conversation
Source: https://docs.voxo.co/api-reference/messaging/hide-conversation
https://api.voxo.co/v2/docs/openapi.json delete /v2/messaging/conversations/{conversationId}
Hide a conversation from the user's list
# List Conversations
Source: https://docs.voxo.co/api-reference/messaging/list-conversations
https://api.voxo.co/v2/docs/openapi.json get /v2/messaging/conversations/
Get paginated conversations for the authenticated user
# List Messages
Source: https://docs.voxo.co/api-reference/messaging/list-messages
https://api.voxo.co/v2/docs/openapi.json get /v2/messaging/messages/
Get paginated messages for a conversation
# Mark Conversation Read
Source: https://docs.voxo.co/api-reference/messaging/mark-conversation-read
https://api.voxo.co/v2/docs/openapi.json patch /v2/messaging/conversations/mark-read/{conversationId}
Mark all messages in a conversation as read
# Rename Conversation
Source: https://docs.voxo.co/api-reference/messaging/rename-conversation
https://api.voxo.co/v2/docs/openapi.json patch /v2/messaging/conversations/name/{conversationId}
Update the display name of a conversation
# Retry Failed Message
Source: https://docs.voxo.co/api-reference/messaging/retry-failed-message
https://api.voxo.co/v2/docs/openapi.json patch /v2/messaging/messages/retry-message/{messageId}
Retry sending a message that is in a failed state
# Search Conversation Messages
Source: https://docs.voxo.co/api-reference/messaging/search-conversation-messages
https://api.voxo.co/v2/docs/openapi.json get /v2/messaging/conversations/search-messages
Search messages within conversations
# Search Conversations
Source: https://docs.voxo.co/api-reference/messaging/search-conversations
https://api.voxo.co/v2/docs/openapi.json get /v2/messaging/conversations/search
Search conversations by phone number
# Search Messages
Source: https://docs.voxo.co/api-reference/messaging/search-messages
https://api.voxo.co/v2/docs/openapi.json get /v2/messaging/messages/search
Search across all messages for the authenticated user
# Send MMS
Source: https://docs.voxo.co/api-reference/messaging/send-mms
https://api.voxo.co/v2/docs/openapi.json post /v2/messaging/messages/send-mms
Send an MMS message with media files to one or more recipients
# Send SMS
Source: https://docs.voxo.co/api-reference/messaging/send-sms
https://api.voxo.co/v2/docs/openapi.json post /v2/messaging/messages/send-sms
Send an SMS message to one or more recipients
# Upload MMS Media
Source: https://docs.voxo.co/api-reference/messaging/upload-mms-media
https://api.voxo.co/v2/docs/openapi.json post /v2/messaging/messages/upload-media
Upload media files for MMS messages (max 3MB)
# Create Music on Hold
Source: https://docs.voxo.co/api-reference/music-on-hold/create-music-on-hold
https://api.voxo.co/v2/docs/openapi.json post /v2/admin/music-on-hold/
Create a music on hold and its MEDIAFILE destinations
# Delete Music on Hold
Source: https://docs.voxo.co/api-reference/music-on-hold/delete-music-on-hold
https://api.voxo.co/v2/docs/openapi.json delete /v2/admin/music-on-hold/{id}
Delete a music on hold, unassign it from extensions/tenants, and remove its destinations
# Get Music on Hold
Source: https://docs.voxo.co/api-reference/music-on-hold/get-music-on-hold
https://api.voxo.co/v2/docs/openapi.json get /v2/admin/music-on-hold/{id}
Get a single music on hold by ID with its destinations
# List Music on Holds
Source: https://docs.voxo.co/api-reference/music-on-hold/list-music-on-holds
https://api.voxo.co/v2/docs/openapi.json get /v2/admin/music-on-hold/
List a tenant's music on holds with pagination, sorting, and name search
# List System Music on Holds
Source: https://docs.voxo.co/api-reference/music-on-hold/list-system-music-on-holds
https://api.voxo.co/v2/docs/openapi.json get /v2/admin/music-on-hold/system
List system (global) music on holds with pagination, sorting, and name search
# Update Music on Hold
Source: https://docs.voxo.co/api-reference/music-on-hold/update-music-on-hold
https://api.voxo.co/v2/docs/openapi.json patch /v2/admin/music-on-hold/{id}
Update a music on hold (partial update)
# New voicemail
Source: https://docs.voxo.co/api-reference/new-voicemail
/openapi/webhooks.json webhook NEWVOICEMAIL
This webhook fires when a new voicemail is left for any mailbox in your account. Time are posted as ISO format.
# Block Numbers
Source: https://docs.voxo.co/api-reference/number-blocking/block-numbers
https://api.voxo.co/v2/docs/openapi.json post /v2/admin/number-blocking/
Block one or more numbers for a tenant
# Get Blocked Number
Source: https://docs.voxo.co/api-reference/number-blocking/get-blocked-number
https://api.voxo.co/v2/docs/openapi.json get /v2/admin/number-blocking/{id}
Get a single blocked number record by ID
# List Blocked Numbers
Source: https://docs.voxo.co/api-reference/number-blocking/list-blocked-numbers
https://api.voxo.co/v2/docs/openapi.json get /v2/admin/number-blocking/
List a tenant's blocked numbers with pagination, sorting, and number search
# Unblock Number
Source: https://docs.voxo.co/api-reference/number-blocking/unblock-number
https://api.voxo.co/v2/docs/openapi.json delete /v2/admin/number-blocking/{id}
Remove a blocked number record
# Update Blocked Number
Source: https://docs.voxo.co/api-reference/number-blocking/update-blocked-number
https://api.voxo.co/v2/docs/openapi.json patch /v2/admin/number-blocking/{id}
Update a blocked number's value or block reason
# Activate Port-In Order
Source: https://docs.voxo.co/api-reference/number-porting/activate-port-in-order
https://api.voxo.co/v2/docs/openapi.json post /v2/admin/number-porting/activate
Activate a port-in order
# Add Document to Port Order
Source: https://docs.voxo.co/api-reference/number-porting/add-document-to-port-order
https://api.voxo.co/v2/docs/openapi.json post /v2/admin/number-porting/order-add-document
Add a document to an existing port-in order
# Add Note to Port Order
Source: https://docs.voxo.co/api-reference/number-porting/add-note-to-port-order
https://api.voxo.co/v2/docs/openapi.json post /v2/admin/number-porting/order-add-note
Add a note to an existing port-in order
# Approve Port-Out Request
Source: https://docs.voxo.co/api-reference/number-porting/approve-port-out-request
https://api.voxo.co/v2/docs/openapi.json post /v2/admin/number-porting/approve-port-out
Approve an incoming port-out request for a number
# Cancel Port-In Order
Source: https://docs.voxo.co/api-reference/number-porting/cancel-port-in-order
https://api.voxo.co/v2/docs/openapi.json post /v2/admin/number-porting/cancel-port-in
Cancel an existing port-in order
# Check Number Portability
Source: https://docs.voxo.co/api-reference/number-porting/check-number-portability
https://api.voxo.co/v2/docs/openapi.json post /v2/admin/number-porting/check-portability
Check if phone numbers are portable
# Check Port-In Availability (Public)
Source: https://docs.voxo.co/api-reference/number-porting/check-port-in-availability-public
https://api.voxo.co/v2/docs/openapi.json post /v2/number-porting/toolbox/port-in-availability
Check port-in availability for phone numbers without authentication
# Create Port-In Order
Source: https://docs.voxo.co/api-reference/number-porting/create-port-in-order
https://api.voxo.co/v2/docs/openapi.json post /v2/admin/number-porting/create-port-in-order
Create a new port-in order with number details
# CSR Lookup
Source: https://docs.voxo.co/api-reference/number-porting/csr-lookup
https://api.voxo.co/v2/docs/openapi.json post /v2/admin/number-porting/csr-lookup
Perform a Customer Service Record lookup for a phone number
# Edit Port-In Order
Source: https://docs.voxo.co/api-reference/number-porting/edit-port-in-order
https://api.voxo.co/v2/docs/openapi.json post /v2/admin/number-porting/edit-port-in-order
Edit an existing port-in order
# Get Available Activation Groups
Source: https://docs.voxo.co/api-reference/number-porting/get-available-activation-groups
https://api.voxo.co/v2/docs/openapi.json post /v2/admin/number-porting/port-in-order-available-activation
Retrieve activation groups available for a port-in order
# Get Port Order Detail
Source: https://docs.voxo.co/api-reference/number-porting/get-port-order-detail
https://api.voxo.co/v2/docs/openapi.json post /v2/admin/number-porting/order-detail
Retrieve detailed information about a specific port order
# List Port-In Orders
Source: https://docs.voxo.co/api-reference/number-porting/list-port-in-orders
https://api.voxo.co/v2/docs/openapi.json post /v2/admin/number-porting/port-in-order-list
List port-in orders filtered by reference, date range, or status
# Port Phone Numbers
Source: https://docs.voxo.co/api-reference/number-porting/port-phone-numbers
https://api.voxo.co/v2/docs/openapi.json post /v2/admin/number-porting/phone-number
Submit a port-in request for local phone numbers
# Port Toll-Free Numbers
Source: https://docs.voxo.co/api-reference/number-porting/port-toll-free-numbers
https://api.voxo.co/v2/docs/openapi.json post /v2/admin/number-porting/toll-free
Submit a port-in request for toll-free numbers with supporting documents
# Reject Port-Out Request
Source: https://docs.voxo.co/api-reference/number-porting/reject-port-out-request
https://api.voxo.co/v2/docs/openapi.json post /v2/admin/number-porting/reject-port-out
Reject an incoming port-out request for a number
# API Overview
Source: https://docs.voxo.co/api-reference/overview
REST API and webhook reference for integrating VOXO into your own systems and applications.
Use the navigation on the left to browse available endpoints and webhooks.
# Create Paging Group
Source: https://docs.voxo.co/api-reference/paging-groups/create-paging-group
https://api.voxo.co/v2/docs/openapi.json post /v2/admin/paging-groups/
Create a paging group and its EXT members
# Delete Paging Group
Source: https://docs.voxo.co/api-reference/paging-groups/delete-paging-group
https://api.voxo.co/v2/docs/openapi.json delete /v2/admin/paging-groups/{id}
Delete a paging group and its members
# Get Paging Group
Source: https://docs.voxo.co/api-reference/paging-groups/get-paging-group
https://api.voxo.co/v2/docs/openapi.json get /v2/admin/paging-groups/{id}
Get a single paging group by ID with its members
# List Paging Groups
Source: https://docs.voxo.co/api-reference/paging-groups/list-paging-groups
https://api.voxo.co/v2/docs/openapi.json get /v2/admin/paging-groups/
List a tenant's paging groups with pagination, sorting, and name/number search
# Update Paging Group
Source: https://docs.voxo.co/api-reference/paging-groups/update-paging-group
https://api.voxo.co/v2/docs/openapi.json patch /v2/admin/paging-groups/{id}
Update a paging group (partial update)
# Clear Parking Session
Source: https://docs.voxo.co/api-reference/parking-sessions/clear-parking-session
https://api.voxo.co/v2/docs/openapi.json patch /v2/admin/parking-sessions/clear/{id}
Clear (unpark) a parking session, resetting its state and host
# Get Parking Session
Source: https://docs.voxo.co/api-reference/parking-sessions/get-parking-session
https://api.voxo.co/v2/docs/openapi.json get /v2/admin/parking-sessions/{id}
Get a single parking session by ID with its timeout destinations
# List Parking Sessions
Source: https://docs.voxo.co/api-reference/parking-sessions/list-parking-sessions
https://api.voxo.co/v2/docs/openapi.json get /v2/admin/parking-sessions/
List a tenant's parking sessions with pagination, sorting, and space search
# Update Parking Session
Source: https://docs.voxo.co/api-reference/parking-sessions/update-parking-session
https://api.voxo.co/v2/docs/openapi.json patch /v2/admin/parking-sessions/{id}
Update a parking session's timeout destination and alternate ring
# Create Phone Number
Source: https://docs.voxo.co/api-reference/phone-numbers/create-phone-number
https://api.voxo.co/v2/docs/openapi.json post /v2/admin/phone-numbers/
Add a phone number to a tenant
# Delete Phone Number
Source: https://docs.voxo.co/api-reference/phone-numbers/delete-phone-number
https://api.voxo.co/v2/docs/openapi.json delete /v2/admin/phone-numbers/{id}
Remove a phone number and disconnect from carrier if in service
# Get Inventory Coverage
Source: https://docs.voxo.co/api-reference/phone-numbers/get-inventory-coverage
https://api.voxo.co/v2/docs/openapi.json get /v2/admin/phone-numbers/local/inventory-coverage
Get NPA-NXX coverage with available number counts for a rate center
# Get Local Inventory
Source: https://docs.voxo.co/api-reference/phone-numbers/get-local-inventory
https://api.voxo.co/v2/docs/openapi.json get /v2/admin/phone-numbers/local/available-inventory
Get available local phone numbers by rate center
# Get Number Detail from Carrier
Source: https://docs.voxo.co/api-reference/phone-numbers/get-number-detail-from-carrier
https://api.voxo.co/v2/docs/openapi.json get /v2/admin/phone-numbers/number-detail/{id}
Fetch number details from Inteliquent including registered CNAM
# Get Phone Number
Source: https://docs.voxo.co/api-reference/phone-numbers/get-phone-number
https://api.voxo.co/v2/docs/openapi.json get /v2/admin/phone-numbers/{id}
Get a phone number by ID with destinations
# Get Rate Centers
Source: https://docs.voxo.co/api-reference/phone-numbers/get-rate-centers
https://api.voxo.co/v2/docs/openapi.json get /v2/admin/phone-numbers/local/rate-centers
Get available rate centers for a state
# Get Toll-Free Inventory
Source: https://docs.voxo.co/api-reference/phone-numbers/get-toll-free-inventory
https://api.voxo.co/v2/docs/openapi.json get /v2/admin/phone-numbers/toll-free/available-inventory
Get available toll-free phone numbers
# List Phone Numbers
Source: https://docs.voxo.co/api-reference/phone-numbers/list-phone-numbers
https://api.voxo.co/v2/docs/openapi.json get /v2/admin/phone-numbers/
List phone numbers for a tenant with optional filters
# Order Local Numbers
Source: https://docs.voxo.co/api-reference/phone-numbers/order-local-numbers
https://api.voxo.co/v2/docs/openapi.json post /v2/admin/phone-numbers/local/order
Order local phone numbers from carrier inventory
# Order Toll-Free Numbers
Source: https://docs.voxo.co/api-reference/phone-numbers/order-toll-free-numbers
https://api.voxo.co/v2/docs/openapi.json post /v2/admin/phone-numbers/toll-free/order
Order toll-free phone numbers from carrier inventory
# Provision SMS
Source: https://docs.voxo.co/api-reference/phone-numbers/provision-sms
https://api.voxo.co/v2/docs/openapi.json post /v2/admin/phone-numbers/sms/provision
Provision or deprovision SMS on a phone number
# Search Phone Numbers
Source: https://docs.voxo.co/api-reference/phone-numbers/search-phone-numbers
https://api.voxo.co/v2/docs/openapi.json get /v2/admin/phone-numbers/search
Search phone numbers across multiple tenants
# Update Caller ID Name
Source: https://docs.voxo.co/api-reference/phone-numbers/update-caller-id-name
https://api.voxo.co/v2/docs/openapi.json patch /v2/admin/phone-numbers/caller-id-name/{id}
Update the registered CNAM for a phone number
# Update Phone Number
Source: https://docs.voxo.co/api-reference/phone-numbers/update-phone-number
https://api.voxo.co/v2/docs/openapi.json patch /v2/admin/phone-numbers/{id}
Update phone number settings and destinations
# Create Phonebook
Source: https://docs.voxo.co/api-reference/phonebooks/create-phonebook
https://api.voxo.co/v2/docs/openapi.json post /v2/admin/phonebooks/
Create a phonebook, hardcode its layout, and seed it with the supplied contacts. Each contact becomes an entry with one detail row per non-empty field.
# Delete Phonebook
Source: https://docs.voxo.co/api-reference/phonebooks/delete-phonebook
https://api.voxo.co/v2/docs/openapi.json delete /v2/admin/phonebooks/{id}
Hard-delete a phonebook and everything under it (entries, details, layout, device links). Returns the full pre-delete phonebook.
# Get Phonebook
Source: https://docs.voxo.co/api-reference/phonebooks/get-phonebook
https://api.voxo.co/v2/docs/openapi.json get /v2/admin/phonebooks/{id}
Get a single phonebook with its contacts.
# List Phonebooks
Source: https://docs.voxo.co/api-reference/phonebooks/list-phonebooks
https://api.voxo.co/v2/docs/openapi.json get /v2/admin/phonebooks/
List phonebooks for a tenant with pagination. Optional `query` filters by name (LIKE). `paginated=0` returns the full list.
# Update Phonebook
Source: https://docs.voxo.co/api-reference/phonebooks/update-phonebook
https://api.voxo.co/v2/docs/openapi.json patch /v2/admin/phonebooks/{id}
Sparse update of header fields. When `contacts` is present, all existing entries are deleted and rebuilt from the array (empty array clears all contacts); omit `contacts` to leave them untouched.
# Create Queue
Source: https://docs.voxo.co/api-reference/queues/create-queue
https://api.voxo.co/v2/docs/openapi.json post /v2/admin/queues/
Create a queue and its routing destinations
# Delete Queue
Source: https://docs.voxo.co/api-reference/queues/delete-queue
https://api.voxo.co/v2/docs/openapi.json delete /v2/admin/queues/{id}
Delete a queue and cascade-remove its destinations and members
# Get Queue
Source: https://docs.voxo.co/api-reference/queues/get-queue
https://api.voxo.co/v2/docs/openapi.json get /v2/admin/queues/{id}
Get a single queue by ID with its settings, destinations, and allowed agents
# List Queues
Source: https://docs.voxo.co/api-reference/queues/list-queues
https://api.voxo.co/v2/docs/openapi.json get /v2/admin/queues/
List a tenant's queues with pagination and name/number search
# Update Queue
Source: https://docs.voxo.co/api-reference/queues/update-queue
https://api.voxo.co/v2/docs/openapi.json patch /v2/admin/queues/{id}
Update a queue's core fields and routing destinations
# Update Queue Settings
Source: https://docs.voxo.co/api-reference/queues/update-queue-settings
https://api.voxo.co/v2/docs/openapi.json patch /v2/admin/queues/{id}/settings
Update a queue's callback, exit, media/announce, and agent settings
# Admin Call Logs
Source: https://docs.voxo.co/api-reference/reporting--calls/admin-call-logs
https://api.voxo.co/v2/docs/openapi.json post /v2/admin/reporting/calls/logs
Get paginated call logs for a tenant with optional filters
# Admin Call Outcomes
Source: https://docs.voxo.co/api-reference/reporting--calls/admin-call-outcomes
https://api.voxo.co/v2/docs/openapi.json post /v2/admin/reporting/calls/call-outcomes
Get call outcome statistics for a tenant with optional filters
# Admin Call Stats
Source: https://docs.voxo.co/api-reference/reporting--calls/admin-call-stats
https://api.voxo.co/v2/docs/openapi.json post /v2/admin/reporting/calls/stats
Get call statistics for a tenant with optional filters by user, group, direction, and time distribution
# Admin Get Call By ID
Source: https://docs.voxo.co/api-reference/reporting--calls/admin-get-call-by-id
https://api.voxo.co/v2/docs/openapi.json get /v2/admin/reporting/calls/{callId}
Get a single call record by call ID, including transcript and AI insights. Authorized against the record's tenant via account permit.
# Call Journey
Source: https://docs.voxo.co/api-reference/reporting--calls/call-journey
https://api.voxo.co/v2/docs/openapi.json post /v2/admin/reporting/calls/call-journey
Get the step-by-step journey of a specific call
# Admin SMS Logs
Source: https://docs.voxo.co/api-reference/reporting--messages/admin-sms-logs
https://api.voxo.co/v2/docs/openapi.json post /v2/admin/reporting/messages/logs
Get paginated SMS/message logs for a tenant with optional filters
# Admin SMS Stats
Source: https://docs.voxo.co/api-reference/reporting--messages/admin-sms-stats
https://api.voxo.co/v2/docs/openapi.json post /v2/admin/reporting/messages/stats
Get SMS/message statistics for a tenant with optional filters
# Admin Agent Availability
Source: https://docs.voxo.co/api-reference/reporting--queues/admin-agent-availability
https://api.voxo.co/v2/docs/openapi.json post /v2/admin/reporting/queues/agent-availability
Get agent availability metrics for a queue with optional time distribution
# Admin Queue Logs
Source: https://docs.voxo.co/api-reference/reporting--queues/admin-queue-logs
https://api.voxo.co/v2/docs/openapi.json post /v2/admin/reporting/queues/logs
Get paginated queue event logs with optional filters
# Admin Queue Stats
Source: https://docs.voxo.co/api-reference/reporting--queues/admin-queue-stats
https://api.voxo.co/v2/docs/openapi.json post /v2/admin/reporting/queues/stats
Get queue statistics with optional filters by user, time distribution, and call outcome
# Admin VR Logs
Source: https://docs.voxo.co/api-reference/reporting--virtual-receptionist/admin-vr-logs
https://api.voxo.co/v2/docs/openapi.json post /v2/admin/reporting/virtual-receptionist/logs
Get paginated virtual receptionist call logs
# Admin VR Stats
Source: https://docs.voxo.co/api-reference/reporting--virtual-receptionist/admin-vr-stats
https://api.voxo.co/v2/docs/openapi.json post /v2/admin/reporting/virtual-receptionist/stats
Get virtual receptionist statistics with optional time distribution
# Create Short Number
Source: https://docs.voxo.co/api-reference/short-numbers/create-short-number
https://api.voxo.co/v2/docs/openapi.json post /v2/admin/short-numbers/
Create a short number for a tenant
# Delete Short Number
Source: https://docs.voxo.co/api-reference/short-numbers/delete-short-number
https://api.voxo.co/v2/docs/openapi.json delete /v2/admin/short-numbers/{id}
Delete a short number record
# Get Short Number
Source: https://docs.voxo.co/api-reference/short-numbers/get-short-number
https://api.voxo.co/v2/docs/openapi.json get /v2/admin/short-numbers/{id}
Get a single short number record by ID
# List Short Numbers
Source: https://docs.voxo.co/api-reference/short-numbers/list-short-numbers
https://api.voxo.co/v2/docs/openapi.json get /v2/admin/short-numbers/
List a tenant's short numbers with pagination, sorting, and number search
# Update Short Number
Source: https://docs.voxo.co/api-reference/short-numbers/update-short-number
https://api.voxo.co/v2/docs/openapi.json patch /v2/admin/short-numbers/{id}
Update a short number's value, destination, or description
# Sms received
Source: https://docs.voxo.co/api-reference/sms-received
/openapi/webhooks.json webhook INBOUNDSMS
This webhook fires when a new message is received for any number in your account.
# Start call
Source: https://docs.voxo.co/api-reference/start-call
/openapi/webhooks.json webhook STARTCALL
This webhook fires when a new call begins for your account.
# Create Tenant Note
Source: https://docs.voxo.co/api-reference/tenant-notes/create-tenant-note
https://api.voxo.co/v2/docs/openapi.json post /v2/admin/tenants/notes/
Create a new note for a tenant
# Delete Tenant Note
Source: https://docs.voxo.co/api-reference/tenant-notes/delete-tenant-note
https://api.voxo.co/v2/docs/openapi.json delete /v2/admin/tenants/notes/{id}
Delete a tenant note by ID
# Get Tenant Note
Source: https://docs.voxo.co/api-reference/tenant-notes/get-tenant-note
https://api.voxo.co/v2/docs/openapi.json get /v2/admin/tenants/notes/{id}
Get a single tenant note by ID
# List Tenant Notes
Source: https://docs.voxo.co/api-reference/tenant-notes/list-tenant-notes
https://api.voxo.co/v2/docs/openapi.json get /v2/admin/tenants/notes/
List notes for a tenant with optional pagination
# Update Tenant Note
Source: https://docs.voxo.co/api-reference/tenant-notes/update-tenant-note
https://api.voxo.co/v2/docs/openapi.json patch /v2/admin/tenants/notes/{id}
Update an existing tenant note
# Create Tenant
Source: https://docs.voxo.co/api-reference/tenants/create-tenant
https://api.voxo.co/v2/docs/openapi.json post /v2/admin/tenants/
Create a new tenant
# Delete Tenant
Source: https://docs.voxo.co/api-reference/tenants/delete-tenant
https://api.voxo.co/v2/docs/openapi.json delete /v2/admin/tenants/{id}
Delete a tenant by ID
# Disable Tenant
Source: https://docs.voxo.co/api-reference/tenants/disable-tenant
https://api.voxo.co/v2/docs/openapi.json patch /v2/admin/tenants/disable/{id}
Disable a tenant by ID
# Enable Tenant
Source: https://docs.voxo.co/api-reference/tenants/enable-tenant
https://api.voxo.co/v2/docs/openapi.json patch /v2/admin/tenants/enable/{id}
Enable a previously disabled tenant by ID
# Get Tenant
Source: https://docs.voxo.co/api-reference/tenants/get-tenant
https://api.voxo.co/v2/docs/openapi.json get /v2/admin/tenants/{id}
Get full tenant details by ID
# List Conduit Tenants
Source: https://docs.voxo.co/api-reference/tenants/list-conduit-tenants
https://api.voxo.co/v2/docs/openapi.json get /v2/admin/tenants/conduits
List tenants with a conduit prefix configured
# List Disabled Tenants
Source: https://docs.voxo.co/api-reference/tenants/list-disabled-tenants
https://api.voxo.co/v2/docs/openapi.json get /v2/admin/tenants/disabled
List disabled tenants with optional search filter and pagination
# List Tenants
Source: https://docs.voxo.co/api-reference/tenants/list-tenants
https://api.voxo.co/v2/docs/openapi.json get /v2/admin/tenants/
List tenants with optional search filter and pagination
# Update Tenant
Source: https://docs.voxo.co/api-reference/tenants/update-tenant
https://api.voxo.co/v2/docs/openapi.json patch /v2/admin/tenants/{id}
Update an existing tenant
# Transcription end
Source: https://docs.voxo.co/api-reference/transcription-end
/openapi/webhooks.json webhook TRANSCRIPTIONEND
This webhook fires when a transcribed call's transcription session ends. It delivers the full conversation transcript along with an `insights` object of AI-generated analysis (summary, sentiment, topics, and intents) produced from the transcript.
A tenant opts in by configuring a webhook with the type `TRANSCRIPTIONEND`. The event only fires for calls that were transcribed. If the transcript is empty or analysis could not be produced, `insights` is an empty object (`{}`).
# Create User
Source: https://docs.voxo.co/api-reference/users/create-user
https://api.voxo.co/v2/docs/openapi.json post /v2/admin/users/
Create a user, optionally assigning an extension, admin tenants, and partner
# Delete User
Source: https://docs.voxo.co/api-reference/users/delete-user
https://api.voxo.co/v2/docs/openapi.json delete /v2/admin/users/{id}
Delete a user and detach its extension, admin tenants, and pharmacy locations
# Get User
Source: https://docs.voxo.co/api-reference/users/get-user
https://api.voxo.co/v2/docs/openapi.json get /v2/admin/users/{id}
Get a single user by ID, including extension, role, partner, admin tenants, and pharmacy locations
# List Users
Source: https://docs.voxo.co/api-reference/users/list-users
https://api.voxo.co/v2/docs/openapi.json get /v2/admin/users/
List users for a tenant with pagination, search by login email, and sorting
# Send Welcome Email
Source: https://docs.voxo.co/api-reference/users/send-welcome-email
https://api.voxo.co/v2/docs/openapi.json get /v2/admin/users/{id}/welcome-email
Reset a user's password and queue their welcome email
# Update User
Source: https://docs.voxo.co/api-reference/users/update-user
https://api.voxo.co/v2/docs/openapi.json patch /v2/admin/users/{id}
Update a user's email, role, partner, extension, or admin tenants
# Create Virtual Receptionist
Source: https://docs.voxo.co/api-reference/virtual-receptionist/create-virtual-receptionist
https://api.voxo.co/v2/docs/openapi.json post /v2/admin/virtual-receptionist/
Create a virtual receptionist with its announcements and destinations
# Delete Virtual Receptionist
Source: https://docs.voxo.co/api-reference/virtual-receptionist/delete-virtual-receptionist
https://api.voxo.co/v2/docs/openapi.json delete /v2/admin/virtual-receptionist/{id}
Delete a virtual receptionist and its announcements and destinations
# Get Virtual Receptionist
Source: https://docs.voxo.co/api-reference/virtual-receptionist/get-virtual-receptionist
https://api.voxo.co/v2/docs/openapi.json get /v2/admin/virtual-receptionist/{id}
Get a single virtual receptionist by ID, including announcements and destinations
# List Virtual Receptionists
Source: https://docs.voxo.co/api-reference/virtual-receptionist/list-virtual-receptionists
https://api.voxo.co/v2/docs/openapi.json get /v2/admin/virtual-receptionist/
List a tenant's virtual receptionists with pagination, search, and sorting
# Update Virtual Receptionist
Source: https://docs.voxo.co/api-reference/virtual-receptionist/update-virtual-receptionist
https://api.voxo.co/v2/docs/openapi.json patch /v2/admin/virtual-receptionist/{id}
Update a virtual receptionist (partial update)
# Delete Voicemail Message
Source: https://docs.voxo.co/api-reference/voicemail-messages/delete-voicemail-message
https://api.voxo.co/v2/docs/openapi.json delete /v2/admin/voicemail-messages/{id}
Delete a voicemail message
# Get Voicemail Message
Source: https://docs.voxo.co/api-reference/voicemail-messages/get-voicemail-message
https://api.voxo.co/v2/docs/openapi.json get /v2/admin/voicemail-messages/{id}
Get a single voicemail message by ID, including its media URL
# List Voicemail Messages
Source: https://docs.voxo.co/api-reference/voicemail-messages/list-voicemail-messages
https://api.voxo.co/v2/docs/openapi.json get /v2/admin/voicemail-messages/
List a tenant's voicemail messages with pagination, search, and optional workflow stats
# Update Voicemail Message
Source: https://docs.voxo.co/api-reference/voicemail-messages/update-voicemail-message
https://api.voxo.co/v2/docs/openapi.json patch /v2/admin/voicemail-messages/{id}
Update a voicemail message's read state
# Create Voicemail Box
Source: https://docs.voxo.co/api-reference/voicemail-settings/create-voicemail-box
https://api.voxo.co/v2/docs/openapi.json post /v2/admin/voicemail-settings/
Create a voicemail box and its operator destinations
# Delete Voicemail Box
Source: https://docs.voxo.co/api-reference/voicemail-settings/delete-voicemail-box
https://api.voxo.co/v2/docs/openapi.json delete /v2/admin/voicemail-settings/{id}
Delete a voicemail box and its destinations
# Delete Voicemail Greeting
Source: https://docs.voxo.co/api-reference/voicemail-settings/delete-voicemail-greeting
https://api.voxo.co/v2/docs/openapi.json delete /v2/admin/voicemail-settings/greetings/{id}
Remove a greeting from a voicemail box
# Get Voicemail Box
Source: https://docs.voxo.co/api-reference/voicemail-settings/get-voicemail-box
https://api.voxo.co/v2/docs/openapi.json get /v2/admin/voicemail-settings/{id}
Get a single voicemail box by ID, including greetings and destinations
# List Voicemail Boxes
Source: https://docs.voxo.co/api-reference/voicemail-settings/list-voicemail-boxes
https://api.voxo.co/v2/docs/openapi.json get /v2/admin/voicemail-settings/
List a tenant's voicemail boxes with pagination, search, and sorting
# Toggle Out-of-Office Greeting
Source: https://docs.voxo.co/api-reference/voicemail-settings/toggle-out-of-office-greeting
https://api.voxo.co/v2/docs/openapi.json patch /v2/admin/voicemail-settings/greetings/{id}/toggle-out-of-office
Enable or disable a voicemail box's out-of-office greeting
# Update Voicemail Box
Source: https://docs.voxo.co/api-reference/voicemail-settings/update-voicemail-box
https://api.voxo.co/v2/docs/openapi.json patch /v2/admin/voicemail-settings/{id}
Update a voicemail box (partial update)
# Update Voicemail Greeting
Source: https://docs.voxo.co/api-reference/voicemail-settings/update-voicemail-greeting
https://api.voxo.co/v2/docs/openapi.json patch /v2/admin/voicemail-settings/greetings/{id}
Upload or assign a greeting (busy, unavailable, name, or out-of-office) for a voicemail box
# Create Webhook
Source: https://docs.voxo.co/api-reference/webhooks/create-webhook
https://api.voxo.co/v2/docs/openapi.json post /v2/webhooks/
Create a new webhook
# Delete Webhook
Source: https://docs.voxo.co/api-reference/webhooks/delete-webhook
https://api.voxo.co/v2/docs/openapi.json delete /v2/webhooks/{id}
Delete a webhook
# Get Webhook
Source: https://docs.voxo.co/api-reference/webhooks/get-webhook
https://api.voxo.co/v2/docs/openapi.json get /v2/webhooks/{id}
Get a webhook by ID
# List Webhook Types
Source: https://docs.voxo.co/api-reference/webhooks/list-webhook-types
https://api.voxo.co/v2/docs/openapi.json get /v2/webhooks/list-types
List all available webhook event types
# List Webhooks
Source: https://docs.voxo.co/api-reference/webhooks/list-webhooks
https://api.voxo.co/v2/docs/openapi.json get /v2/webhooks/
List webhooks for a tenant with optional pagination, sorting, and search
# Update Webhook
Source: https://docs.voxo.co/api-reference/webhooks/update-webhook
https://api.voxo.co/v2/docs/openapi.json patch /v2/webhooks/{id}
Update an existing webhook
# Changelog
Source: https://docs.voxo.co/changelog/index
Product updates and announcements for VOXO.
## Updates
### Platform
* **Welcome emails point to VOXO Connect** — The invitation and welcome emails now carry App Store and Google Play buttons for VOXO Connect in place of the retired VOXO Mobility app. The mobile-login QR code, which only the legacy softphone could read, has been dropped from them. [Learn more](/omnia)
### API
* **The audit log can be read across accounts** — `tenantId` is now optional on `GET /admin/audit-log`. Leave it off and the list covers every account your permissions reach; narrow it with the new `tenantIds` parameter. Each row carries `tenantName` and `userEmail`, so a list spanning accounts can name them, and the CSV export now has **Account** and **User** columns in place of the user ID. [Learn more](/api-reference/overview)
* **More audit log entities to filter by** — The `entities` parameter now also accepts `call-outcome`, `custom-voice`, `queue`, and `theme`. [Learn more](/api-reference/overview)
## Bug fixes
### Platform
* **A save that changed nothing is no longer logged** — Saving an item without editing any of its fields wrote an audit log entry whose history opened empty. Those saves are no longer recorded. [Learn more](/omnia/admin/admin-audit-log)
### Pharmacy
* **The Import button stays in reach on a long CSV** — In **Call Campaigns → Add records → Import CSV**, a file with many rows or a long list of flagged rows pushed **Import** past the bottom of the dialog with no way to reach it. The dialog now scrolls its contents and keeps the buttons in place. [Learn more](/pharmacy/outbound-campaigns#importing-a-csv-file)
## Updates
### Pharmacy
* **The agent's settings are reorganized** — The agent's **Settings** tab now has five sub-tabs: **General** (agent name and languages), **Voice**, **Call Routing**, **Webchat**, and **Announcements**. Business hours, transfer destinations, prescriber and after-hours voicemail, the transfer ringtone, and auto transfer compounding are gathered on **Call Routing**. Your store name, contact details, and address moved to a **Store Information** tab in Store Settings, and refill settings to a **PMS Config** tab on the PMS page — each saves on its own. **PMS Tools** in the sidebar is now **PMS**. [Learn more](/pharmacy/agent#configuring-the-agent)
* **Settings you can only read say so** — Where your account can open the agent's settings or PMS Config but not change them, a banner says you can view them without permission to edit, rather than leaving fields that look editable. When **Save Changes** is unavailable, the reason now appears beneath the button — for example, "Choose a voice before saving." [Learn more](/pharmacy/agent#configuring-the-agent)
* **The LibertyRx Who Is Calling plugin downloads from the PMS page** — On Liberty RX locations, the plugin download is now a card on the **Who is Calling** tab of the PMS page, alongside the lookup events it produces. [Learn more](/pharmacy/who-is-calling#installing)
* **Webchat opens on every plan** — The **Webchat** sub-tab is no longer greyed out on plans that don't include it. It opens read-only with a note saying webchat isn't part of your current plan, so you can see what it offers. [Learn more](/pharmacy/agent#webchat)
### Agent
* **Callers hear when a prescription can next be filled** — Where your pharmacy management system supplies a next fill date, the agent uses it: on a prescription that can't be refilled yet it says when it can be, on one it can submit it says the pharmacy won't fill it until that date before asking, and on a status check it mentions the date. [Learn more](/pharmacy/agent#refill-config)
## Bug fixes
### Agent
* **Several requests in one breath are all handled** — A caller who asked for a refill and something the agent can't do — a delivery question, say — in the same turn could be transferred before the refill was submitted, losing it. The agent now finishes every request it can handle before handing the call off. [Learn more](/pharmacy/agent)
### Pharmacy
* **The Billing tab is shown only to accounts that can use it** — The **Billing** tab in Settings appeared for accounts with read-only billing permission, which could open it but not act on anything in it. It now appears only for accounts with full billing permission. [Learn more](/pharmacy/billing)
## Updates
### Connect
* **A keypad in the attended transfer and merge windows** — While you are connected to the party you dialed for an attended transfer or a merge, a keypad button opens a dial pad, so you can send touch-tone digits to them — picking an option in an interpreter service's menu, for example, or entering an access code — before you complete the transfer or merge. [Learn more](/connect/calling#transferring-a-call)
## Updates
### Agent
* **A household with several pets is handled in one go** — The agent no longer asks for a pet's name. When the number a caller is calling from has one pet on it, the agent works from that profile; when the household has several, it reports their prescriptions as a single list. When the number has no pet on it, the agent asks for a prescription number read off the label. [Learn more](/pharmacy/agent)
### API
* **Relation Graph endpoint** — `GET /destinations/graph` returns the routing graph around an entity: the entity itself, and everything it routes to or is routed from, out to the number of hops you ask for. [Learn more](/api-reference/overview)
* **List endpoints share one paging, sorting, and search contract** — The Devices, Button Layouts, and Call Campaigns list endpoints now take the same `paginated`, `page`, and `recordsPerPage` parameters, sort with `sortBy` and `sortDirection`, and search with `query`. The `name` parameter still works where it worked before. `GET /devices/search` now answers with the same paginated envelope as the other list endpoints rather than a bare array, so update any code that reads that response as a plain list. [Learn more](/api-reference/overview)
### Pharmacy
* **Tax is calculated on every invoice and estimate** — Tax is now applied automatically to subscriptions, scheduled plan changes, and the estimates behind the **Next invoice** card and the plan-change review screen, so an estimate and the invoice that follows it agree on the tax line. [Learn more](/pharmacy/billing#reviewing-your-subscription)
## Bug fixes
### Agent
* **The agent doesn't say a refill went in until it has** — A caller could be told their refill had been queued or sent in before the request was actually submitted. The agent now submits the refill first and describes the outcome only from what came back. [Learn more](/pharmacy/agent#refill-config)
* **BestRx refills no longer need a last name on the profile** — On BestRx, a refill was refused and the caller offered a transfer to staff whenever the profile didn't carry both a last name and a spoken date of birth — which is what happens when the caller is identified by the number they're calling from or by a prescription number. Those refills go through now. [Learn more](/pharmacy/agent#refill-config)
* **A transferred prescription isn't mistaken for the current one** — When a medication had more than one prescription on file and the transferred one carried the newer number, that record was the one reported and refilled against. The agent now works from the prescription that wasn't transferred, so a refill goes to the script your pharmacy still fills. [Learn more](/pharmacy/agent#refill-config)
### Pharmacy
* **The voicemail list stops showing another location's messages** — Switching locations while the voicemail list was still loading could leave the previous location's messages, counts, and workflow totals on screen, because the slower response overwrote the newer one. Only the response for the location you're on is applied now. [Learn more](/pharmacy/voicemails#managing-messages)
### API
* **A media file whose audio is missing returns the record instead of an error** — `GET /media-files/{id}` answered with a server error when the stored `.wav` file was gone. It now returns the media file record with an empty `mediaUrl`. [Learn more](/api-reference/overview)
## Bug fixes
### Pharmacy
* **Extension lists load again** — Anywhere the pharmacy dashboard asks you to pick an extension, the list came back empty and searching it found nothing. That blocked creating a user on the **Users** tab of Store Settings, where an admin-level role has to be linked to an extension, and it left the agent's **Voice Settings** with no extensions to choose as a transfer or voicemail destination. The dashboard was asking for extensions by a filter value the API did not recognize, so no extensions were returned. Queue and call group destinations were never affected. [Learn more](/pharmacy/store-settings#managing-users)
## Updates
### Agent
* **Ask about someone else on the same call** — A caller who also needs help for a spouse or another family member can say so mid-call. The agent clears the profile it was working from and identifies the new patient from scratch, verifying them the same way, so one person's prescriptions are never reported against another's. [Learn more](/pharmacy/agent)
* **A blanket "refill everything" is confirmed, not assumed** — A caller who asks to refill "all of them" is now asked which medications they mean rather than having their whole profile submitted. A caller who asks what they can refill hears the names of the prescriptions that are currently refillable, so they can pick from that list. [Learn more](/pharmacy/agent#refill-config)
### Pharmacy
* **Reset the agent config to defaults** — A **Reset to Defaults** button on the Agent Settings tab clears every field — greeting, voice and call behavior, refill settings, store and contact details, hours, announcements, transfer and voicemail destinations, tools, and language — back to VOXO's defaults. It fills the form only; nothing is applied until you select **Save Changes**, and **Cancel Changes** still puts the form back the way you found it. [Learn more](/pharmacy/agent#configuring-the-agent)
* **Manage discounts while you change plans** — When a plan or add-on change is an upgrade, the review screen offers **Manage discounts**, so a discount can be added to a line the subscription will carry — or an existing one staged for removal — and applied when you confirm the change. A change that includes a downgrade hides discount management. The review screen also names any discount the change ends, because dropping a product drops the discount that sits on it. [Learn more](/pharmacy/billing#changing-plans-and-add-ons)
* **The Analysis tab has been removed** — The Agent page now has two tabs, **Conversations** and **Settings**. The session stats and filters on the Conversations tab are unchanged. [Learn more](/pharmacy/agent#monitoring-conversations)
## Bug fixes
### Agent
* **A date of birth heard as one long number is read correctly** — Speech recognition sometimes runs a spoken date together into a single number, such as "10282" for October 2, 1982, and the lookup on that number found no profile. The agent now splits a run-together date back into month, day, and year. [Learn more](/pharmacy/agent)
* **One receiving option isn't offered as a choice** — When a pharmacy has a single receiving option configured, the agent asked the caller to choose from a list with one item on it. It now applies that option to the refill and moves on. [Learn more](/pharmacy/agent#refill-config)
* **Pet profiles are found by prescription number** — On PioneerRx, a pet was matched only against the number the caller was calling from, so a pet on a different number couldn't be reached. A prescription number read off the label now finds the pet's profile, and a caller who has already been identified as themselves can move on to a pet without starting over. [Learn more](/pharmacy/agent)
* **The agent waits out a pause instead of talking over it** — Its "are you still there?" check-ins were timed from its own last word, so a caller who was still thinking or reading a label could be interrupted, and the wrap-up before hanging up read as abrupt. Check-ins now start only once both sides are quiet, the caller speaking at any point cancels the sequence, and the goodbye is friendlier and names your pharmacy. [Learn more](/pharmacy/agent)
### API
* **Retrying a failed fax works again** — `GET /faxes/retry/{id}` and the **Retry** button it powers failed when the stored fax number wasn't already in E.164 form, because our carrier rejected the retry as an invalid `from` number. Retries now normalize both numbers the same way the initial send does. [Learn more](/pharmacy/faxes#retrying-a-failed-fax)
### Connect
* **The mobile app addresses the production calling service** — Parts of the iOS and Android softphone built their SIP addresses against VOXO's development domain rather than the production one, which could leave the app unreachable for inbound calls and broke blind transfer on iOS. Every path now uses the production domain. Update to version 3.12.0 of VOXO Connect to get the fix. [Learn more](/connect/mobile/calling#receiving-a-call)
## Bug fixes
### Connect
* **An answered call on Android no longer drops** — On Android, a call that arrived while the mobile app was in the background could end the instant it was answered, and sometimes never rang at all. Two wake-up paths could start for the same incoming call and register competing connections; the call reached only one of them, and when the other gave up waiting it hung up the call that had already connected. One wake-up path now runs per call, a late timeout can no longer end a call that is already up, and a sign-in that is still in progress no longer cancels the incoming call. Update to the latest version of VOXO Connect for Android to get the fix. [Learn more](/connect/mobile/calling#receiving-a-call)
## Bug fixes
### API
* **Listing conduit tenants works again** — `GET /tenants/conduits` answered with a server error instead of the tenant list. Every tenant in the response was checked for a `healthcareVertical` value that this endpoint does not read, so the request failed once that field was added to tenant lists on September 2. The field is now optional on tenant list responses; the other tenant lists still return it. [Learn more](/api-reference/overview)
## Updates
### Agent
* **Send callers to the agent in the language they chose** — A phone menu key can now be pointed at **Pharmacy Agent (\)**, and calls that press it run in that language from the start, whatever the location's primary language is. Fifteen languages are available: English, Spanish, French, German, Portuguese, Italian, Dutch, Polish, Russian, Swedish, Turkish, Chinese, Japanese, Korean, and Hindi. The agent's fixed lines follow the call's language rather than always being English — the greeting, "please hold while I connect you", what it says before handing the caller to staff, the recording disclosure, and its goodbye. Write your greeting in English and it is translated; a language picker beside **Preview Audio** plays it back as a caller in that language would hear it. [Learn more](/pharmacy/agent#language)
* **Turn on a call recording disclosure yourself** — A new **Compliance** tab on Store Settings has a **Call Recording Disclosure** switch. Turn it on, pick the voice that reads it, and callers hear a short consent message before the agent says anything else. It cannot be interrupted, it plays only on calls that are already being recorded, it is spoken in the call's language, and an answering machine on an outbound campaign skips it. Turning it off keeps the recording, so switching it back on doesn't mean choosing a voice again. [Learn more](/pharmacy/store-settings#playing-a-call-recording-disclosure)
### Pharmacy
* **One audio file, several languages** — Text-to-speech on the Audio files tab now takes a block of text per language instead of one block of text. Write each block in English and it is translated into that block's language before it's spoken; the blocks are read in order into a single file, so a greeting can run in English and then Spanish. **Add Language** adds a block, one per supported language. [Learn more](/pharmacy/store-settings#managing-audio-files)
### API
* **Media files carry a language and per-language text** — Creating or updating a media file accepts `language` and `multilingualText`, an array of `{language, text}` segments, and both are returned when you read one back. `text` and `multilingualText` are mutually exclusive — sending both is rejected. The `text` limit is raised from 1,000 to 5,000 characters. [Learn more](/api-reference/overview)
* **Text-to-speech generates multi-language audio** — `POST /text-to-speech/voices/{id}/tts` takes either `text` with an optional `language`, or `segments` — up to 10 `{language, text}` pairs synthesized in order and returned as one audio file. Text is translated to the target language before it is spoken. Sending both `text` and `segments`, or neither, is rejected. `GET /text-to-speech/supported-languages` lists the languages the agent supports and their codes. [Learn more](/api-reference/overview)
* **Destination types for the agent in each language** — Destinations accept `PHARMACY_AGENT_` and `PHARMACY_IVR__` types, so a menu key can point at the pharmacy agent in a given language, and `QS1_` pharmacy destinations resolve alongside the PioneerRx, BestRx, and LibertyRx ones. [Learn more](/pharmacy/ivr#setting-up-key-press-options)
## Bug fixes
### Agent
* **A prescription with no number goes to pharmacy staff** — When a pharmacy management system returned a prescription without a prescription number, the agent answered about it from the patient's profile and could ask the caller to read out a number that doesn't exist. It now hands those callers to pharmacy staff instead, and won't file a refill against a prescription it has no number for. [Learn more](/pharmacy/agent#refill-config)
* **The agent accepts the receiving option a caller picks** — Choosing how to receive a refill could fail with "there is no receiving option", listing the very option the caller had just chosen, when the pharmacy system returned that option's id as a number and the agent's pick came back as text. The two are now compared by value. [Learn more](/pharmacy/agent#refill-config)
* **An unreachable pharmacy system is logged as a failure, not an empty result** — The patient lookup the agent runs as a call starts was recorded as a successful lookup that found nobody when the pharmacy system was down, so the session's tool usage list showed a green success for an outage. It is now recorded as a failed action with the error. No change to what the caller hears. [Learn more](/pharmacy/agent#session-list)
## Bug fixes
### Agent
* **A halted action is no longer logged as a failure** — Some actions finish without the agent speaking a reply, because the agent handles the request itself rather than reading a result back to the caller. Those steps were recorded as failures in a conversation's tool usage log, so reviewing a session showed errors on work the agent had actually completed. They are now logged as successful, noting that the reply was halted. [Learn more](/pharmacy/agent#session-list)
## Updates
### API
* **Tenant responses include the healthcare vertical** — `healthcareVertical` is returned on the tenant list and on a single tenant's details, so you can tell a pharmacy account from a general one without a second call. It is `null` on accounts that aren't in a healthcare vertical. [Learn more](/api-reference/overview)
## Bug fixes
### Agent
* **An unreachable pharmacy system is treated as an outage everywhere** — When the connection to PioneerRx, Liberty RX, or BestRx was down, only some lookups recognized it. Patient profile lookups, prescription status checks, and refill requests treated the outage as "nothing found", so the caller was told no matching prescription could be found instead of hearing that the pharmacy system was unavailable. Every one of those paths now reports the outage — including the unreachable status BestRx returns on a refill — so the agent tells the caller and transfers them to pharmacy staff. [Learn more](/pharmacy/agent)
## Updates
### Pharmacy
* **Your upcoming invoice, line by line** — The **Next invoice** card on Billing has a **View details** button that opens the estimated invoice itemized: every line with its amount, a **Proration** label on the ones that come from a mid-period change, and the subtotal, discount, tax, total, and amount due. [Learn more](/pharmacy/billing#reviewing-your-subscription)
* **Discounts apply per product** — A discount now takes a percentage off one product rather than the subscription as a whole, and each product can carry its own, so more than one discount can be active at a time. Integration fees are never discounted. Discounts are managed in one place — **Manage** on the payment card — where you can stage several and apply them together, and each one records the reason shown on the invoice alongside internal terms for what was agreed. [Learn more](/pharmacy/billing#discounts)
### API
* **21 more service areas in the API reference** — Announcements, call outcomes, custom voices, directory, faxing, feature codes, media files, music on hold, number blocking, paging groups, parking sessions, patients, queues, short numbers, TCR, user activity, user roles, users, virtual receptionists, voicemail messages, and voicemail settings now publish their request and response schemas, so their endpoints appear in the reference with the fields they accept and return. [Learn more](/api-reference/overview)
* **Discount endpoints target a product line** — Applying a percent discount takes a `priceId` and discounts that one product line, and several product lines can be discounted at once. An amount discount takes no `priceId` and applies across the subscription, excluding products that can't be discounted. Removing a discount takes the same `priceId` to name which one to remove, and without it removes the subscription-level discount. [Learn more](/api-reference/overview)
* **Find me, follow me fields removed** — The `fmfm` fields on extensions and `checkOffline` on call groups have been removed from requests and responses. The matching option is gone from the call group form in the Omnia admin portal. [Learn more](/omnia/admin/call-groups)
## Bug fixes
### Platform
* **e911 address validation says why it failed** — Validating an emergency address in the Omnia admin portal reported every failure as "Address validation failed", whatever went wrong. The reason from the carrier's address database is now shown, so you can correct the entry and validate again. [Learn more](/omnia/admin/e911-locations)
## Updates
### Pharmacy
* **Toll-free and international minutes are metered** — Time on toll-free and international calls is now counted toward your invoice alongside agent minutes. Minutes are measured from the moment a call is answered until it ends and rounded up to the next whole minute, and a call that is never answered isn't billed. The **Next invoice** card on Billing includes them in the estimate for the period you're in. [Learn more](/pharmacy/billing#metered-usage)
* **Campaigns follow the plan on the location** — The Silver-or-Gold requirement behind Assistant mode is now checked before each campaign call rather than only when the campaign is created, so a campaign set up while the location had the plan stops dialing in Assistant mode once the plan is dropped. Pickup Reminder, Refill Reminder, Contact Pharmacy, and Birthday campaigns keep running in IVR mode; Custom campaigns are deactivated, and so is a Vaccine Scheduling campaign whose location no longer has the Appointment Scheduling add-on. A campaign that switched to IVR returns to Assistant mode on its own once the plan is restored. [Learn more](/pharmacy/outbound-campaigns#when-a-plan-or-add-on-is-removed)
## Updates
### Pharmacy
* **Conversations open from the list** — Selecting a row in the Conversations or live sessions table opens that conversation, and right-clicking a row offers **Open conversation** and **Open in new tab**. A conversation link now carries the location the call belongs to, so a link you copy to a colleague opens on the right location instead of on whichever one they happen to be viewing. The **RX Numbers** column has been removed from the table. [Learn more](/pharmacy/agent#session-list)
* **Search conversations by caller name** — The search box above the conversations table matches the caller's name as well as their phone number. Typing a name used to be stripped down to nothing and quietly returned every conversation. [Learn more](/pharmacy/agent#monitoring-conversations)
## Bug fixes
### Agent
* **Dates of birth are heard in US order** — A caller saying a date such as "one five ninety" could be read as the fifth of January or the first of May, and a lookup on the wrong reading found no profile. The agent now reads spoken dates as month, then day, then year, and a number the transcription rendered as a word in another language is understood as that number. [Learn more](/pharmacy/agent)
* **Names match more of the way callers say them** — A name with an accent on file, or a middle name recorded on one side and not the other, could stop a patient lookup from matching. Names are now compared with accents set aside, and against both the full name your PMS holds and the patient's first and last name, on PioneerRx, Liberty RX, and BestRx. A caller still needs to give both a first and a last name for a name lookup. [Learn more](/pharmacy/agent)
### Pharmacy
* **Coming back from a conversation keeps your place** — Opening a conversation and going back reset the type, direction, and transferred filters, the search term, and the page you were on. The list now returns as you left it.
* **Tool call details are readable** — In the tool log on a conversation, a request or response containing an apostrophe — a name like O'Brien — failed to format and was printed as one raw line, and call durations were shown with every decimal the agent reported. Details now format correctly, and durations round to whole milliseconds or two decimal seconds.
## Bug fixes
### Agent
* **Two strengths of the same medication no longer collapse into one** — A patient's prescriptions were grouped by base drug name, so a second strength of the same medication was folded behind the most recently filled one and a caller asking for it could be answered about the wrong script. Each medication now stands on its own in the profile the agent works from, with its strength, on PioneerRx, Liberty RX, and BestRx. When a caller names a medication that matches more than one of theirs, the agent names the strengths and asks which they mean instead of choosing, and a prescription number a renewal has since replaced still resolves to the current prescription. [Learn more](/pharmacy/agent#refill-config)
## Bug fixes
### Agent
* **Calls in a language other than English are transcribed again** — On a location whose primary language isn't English, or one that allows callers to switch languages, the agent could hear nothing a caller said and end the call. It now transcribes with a multilingual model in those cases, so Spanish and any other language you have configured are understood. [Learn more](/pharmacy/agent#language)
* **A prescription still being prepared is named as such** — On PioneerRx, a prescription your pharmacy hadn't finished preparing came back with no refill verdict, and the reason the agent gave the caller was internal wording rather than something they could act on. It now reports the prescription as not yet refillable and tells the caller it is still being prepared by the pharmacy. [Learn more](/pharmacy/agent#refill-config)
## Updates
### Agent
* **Patient lookup by name and date of birth works everywhere** — The agent identifies callers by name and date of birth on PioneerRx, Liberty RX, and BestRx without a per-location setting. **Enable Search Patient Tool** in Voice Settings no longer changes what the agent does and is being removed from the dashboard. Callers are still matched on the number they are calling from first, and a prescription number read off the label still resolves fastest. [Learn more](/pharmacy/agent#voice-settings)
## Bug fixes
### Agent
* **Refills go through on named receiving options** — On Liberty RX, where receiving options are named rather than numbered, the agent could not pass back the option a caller chose and asked them to pick again. It now sends the option exactly as your PMS defines it and submits the refill. [Learn more](/pharmacy/agent#refill-config)
## Updates
### API
* **Default payment method is reported as a single shape** — The pharmacy billing responses now return `defaultPayment` as one object with the Stripe payment method `type`, a display-ready `label`, and best-effort `brand`, `last4`, `expMonth`, `expYear`, `bankName`, `accountType`, and `email` fields, instead of a card-or-bank union. Any payment method Stripe holds is reported, rather than being left out when it isn't a card or a US bank account.
## Bug fixes
### Pharmacy
* **Billing shows every payment method, not just cards and bank accounts** — The payment card in the Billing tab showed **No payment method on file** when the default method was something other than a card or a US bank account, even though the account was set up to be charged. Any method now appears with its own details — Link with the email it's attached to, and anything else with a readable label. [Learn more](/pharmacy/billing#updating-your-payment-method)
* **Bookings show which vaccine the appointment is for** — The vaccine recorded on an appointment now appears next to the patient's name in both the calendar and list views of [Bookings](/pharmacy/scheduling#managing-bookings), instead of only inside the booking itself.
### Agent
* **The agent hangs up instead of leaving the line open** — On an outbound campaign call, the agent could record the outcome, say goodbye, and leave the patient sitting on an open line. It now asks whether there's anything else the patient needs and then ends the call itself. A call it transfers to pharmacy staff is still left for them to end. [Learn more](/pharmacy/outbound-campaigns#campaign-modes)
* **No repeat lookup once the caller is identified** — After the agent already has a caller's profile, a prescription number they read out is matched against the prescriptions it holds instead of starting another lookup and announcing a second time that it found their profile.
## Updates
### Pharmacy
* **Appointment scheduling** — A new [Scheduling](/pharmacy/scheduling) page lets you connect a Google or Outlook calendar, define the appointment types patients can book, and manage bookings from a calendar or list view. Bookings are assigned round-robin across the staff calendars you choose and written to that person's own calendar, so they never collide with meetings already booked. You can add, reschedule, and cancel appointments by hand, and each change emails the staff member the appointment is assigned to. Requires the Appointment Scheduling add-on. [Learn more](/pharmacy/scheduling)
* **Manage your subscription from the dashboard** — The Billing tab in Settings now shows what each location is paying for and lets you change it yourself: set plans and add-ons per location, review what's due today before you confirm, update the card on file, and download invoices. Upgrades apply immediately and are prorated; downgrades are scheduled for your next renewal. A past-due account gets a banner with a link to pay the outstanding invoice. [Learn more](/pharmacy/billing)
* **Vaccine Scheduling call campaigns** — A sixth [campaign type](/pharmacy/outbound-campaigns#vaccine-scheduling-campaigns) calls patients to offer a vaccine and books the appointment on the call. Pick the calendar event type the appointment books against and list the vaccines the agent can offer. Assistant mode only, and requires the Appointment Scheduling add-on.
* **Assistant-mode campaigns now available on Silver** — Creating a call campaign in Assistant mode previously required the Gold plan. It is now available on Silver as well as Gold. IVR-mode campaigns still have no plan requirement. [Learn more](/pharmacy/outbound-campaigns#campaign-modes)
### Agent
* **The agent books vaccine appointments** — On a Vaccine Scheduling campaign call, the agent offers the vaccines configured on the campaign, reads back open times from your calendar for the day the patient chooses, and books the slot they pick. It says so and offers another time when a slot was just taken or is less than an hour away. Patients who call in asking to schedule are still handed off to pharmacy staff. [Learn more](/pharmacy/outbound-campaigns#vaccine-scheduling-campaigns)
* **Outbound campaign calls recognize an answering machine** — The agent now listens to how a campaign call was answered before it starts talking. A voicemail greeting gets a brief message saying the pharmacy will call back, together with the number to call to stop receiving calls; a carrier message such as "the number you have dialed is unavailable" ends the call without leaving one. Both are recorded on the campaign record as a **VOICEMAIL** disposition. [Learn more](/pharmacy/outbound-campaigns#campaign-modes)
## Updates
### API
* **Filter extensions by branch** — The [extensions](/omnia/admin/extensions) list endpoints now accept an optional `branchId` query parameter that narrows results to a single branch, and each extension in the response includes its `branchId`.
## Bug fixes
### Connect
* **Microsoft single sign-on no longer returns you to the login screen** — Signing in with Microsoft could send you back to the login page without signing you in, because the sign-in popup was unable to hand its result back to VOXO Connect. Google and Microsoft sign-in now complete as a redirect in the same browser tab instead of a popup window, so pop-up blockers no longer interfere. [Learn more](/connect#how-to-log-in)
## Bug fixes
### Pharmacy
* **Agent conversation timestamps show the correct time** — Session dates and times in the agent [Conversations](/pharmacy/agent#monitoring-conversations) tab were converted using the time zone of the date-range filter's start date and returned without a time-zone marker, so they could appear hours off. Session times are now returned in UTC and shown in your local time.
## Updates
### Agent
* **Out-of-scope requests route by channel and store hours** — When a caller asks for something the agent can't handle — a delivery, an insurance or billing question, medical or dosage advice, appointment or vaccine scheduling, a special order, or a message for staff — the agent hands the request off instead of improvising. On a call during business hours it connects the caller to pharmacy staff; outside business hours it offers to take a voicemail; in chat and SMS it gives the caller the pharmacy's phone number. Patients are never routed to the prescriber voicemail box. [Learn more](/pharmacy/agent)
## Bug fixes
### Agent
* **Offer-to-help prompt no longer interrupts transfers it shouldn't** — With **Offer help before transferring** enabled, the agent no longer makes the self-service offer after it was the one who proposed connecting the caller, after the caller has already used a lookup, status check, or refill, when the destination is a voicemail box, or for a request the agent has no way to handle. [Learn more](/pharmacy/agent#voice-settings)
* **No hand-off the agent can't complete** — The agent checks that a call leg is available before announcing a transfer. When it isn't, the caller is told the transfer didn't go through instead of hearing a hand-off line and waiting on a connection that never happens.
## Updates
### Pharmacy
* **Liberty RX caller identification** — Pharmacies using Liberty RX can now match inbound callers to patient records from their Liberty workstation, the same Who's Calling lookup already available for PioneerRx. Lookups appear in the [Who is Calling](/pharmacy/pms-tools#who-is-calling) tab of PMS Tools. [Learn more](/pharmacy/pms-tools#supported-systems)
## Updates
### Agent
* **Return-call inquiries hand off to staff** — When a patient calls back and says the pharmacy called them (for example, "you called me" or "I missed a call from you"), the agent no longer guesses the reason for the call. It offers to connect the patient with the pharmacy team, and still handles refill or prescription-status requests directly when that is what the patient needs.
## Bug fixes
### Pharmacy
* **PioneerRx agent toggle no longer returns a payment error** — Enabling or disabling the PioneerRx agent for a pharmacy no longer fails with a "Payment Required" error when the account has an older canceled subscription on file. Plan changes now apply to the active subscription.
## Updates
### API
* **CSV export for Admin audit log and extensions** — The [Admin audit log](/omnia/admin/admin-audit-log) and [extensions](/omnia/admin/extensions) list endpoints now accept an `export` query parameter that returns the full filtered result set as a downloadable CSV instead of a paginated JSON response. This backs the **Export** button on both Admin Portal pages, so the download honors your active filters rather than a single page of results.
## Bug fixes
### API
* **Indiana state code accepted** — US state-code validation now accepts `IN` (Indiana). Requests that included an Indiana address previously failed with an "Invalid State Code." error.
## Bug fixes
### Agent
* **LibertyRx prescription status mapping** — Prescription statuses from LibertyRx now report accurately during status checks and refill requests. Statuses such as No Refills, Expired, Discontinued, On Hold, and Too Early are no longer treated as refillable, and a verified prescription now shows as **Filled and Ready for Pickup** instead of an in-progress state. This applies to both single and bulk refill requests.
## Bug fixes
### Agent
* **Patient default receiving option on refills** — When [receiving options](/pharmacy/agent#refill-config) are set to use each patient's default preference from your PMS, the agent now applies that patient-level default (such as pickup, mail, or delivery) when filing refill requests on PioneerRx, instead of falling back to the location default. This applies to both single and bulk refill requests. [Learn more](/pharmacy/agent#refill-config)
## Bug fixes
### API
* **Finalized transcript turns only** — The [`TRANSCRIPTIONEND` webhook](/api-reference/overview) and the stored call transcript now include only completed, finalized turns. Interim (partial) speech results that could previously slip in as duplicated or half-finished segments are no longer written, so the `transcript` array holds one clean entry per turn. [Learn more](/api-reference/overview)
## Updates
### Agent
* **Recording-consent disclosure on outbound calls** — When recording consent is enabled for your pharmacy agent, [outbound calls](/pharmacy/outbound-campaigns#campaign-modes) now open with a spoken recording disclosure before the greeting, telling the patient the call is recorded and that staying on the line is their consent. It plays on every outbound agent call and can't be interrupted, so it is always heard. [Learn more](/pharmacy/outbound-campaigns#campaign-modes)
### API
* **Transcription End webhook** — A new `TRANSCRIPTIONEND` webhook fires when a transcribed call's transcription session ends, delivering the full transcript plus an `insights` object of AI-generated analysis (summary, sentiment, topics, and intents). Opt in by configuring a webhook with type `TRANSCRIPTIONEND`. [Learn more](/api-reference/overview)
## Bug fixes
### Platform
* **Queue call answer time** — Calls answered on a different server instance than the one hosting the queue now record their answered time correctly, so queue call disposition and reporting reflect them accurately.
### Connect
* **Call center login for multi-location organizations** — Fixed an issue that prevented call center users at some multi-location organizations from loading their call centers.
## Updates
### Agent
* **Identity verification before prescription details on campaign calls** — When the pharmacy agent places [Pickup Reminder, Refill Reminder, or Contact Pharmacy](/pharmacy/outbound-campaigns#campaign-types) calls in [Assistant mode](/pharmacy/outbound-campaigns#campaign-modes), it now confirms who it's speaking with before sharing any prescription information. The opening message gives only the pharmacy name and a general reason for the call, and the agent asks for the patient's date of birth to verify identity — the same verify-before-disclosure flow it uses on inbound calls. Birthday and Custom campaigns are unchanged. [Learn more](/pharmacy/outbound-campaigns#campaign-modes)
## Bug fixes
### Pharmacy
* **Campaign calls labeled correctly in reporting** — Assistant-mode outbound [campaign](/pharmacy/outbound-campaigns) calls are no longer shown as inbound in the agent's [Conversations](/pharmacy/agent#monitoring-conversations) session list, so the Direction filter reflects them accurately.
* **Call campaign creation** — Fixed an error that prevented some pharmacies from creating outbound [call campaigns](/pharmacy/outbound-campaigns).
### Platform
* **Caller name fallback** — When a caller's name can't be retrieved from the carrier lookup, incoming calls now display the caller's phone number instead of an internal error message.
## Bug fixes
### Pharmacy
* **Manual phone number entry in call campaigns** — When you add a record to an outbound [call campaign](/pharmacy/outbound-campaigns#adding-records-manually) by hand, you can again type the patient's phone number directly into the Manual entry dialog. [Learn more](/pharmacy/outbound-campaigns#adding-records-manually)
## Updates
### Agent
* **New AI voice catalog** — When you choose the pharmacy agent's voice in [Voice Settings](/pharmacy/agent#voice-settings), you now pick from a searchable catalog of named AI voices, each with a short description of its persona. The same catalog powers voice selection when you generate media files and voicemail greetings. Voices are no longer tied to a single speech provider, so the agent can keep speaking in your chosen voice even if one provider has an outage. [Learn more](/pharmacy/agent#voice-settings)
## Updates
### Agent
* **Graceful handling of PMS outages** — When the agent can't reach your pharmacy management system during a call (for example, the connection to [PioneerRx](/pharmacy/agent) or BestRx is down), it now recognizes the outage, lets the caller know, and transfers them to pharmacy staff — instead of retrying or ending the call with a generic error. If the agent can't load your pharmacy's configuration at all when a call starts, it asks the caller to contact the pharmacy directly and ends the call rather than leaving them in silence. [Learn more](/pharmacy/agent)
## Bug fixes
### Agent
* **Keypad input refinements** — A caller can now press **0** on their keypad at any point to let the agent know they'd like to speak with a person. The agent also no longer mistakes a short keypad entry — such as a four-digit birth year entered for [date-of-birth verification](/pharmacy/agent) — for a prescription number. [Learn more](/pharmacy/agent)
## New features
### Agent
* **Offer help before transferring** — A new **Offer help before transferring** toggle in the pharmacy agent's [Voice Settings](/pharmacy/agent#voice-settings). When enabled, if a caller asks to be transferred the agent makes one brief offer to help them directly before connecting them to staff. If the caller declines or asks again, the agent transfers right away. Emergency, safety, and compliance transfers always connect immediately. [Learn more](/pharmacy/agent#voice-settings)
## Updates
### API
* **Device Models API** — New endpoints to list, create, retrieve, update, and delete device models under `/v2/admin/device-models`. [Learn more](/api-reference/overview)
* **Phonebooks API** — New endpoints to list, create, retrieve, update, and delete phonebooks under `/v2/admin/phonebooks`. [Learn more](/api-reference/overview)
* **Richer ENDCALL webhook** — The `ENDCALL` webhook payload now includes call-identity fields (`direction`, `start`, `answeredAt`, `cidNum`, `cidName`, `dialedNum`, `uniqueId`, `isTransferred`, `isRecorded`), so you can identify a call and measure its duration and ring time without correlating back to the `STARTCALL` event. [Learn more](/api-reference/overview)
## Updates
### Pharmacy
* **Assistant mode now requires the Gold plan** — Creating, editing, or duplicating a pharmacy [call campaign](/pharmacy/outbound-campaigns) in **Assistant** mode now requires an active Gold plan. Campaigns that run in **IVR** mode are unaffected. Custom campaigns are Assistant-only, so they always require the Gold plan. [Learn more](/pharmacy/outbound-campaigns#campaign-modes)
## Updates
### API
* VoIP push notifications now include a `sentAt` timestamp (epoch milliseconds) so mobile clients can detect and discard stale incoming-call notifications. [Learn more](/api-reference/overview)
* V2 API schema improvements across Emergency Locations, Messaging, Number Porting, Phone Numbers, Tenants, and Tenant Notes endpoints. [Learn more](/api-reference/overview)
## Bug fixes
### API
* Fixed pharmacy agent partial updates (`PATCH /v2/admin/pharmacy/agents/:id`) silently resetting announcement assignments, identity playback, and the alternate ringtone when those fields were omitted from the request. Omitted fields are now left unchanged. [Learn more](/api-reference/overview)
## Bug fixes
### Agent
* Fixed PioneerRx patient lookups occasionally matching patients who belong to another store. The agent now matches only patients on file at your pharmacy. [Learn more](/pharmacy/agent)
## Updates
### API
* **Device search** — The List Devices endpoint now accepts an optional `query` parameter to filter devices by name or MAC address. [Learn more](/api-reference/overview)
## New features
### Agent
* **Multi-profile patient matching** — When more than one PioneerRx profile matches the name and date of birth a caller gives (for example, family members who share a phone number), the agent now asks for the street address on file to identify the right profile before continuing. If the address can't narrow it to a single profile, the agent transfers the call to pharmacy staff. [Learn more](/pharmacy/agent)
## Updates
### Agent
* **BestRx patient identification** — The agent can now look up patients by name and date of birth on BestRx, using the same patient-search flow already available for PioneerRx and Liberty RX. Turn it on with **Enable Search Patient Tool** in Voice Settings. [Learn more](/pharmacy/agent#voice-settings)
## Bug fixes
### Agent
* Improved touch-tone prescription entry. The agent now allows a longer pause between digits, so callers reading a number off a bottle aren't cut off, and accepts **#** to submit the number as soon as the caller finishes. [Learn more](/pharmacy/agent)
* Fixed the agent implying it could handle requests it can't, such as deliveries, bringing medications out, or passing messages to staff. The agent now says it can't help with those and offers to transfer the caller. [Learn more](/pharmacy/agent)
## New features
### Agent
* **Language controls** — A new **Language** sub-tab in agent Settings lets you set the agent's primary language, lock the agent to that language so it never switches, and pick additional languages the agent may switch to when a caller explicitly asks. [Learn more](/pharmacy/agent#language)
### Pharmacy
* **BestRx outbound faxing** — Pharmacies using BestRx can now send outbound faxes through the VOXO platform, matching the outbound fax support already available for Liberty RX. [Learn more](/pharmacy/pms-tools#supported-systems)
## Updates
### Agent
* **Hyphenated and multi-part name matching** — The agent now matches patients whose first or last name has multiple parts or a hyphen (for example, "Ana Maria" or "Garcia-Lopez") part by part, and tries alternate spellings when the first attempt finds no match. This improves patient lookup on PioneerRx, BestRx, and Liberty RX. [Learn more](/pharmacy/agent)
* **Pet patients on PioneerRx** — The agent now recognizes pet (animal) profiles on PioneerRx, including pets that have no prescriptions on file, so callers asking about an animal's medications are matched to the right profile. [Learn more](/pharmacy/agent)
### Telecom
* **Music on hold play order** — Music on hold can now play its tracks in a fixed order or shuffle them randomly, configurable per music-on-hold list. [Learn more](/omnia/admin/music-on-hold)
### API
* **BestRx outbound fax endpoint** — A new BestRx integration endpoint sends an outbound fax from a pharmacy's number, and the BestRx fax list and retrieval endpoints now validate their parameters. [Learn more](/api-reference/overview)
* **`statusDate` on Liberty RX status responses** — Liberty RX prescription status responses now include `statusDate`, the date of the most recent status change. [Learn more](/api-reference/overview)
## Bug fixes
### Agent
* Further corrected Liberty RX prescription status mapping so ready, picked up, on hold, and in-progress statuses report accurately. [Learn more](/pharmacy/agent)
### Pharmacy
* Fixed distributed queue statistics returning zeros in queue reporting. [Learn more](/pharmacy/reports)
## Bug fixes
### Agent
* Fixed Liberty RX prescription status checks returning the wrong status or no status at all. Statuses now map correctly to in progress, ready for pickup, on hold, and picked up. [Learn more](/pharmacy/agent)
* Fixed prescription status checks failing when placed through the automated phone system. Status lookups now complete reliably on both Liberty RX and PioneerRx. [Learn more](/pharmacy/agent)
## Bug fixes
### Agent
* Fixed the pharmacy agent taking its turn too quickly and talking over callers. The agent now waits a moment longer for the caller to finish speaking before it responds. [Learn more](/pharmacy/agent)
* Fixed the agent occasionally applying a receiving option (such as mail or delivery) to a refill when none was offered or the caller hadn't chosen one. The agent now only sends a receiving option when the caller actually selects one. [Learn more](/pharmacy/agent#refill-config)
## New features
### API
* **Button Layouts API** — New endpoints to list, retrieve, create, update, and delete phone button layouts. Each layout defines a key range and a per-key configuration of Park, Speed Dial, and BLF buttons. [Learn more](/api-reference/overview)
## Bug fixes
### Agent
* Fixed the pharmacy agent occasionally grouping a patient's prescriptions incorrectly. Medications whose names include a strength, unit, or item code are no longer merged under the wrong drug, and prescriptions without a readable drug name are still listed instead of dropped. [Learn more](/pharmacy/agent)
## Updates
### Agent
* **Faster greetings and transfers** — The agent now speaks its greeting and transfer hand-off line directly instead of waiting on the language model, so callers hear the agent answer and route the call with less delay. [Learn more](/pharmacy/agent)
* **Refill-already-pending wording** — When a prescription already has a refill working through your pharmacy system, the agent now tells callers the refill "is being processed" instead of "has already been requested." [Learn more](/pharmacy/agent#refill-config)
### API
* **`drugName` on prescription status responses** — BestRx, LibertyRx, and PioneerRx prescription status responses now include `drugName` so integrations can show the medication alongside the status. [Learn more](/api-reference/overview)
* **`dob` on bulk query refill** — The PioneerRx bulk-query-refill endpoint accepts an optional `dob` parameter, and date of birth verification is enforced when the request comes through the IVA path. [Learn more](/api-reference/overview)
## Bug fixes
### Agent
* Fixed the pharmacy agent occasionally verifying a date of birth the caller hadn't given. The agent now only verifies a date of birth after the caller provides one, and asks again if it's missing. [Learn more](/pharmacy/agent)
* Fixed transfers failing when a destination name had extra spaces or different capitalization. Destination names now match regardless of whitespace and case. [Learn more](/pharmacy/agent#voice-settings)
* Fixed the agent telling callers a prescription wasn't found on a status check when the prescription was located but its drug name field was empty. [Learn more](/pharmacy/agent)
* Fixed the agent saying "please hold" twice and trailing off with extra words after a transfer. The hand-off line now plays once and the agent stops speaking. [Learn more](/pharmacy/agent)
## New features
### Pharmacy
* **Birthday call campaigns** — A new **Birthday** campaign type places greeting calls to patients on their birthday. Turn on **Enable Automated Birthday Calls** on the new Settings tab to queue today's birthdays from your PMS into the campaign each day. [Learn more](/pharmacy/outbound-campaigns#birthday-campaign-settings)
* **Custom campaigns** — A new **Custom** campaign type covers outreach that doesn't fit a system template. Custom campaigns always run in Assistant mode, and you can create as many as you need per location. [Learn more](/pharmacy/outbound-campaigns#campaign-types)
* **Always-on or one-time scheduling** — When you create a campaign, choose **Always-on** to keep it running during its calling hours, or **One-time** to schedule it for a specific date and time. [Learn more](/pharmacy/outbound-campaigns#campaign-schedule)
* **Call Campaigns page refresh** — The Outbound Campaigns page is now **Call Campaigns** and is organized into **Report**, **Campaigns**, and **Settings** tabs. The Campaigns tab lists every campaign with search, status filtering, and archive controls, and **Create Campaign** opens a guided wizard. [Learn more](/pharmacy/outbound-campaigns)
### Agent
* **Auto Transfer Compounding** — The Tools sub-tab in agent Settings has a new **Auto Transfer Compounding** section. When enabled, the agent transfers compounding-related calls directly to a destination you pick instead of trying to refill them. [Learn more](/pharmacy/agent#tools)
* **Bulk refills in one request** — On PioneerRx, BestRx, and LibertyRx, the agent now files a caller's multiple refill requests in a single bulk submission and reports the outcome for each prescription in one summary, instead of repeating the refill flow per script. [Learn more](/pharmacy/agent#refill-config)
## Updates
### Pharmacy
* **Pickup Refill renamed to Pickup Reminder** — The system campaign type previously called **Pickup Refill** is now **Pickup Reminder** to match the Refill Reminder naming. Existing campaigns and records carry over automatically. [Learn more](/pharmacy/outbound-campaigns#campaign-types)
## Updates
### Agent
* **Drug pronunciation dictionary paused** — The phonetic dictionary the pharmacy agent used to pronounce common prescription medications has been temporarily removed while it's refined, so drug names are spoken with the standard text-to-speech voice for now. The agent still feeds the verified patient's own medications into speech recognition during a session, so callers are understood reliably when they mention their medications by name. [Learn more](/pharmacy/agent)
## Updates
### Pharmacy
* **Preview audio when linking it to special hours** — When you link an audio file to special hours, a play button now appears next to the file picker so you can listen to the selected file before saving. [Learn more](/pharmacy/store-settings#linking-announcements-to-store-hours)
* **Filters stay put as you move around the dashboard** — Search terms now persist when you switch tabs or leave a page and come back, matching the date-range filters that already carried over. This applies across Calls, Faxes, Voicemails, IVR, Reports, Campaigns, and other list views.
## Bug fixes
### Agent
* Fixed the pharmacy agent getting stuck in a loop when a caller requested a refill for a prescription that wasn't eligible. The agent now tells the caller the prescription isn't refillable and offers to transfer the call to pharmacy staff. [Learn more](/pharmacy/agent#refill-config)
## New features
### Agent
* **Drug pronunciation dictionary** — The pharmacy agent now uses a phonetic dictionary covering common prescription medications so drug names sound natural during calls. The agent also feeds the verified patient's own medications into speech recognition for the rest of the session, improving how reliably callers can be understood when they mention their medications by name. [Learn more](/pharmacy/agent)
### Pharmacy
* **All option on agent session type filter** — The session list on the pharmacy agent page now includes an **All** option in the Type filter, so voice, web, and SMS sessions can be viewed together. **All** is the new default. [Learn more](/pharmacy/agent#monitoring-conversations)
## Updates
### Agent
* **Smarter handling of medication strengths and history** — For PioneerRx pharmacies, the agent now groups prescriptions by drug name and keeps prior fills accessible per group, so it can identify the right script when a caller asks about a strength that's different from the latest fill (for example, an older 3.125 mg Carvedilol versus a current 6.25 mg). Medications replaced by a newer strength are flagged so the agent doesn't suggest renewing them. [Learn more](/pharmacy/agent)
### Pharmacy
* **Direct CSV download for campaign exports** — Exporting outbound campaign records now downloads the CSV directly in your browser instead of emailing a link. The file is named with your location, campaign type, and date range, and timestamps are converted to your local timezone. The **Date/Time** column has been renamed to **Timestamp** across the campaign UI and CSV. Exports over 512,000 records are blocked with a clear message — narrow the date range and try again. [Learn more](/pharmacy/outbound-campaigns#exporting-campaign-records)
### API
* **Holiday audio plays during the holiday window** — Holiday and special hours media now plays while the holiday is in effect, in addition to the prior-days notification period. `mediaFileId` remains optional on create and update holiday endpoints. [Learn more](/pharmacy/store-settings#linking-announcements-to-store-hours)
* **`timezone` query param on campaign records export** — The pharmacy campaign records export endpoint accepts an optional `timezone` (IANA name) that controls how timestamps are formatted in the CSV. The endpoint now streams the CSV in the response (with `Content-Disposition`) instead of emailing it. [Learn more](/api-reference/overview)
## Bug fixes
### API
* Fixed DELETE requests with an empty JSON body returning 500. Empty bodies are now treated as no payload and the request proceeds normally.
## Updates
### Agent
* **Liberty RX status checks** — The pharmacy agent can now look up prescription status for pharmacies on Liberty RX. Patients can ask whether a refill is ready, in progress, or has an issue, and the agent reports the current status from the pharmacy system. [Learn more](/pharmacy/agent)
## New features
### Pharmacy
* **Default voice for audio generation** — The Audio files tab now has a **Location Settings** option (the gear icon next to the upload button) for picking a default voice gender and specific voice. The default is pre-selected wherever you generate text-to-speech audio — Audio files, Announcements, IVR media, voicemail greetings, special hours, and outbound campaigns — so staff don't have to re-pick a voice for each new file. The voice used to generate each file also appears as a new **Voice** column in the Audio files table, and editing a generated file pre-selects the original voice. [Learn more](/pharmacy/store-settings#setting-a-default-voice)
## Updates
### Pharmacy
* **Caller ID on PioneerRx refill comments** — Refill requests the agent or IVR submits to PioneerRx now include the caller's name and number in the script comment, alongside the source and timestamp, so staff can see who requested the refill without leaving Pioneer. [Learn more](/pharmacy/pms-tools#configuring-pioneerrx-integrations)
* **Patient opt-out respected on campaigns** — Outbound campaign records for patients who have opted out of voice contact are now rejected at create time, and pickup-ready or refill-ready uploads sent from PioneerRx and BestRx skip those numbers before they reach the queue. [Learn more](/pharmacy/outbound-campaigns#adding-records-to-a-campaign)
### API
* **Patient consent fields** — The patient consent check endpoint now returns a `shouldRepromptVoice` flag, and the upsert endpoint accepts an optional `source` (`ivr`, `agent`, or `manual`) and at least one of `sms` or `voice`. Campaign record creation rejects opted-out numbers with `403`. [Learn more](/api-reference/overview)
* **`recorded` filter on pharmacy call stats** — The pharmacy call stats endpoint accepts a `recorded` filter to scope results to recorded calls. [Learn more](/api-reference/overview)
* **`transferred` filter on agent call stats** — The pharmacy agent call stats endpoint accepts a `transferred` filter. [Learn more](/api-reference/overview)
* **Default voice on pharmacy agent** — The pharmacy agent endpoints accept and return `defaultVoiceGender` and `defaultVoiceId` for the location's default audio-generation voice.
* **`voiceId` on media files** — Media file create, update, and list responses include `voiceId` so you can see which voice generated a text-to-speech file.
* **SMS media upload response** — The Connect messaging media upload endpoint now returns a flat array of URLs instead of `{ urls: [...] }`. Update any integrations that read from the wrapped shape.
## Bug fixes
### Pharmacy
* Fixed recordings being hidden on the Calls page for internal and parked calls. Any call with a recording is now playable, regardless of disposition. [Learn more](/pharmacy/calls)
* The **Transferred** column on the agent sessions table now shows **Yes** / **No** instead of **True** / **False**, and the column is included in the Agent stats CSV export. [Learn more](/pharmacy/agent)
### Connect
* Fixed image paste failing when sending SMS to a DID in Connect Web. [Learn more](/connect/direct-messages)
### Agent
* Fixed the pharmacy agent not playing its configured greeting on WebRTC sessions (such as the in-app agent test). Web sessions now match phone-call behavior. [Learn more](/pharmacy/agent#voice-settings)
## New features
### Agent
* **Outbound campaign calls** — The pharmacy agent now places outbound calls for campaigns set to **Assistant** mode. The agent introduces the call, walks the patient through a pickup reminder, refill reminder, or contact pharmacy message, captures the patient's response, and detects voicemail so the disposition is recorded correctly. [Learn more](/pharmacy/outbound-campaigns#campaign-modes)
## Updates
### Pharmacy
* **Liberty RX click-to-call** — Pharmacies using Liberty RX can now use click-to-call to dial patients from their Liberty workstation. Activity appears in the [Click to Call](/pharmacy/pms-tools#click-to-call) tab of PMS Tools. [Learn more](/pharmacy/pms-tools#supported-systems)
## Bug fixes
### Agent
* Fixed the pharmacy agent's SMS conversations failing when looking up prescriptions, requesting refills, or checking refill status. SMS interactions now work alongside voice calls.
## New features
### Agent
* **Knowledge Base sections** — The **Knowledge Base** sub-tab in agent Settings now supports multiple named information sections, each with a **Title** and **Data** field. The agent reads every section when answering patient questions, so you can capture distinct topics — policies, services, FAQs — as separate entries instead of one block of text. [Learn more](/pharmacy/agent#knowledge-base)
## Bug fixes
### Agent
* Fixed prescription lookups failing when an rx number was transcribed with spaces or other non-digit characters. The agent now strips these before checking the pharmacy system, improving reliability for keypad and spoken rx entry. [Learn more](/pharmacy/agent)
## Bug fixes
### Connect
* Fixed remote participant video appearing zoomed in or cropped during VOXO Meet calls. Video now displays at its full aspect ratio in grid view, active speaker view, and screen-sharing layouts. [Learn more](/connect/meetings)
## Updates
### Pharmacy
* **Tools sub-tab paused** — The **Tools** sub-tab in agent Settings, including the Cal.com vaccine scheduling integration, is currently unavailable while it's being updated. It will return in a future release. [Learn more](/pharmacy/agent#tools)
## Bug fixes
### Pharmacy
* Fixed an issue in agent Refill Config where deleting a receiving option could remove the wrong row when multiple options were configured. [Learn more](/pharmacy/agent#refill-config)
## New features
### Agent
* **Vaccine appointment scheduling** — The pharmacy agent can now book vaccine appointments for callers using a connected [Cal.com](https://cal.com) account. Add your Cal.com API key in the new **Tools** sub-tab of agent Settings, and the agent will offer live availability and create the booking on your calendar without staff involvement. [Learn more](/pharmacy/agent#tools)
### Pharmacy
* **Agent transfer ringtone** — Voice Settings now includes an **Agent Transfer Ringtone** option. Pick one of ten alternate ringtones (matching the alternate ringtone slots on Yealink deskphones) so staff can hear the difference between an agent-transferred call and a regular inbound call. [Learn more](/pharmacy/agent#voice-settings)
* **Refill loop attempts** — Refill Config now lets you cap how many times the IVR retries filling a script before exiting the refill flow. Choose a value from 1 to 10 to keep callers from getting stuck in long refill loops. [Learn more](/pharmacy/agent#refill-config)
## Updates
### Pharmacy
* **Single end destination on IVR timeout and wrong-key flows** — IVR timeout and wrong-key-press selectors now accept exactly one terminating destination (voicemail, extension, custom destination, queue, call group, or another IVR). You can still add media playback alongside it. Key press options have a refreshed compact layout that lets the selected destination act as the trigger to change it. [Learn more](/pharmacy/ivr#configuring-general-settings)
## New features
### Agent
* **Keypad input on calls** — Callers can now enter their prescription number using the touch-tone keypad during a call. The agent reads the digits as the rx number and looks up the prescription without first asking for a name and date of birth. [Learn more](/pharmacy/agent)
## Bug fixes
### Agent
* Fixed the agent reading off the full medication list. The agent now asks which medication the caller needs help with instead of listing every prescription on file. [Learn more](/pharmacy/agent)
### Pharmacy
* Fixed an issue where new users could not be created in the Pharmacy Dashboard. [Learn more](/pharmacy/store-settings#managing-users)
## Updates
### Pharmacy
* **Optional fields for Contact Pharmacy campaigns** — When adding records to a Contact Pharmacy outbound campaign, Rx Number and Drug Name are now optional. The CSV import and manual entry forms label these fields as optional, and a row is valid as long as the patient name and phone number are filled in. [Learn more](/pharmacy/outbound-campaigns#adding-records-to-a-campaign)
### API
* **Rx Number optional for Contact Pharmacy campaign records** — The endpoint that adds records to a campaign now accepts requests without `rxNumber` when the campaign type is `contactPharmacy`. Other campaign types still require `rxNumber`. [Learn more](/api-reference/overview)
## Bug fixes
### Telecom
* Fixed click-to-call so the caller ID shown on the originator's phone displays the destination party's name and number, instead of the originator's own caller ID.
## New features
### Pharmacy
* **Audio files for special hours** — When adding or editing special hours, the Audio File field now pulls from your Audio files library, and you can create a new audio file inline without leaving the form. Previously this field used the Announcements library. [Learn more](/pharmacy/store-settings#linking-announcements-to-store-hours)
## Updates
### API
* **Holidays now reference media files** — The holidays endpoints now use `mediaFileId` instead of `announcementId` to link audio, matching the rest of the audio model. Update any integrations that reference the old field. [Learn more](/api-reference/overview)
## Bug fixes
### Pharmacy
* Fixed tool call details not expanding reliably in agent session transcripts. [Learn more](/pharmacy/agent)
* Fixed the announcement editor closing unexpectedly when interacting with the schedule date picker. [Learn more](/pharmacy/announcements)
## Bug fixes
### API
* Fixed an issue where toggling call recording during a queue call could select the wrong outbound channel.
## Updates
### API
* **Detailed validation errors** — API responses for invalid requests now include a `validationErrors` array with specific field-level details, making it easier to identify and fix malformed requests. [Learn more](/api-reference/overview)
## New features
### Pharmacy
* **Retry failed faxes** — Outbound faxes that fail to deliver now show a Retry button, so you can re-attempt the transmission without re-creating the fax. [Learn more](/pharmacy/faxes#retrying-a-failed-fax)
## Updates
### Pharmacy
* **Liberty RX outbound fax support** — Pharmacies using Liberty RX can now send outbound faxes through the VOXO platform. [Learn more](/pharmacy/pms-tools#supported-systems)
## Bug fixes
### Agent
* Fixed an issue where the pharmacy agent could prematurely switch to Spanish during a call.
## Updates
### Pharmacy
* **Multi-queue selection for URAC reporting** — The URAC tab now supports selecting multiple entry queues at once, so you can view combined compliance data across queues in a single report. All configured entry queues are selected by default. [Learn more](/pharmacy/reports)
* **Full URAC CSV export** — Exporting URAC queue stats as CSV now includes all records across all pages, not just the rows currently displayed.
## Bug fixes
### Telecom
* Fixed an issue with call parking where newly created parking spaces were not functioning correctly.
## Updates
### Pharmacy
* **Custom destinations for voicemail routing** — Prescriber voicemail and after-hours voicemail settings now support custom destinations in addition to voicemail boxes, giving you more flexibility when routing these calls. [Learn more](/pharmacy/agent)
### Connect
* **Analytics CSV export improvements** — Exporting analytics data as CSV now generates proper column headers even when the dataset is empty, and ensures consistent columns across all rows.
## Bug fixes
### Connect
* Fixed an issue where messages were not displaying in conversations.
## New features
### Pharmacy
* **Voicemail greeting media library** — When configuring a voicemail greeting, you can now select an existing recording from your media library instead of uploading or recording a new one each time. [Learn more](/pharmacy/voicemails)
* **Agent section details** — You can now add custom context descriptions to transfer destinations, prescriber voicemail, after-hours voicemail, and location settings. The agent uses these details to make more informed decisions when handling calls. [Learn more](/pharmacy/agent)
## Updates
### Pharmacy
* **Clickable IVR dashboard widget** — The IVR analytics widget on the dashboard now links directly to the IVR configuration page. [Learn more](/pharmacy/dashboard)
* **Consistent phone number formatting** — Phone numbers are now uniformly formatted throughout the application for better readability.
## Bug fixes
### Telecom
* Fixed a reliability issue with call parking where rapid park/unpark actions could display incorrect call state.
### Agent
* Fixed a compatibility issue with refill processing for pharmacies using Liberty RX.
## Updates
### Agent
* **Improved call transfers** — The pharmacy agent now resolves transfer destinations by name rather than number, improving transfer reliability and consistency. [Learn more](/pharmacy/agent)
## Bug fixes
### Agent
* Fixed the agent returning an incomplete message when a prescription status was unavailable. The agent now clearly tells the caller that the status is not available at this time.
## New features
### Pharmacy
* **Click to Call activity log** — The PMS Tools page now includes a Click to Call tab showing outbound call activity initiated by your agent or IVR, with success/fail stats and searchable event logs. [Learn more](/pharmacy/pms-tools)
* **Who is Calling activity log** — A new Who is Calling tab in PMS Tools shows caller identification lookups, so you can see when inbound callers are matched to patient records. [Learn more](/pharmacy/pms-tools)
* **Custom transfer destinations** — The pharmacy agent can now transfer calls to custom destinations in addition to extensions, queues, and call groups. [Learn more](/pharmacy/agent)
* **Knowledge base content warnings** — When saving agent settings, the system now checks the knowledge base for content that could interfere with agent behavior and displays a warning with details so you can fix issues before saving. [Learn more](/pharmacy/agent)
## Updates
### Pharmacy
* **Expanded refill configuration** — The agent's Refill Config settings now include receiving options (pickup, mail, delivery), promise time estimates, date of birth verification, and conditional refill rules to prevent early refill requests. [Learn more](/pharmacy/agent)
## Bug fixes
### Connect
* Fixed text overflowing in the Copilot panel during active calls.
* Fixed an issue with exporting data from the Call Center Agents view. [Learn more](/connect/call-centers)
## Bug fixes
### Connect
* Fixed an issue where inbound calls could fail to connect.
## New features
### Pharmacy
* **Queues reporting view** — A new reporting view for call queues is now available in the pharmacy dashboard. [Learn more](/pharmacy/reports)
* **Unified calls view** — Call logs and call recordings have been combined into a single, streamlined page. [Learn more](/pharmacy/calls)
* **Redesigned navigation** — The sidebar has been reorganized with dedicated Calls and Reports sections, plus a new Calls reporting page with filtering, stats, and CSV export.
### Connect
* **Enhanced Agents view** — The Call Center Agents view now includes live stats (inbound, outbound, talk time) and per-agent admin actions like coach, listen, and view transcription. [Learn more](/connect/call-centers)
* **Live call badges** — Call Centers tabs now display badge counts for Live Calls and On Hold.
## Updates
### Pharmacy
* **Dashboard reporting redesign** — The reporting interface has been refreshed for a cleaner, more streamlined experience. [Learn more](/pharmacy/reports)
* **URAC compliance enhancements** — Added URAC compliance improvements to the pharmacy dashboard.
## Bug fixes
### Connect
* Fixed call center stats not filtering by the selected call center(s). [Learn more](/connect/call-center-stats)
* Fixed call insights not displaying transcripts. [Learn more](/connect/analytics)
* Fixed an error when importing contacts. [Learn more](/connect/contacts)
* Fixed live calls not loading for some users.
* Fixed noise reduction not working in VOXO Meet. [Learn more](/connect/meetings)
### Pharmacy
* Fixed tables not scrolling on smaller screens.
* Fixed incorrect timezone display.
* Fixed the "Transferred" filter not working in call records.
* Fixed Call Campaigns table not refreshing when switching locations. [Learn more](/pharmacy/outbound-campaigns)
* Fixed Session Details panel layout overflow on the dashboard.
### Telecom
* Fixed prescription number formatting in the Best-Rx Refill IVR integration. [Learn more](/pharmacy/pms-tools)
Welcome to the new VOXO documentation site.
# Activity
Source: https://docs.voxo.co/connect/activity
Use the Activity section to review your call history, missed calls, voicemails, recordings, and faxes.
Activity is your inbox for all communication history in VOXO Connect. It collects every call, missed call, voicemail, recording, and fax in one place so you can review, respond to, or play back interactions without leaving the app.
## How to open Activity
Click **Activity** in the left sidebar.
## The five tabs
### Calls
Shows your complete call history, including timestamps, call durations, and the caller or callee for each entry. Use this tab to review any call you made or received.
### Missed
Lists calls you did not answer, sorted with the most recent at the top. This tab helps you quickly identify who tried to reach you.
### Voicemails
Displays voicemails left for you. Each entry shows the caller, date, and duration.
* **To listen:** Click the play button on any voicemail entry.
* **To call back:** Click the call back icon next to the entry.
* **To delete:** Click the delete icon next to the entry.
Voicemails are stored in your account and remain available until you delete them.
### Recordings
Contains recorded calls associated with your account. Click the play button to listen to a recording in the browser, or click the download icon to save it locally.
### Faxes
Shows your incoming and outgoing fax history. Each entry displays the status of the fax — **Sent**, **Received**, or **Failed** — along with the date and the fax number involved.
Failed faxes are not automatically retried. If a fax shows a Failed status, you will need to resend it manually.
## How to return a missed call
1. Click the **Missed** tab.
2. Find the call you want to return.
3. Click the call back icon next to that entry.
The app initiates a call to that number immediately.
## How to listen to a voicemail
1. Click the **Voicemails** tab.
2. Find the voicemail you want to hear.
3. Click the play button on that entry.
The voicemail plays directly in the browser. You can pause, rewind, or fast-forward using the audio controls.
# Analytics
Source: https://docs.voxo.co/connect/analytics
View historical reports on call volume, messaging activity, agent performance, and call outcomes across your organization.
Analytics provides historical reporting on calls, messages, and agent performance across your organization. Use it to review trends, identify gaps, and understand how your team is performing over time.
To open it, click **Analytics** in the left sidebar.
## My Analytics vs. All Analytics
At the top of the page, a toggle lets you switch between two views:
* **My Analytics** — shows data scoped to your own activity
* **All Analytics** — shows data across your entire organization (admin permissions required)
Users without admin access only see **My Analytics**. The available tabs also differ between the two views — for example, the IVR tab is only visible in **All Analytics** mode.
## Analytics tabs
### Calls
The **Calls** tab shows call volume trends over your selected date range, including total call counts and average call duration. Use it to spot busy periods or changes in call traffic.
### Unanswered
The **Unanswered** tab shows calls that went unanswered during the selected period. Use it to identify missed opportunities and determine whether staffing adjustments are needed.
### Messages
The **Messages** tab shows messaging volume and activity over time. Use it to track how often your team is communicating via SMS or chat.
### Agent status
The **Agent Status** tab shows how agents have been spending their time — broken down into statuses such as available, on call, and off duty — over the selected period. Use it to understand agent utilization and availability patterns.
### Call outcomes
The **Call Outcomes** tab shows a breakdown of how calls ended, including answered, sent to voicemail, transferred, and other dispositions. Use it to evaluate call handling across your team.
### IVR
The **IVR** tab shows call flow activity through your virtual receptionist menus. Use it to see which menu options callers are selecting and where they are being routed.
The IVR tab is only available in All Analytics mode and requires the appropriate admin permissions.
## Filtering data
Each tab has its own set of filters. Click the filter icon at the top-right of the page to open the filter panel for the active tab.
### Time period
All tabs include a time period selector with quick presets — **Today**, **Yesterday**, **Last week**, and **Last month** — as well as a custom date range picker.
### Calls, Unanswered, and Call Outcomes filters
* **Users and groups** — filter by specific team members or groups
* **Call outcomes** — filter by how calls ended (answered, voicemail, transferred, etc.)
* **Call direction** — filter by **Inbound**, **Outbound**, or **Both**
### Messages filters
* **Users and groups** — filter by specific team members or groups
### Agent Status filters
* **Call center** — filter by a specific call center queue
* **Users** — filter by specific agents within the selected call center
### IVR filters
* **Call tree** — select a specific virtual receptionist to analyze
* **Key presses** — filter by the menu options callers selected within that call tree
## Exporting data
Click **Export** to download the current view as a CSV. Use the dropdown arrow next to the Export button to choose a specific export format:
* **Daily / Weekly / Monthly statistics** — aggregated metrics over time
* **User statistics** — metrics broken down by user
* **Logs** — a full record of individual events
You can also schedule recurring exports from this dropdown.
## Saved filters
Click **Saved Filters** to apply, manage, or create reusable filter sets. Saved filters are scoped to the current tab and analytics view (My Analytics or All Analytics), so you can maintain separate filter sets for each.
# Call center stats
Source: https://docs.voxo.co/connect/call-center-stats
Monitor live call center activity, queue wait times, and agent availability in real time.
Call Center Stats is a live dashboard for monitoring call center activity as it happens. It shows current call counts, caller wait times, and agent availability across your queues — all updated automatically.
To open it, click **Call Center Stats** in the left sidebar.
The dashboard refreshes automatically every 5 seconds. You do not need to manually reload the page.
Call Center Stats shows what is happening right now. If you need historical data — trends, totals, or agent performance over time — use Analytics instead.
## Filtering by queue
You can focus the dashboard on a specific call center queue using the queue selector at the top of the page.
1. Click the queue selector at the top of the dashboard.
2. Choose the call center queue you want to monitor.
3. All three tabs will update to show data for that queue.
## Call center stats tabs
### Calls tab
The **Calls** tab shows live and waiting call counts across your queues. For each call you can see:
* How long the caller has been waiting
* How long active calls have been in progress
Use this tab to identify when callers are waiting too long and intervention may be needed.
### Call centers tab
The **Call Centers** tab shows a breakdown of activity by individual call center queue. Use it to compare activity across multiple queues at a glance.
### Agents tab
The **Agents** tab shows the current availability and status of each agent across your call centers. Use it to see who is available, on a call, or off duty in real time.
Agent status reflects their current state and updates automatically. If an agent's status appears incorrect, they may need to update their availability manually within the app.
# Call centers
Source: https://docs.voxo.co/connect/call-centers
View and manage your call center queues from the VOXO Connect sidebar.
If you're a member of one or more call center queues, they appear in the left sidebar under **Call Centers**. From here you can manage your availability, monitor live activity, and review call history.
## Setting your availability status
Your current status is shown at the top of the Call Centers section in the sidebar.
* **Available** (green) — you will receive calls from your queues.
* **Off Duty** (red) — you will not receive calls from your queues.
To change your status, click the status dropdown next to **Call Centers** and select **Available** or **Off Duty**.
Set yourself to Off Duty before stepping away so calls route to available agents.
## Navigating to a call center
Click any call center name in the sidebar to open its detail page. The detail page has the following tabs:
| Tab | Description |
| -------------- | -------------------------------------------------------------------------------------------------------- |
| **Live Calls** | Calls currently active in this queue. Shows caller, agent, and duration. Auto-refreshes every 5 seconds. |
| **On Hold** | Calls waiting in the queue to be answered. Shows wait time. |
| **Agents** | Agents assigned to this queue and their current status. |
| **Activity** | Recent call history for this queue. |
| **Missed** | Calls that went unanswered in this queue. |
| **Recordings** | Recorded calls from this queue. Visible to admins only. |
Click the refresh icon on the Activity, Missed, or Recordings tabs to load the latest data.
## All call centers view
Click **All Call Centers** at the bottom of the Call Centers section in the sidebar to see an overview of every queue you have access to.
# Calling
Source: https://docs.voxo.co/connect/calling
Make and receive calls directly in your browser using the VOXO Connect softphone.
VOXO Connect includes a built-in softphone for making and receiving calls directly in the browser — no desk phone or additional app required.
## Making a call
1. Click the phone icon at the top of the left sidebar.
2. A dial pad appears — type a phone number or extension.
3. Click the green call button to dial.
The phone icon is disabled if your softphone is not registered. If you see it grayed out, check your network connection and confirm your device settings are configured correctly.
## Receiving a call
When an incoming call arrives, a notification appears on screen. Click **Answer** to connect the call.
## In-call controls
Once a call is connected, the following controls are available:
* **Mute** — silences your microphone. The caller cannot hear you while muted.
* **Hold** — places the caller on hold. They hear hold music while you are away from the call.
* **Transfer** — sends the call to another number or extension. See [Transferring a call](#transferring-a-call) below for details.
* **Conference / Merge** — combines two or more calls into a single multi-party conversation.
Connect doesn't have an in-call button to start or stop recording. Recording is configured by an administrator on the phone number (inbound) or extension (outbound), and any resulting recordings show up under [Activity → Recordings](/connect/activity#recordings).
## Transferring a call
VOXO Connect supports two types of call transfers:
* **Blind transfer** — immediately sends the caller to another number or extension without announcing them first.
* **Attended transfer** — lets you speak to the recipient before connecting the caller, so you can introduce the caller or confirm availability.
**To perform a blind transfer:**
1. While on an active call, click **Transfer**.
2. Select **Blind transfer**.
3. Enter the number or extension you want to transfer to.
4. Click **Transfer** to complete.
**To perform an attended transfer:**
1. While on an active call, click **Transfer**.
2. Select **Attended transfer**.
3. Enter the number or extension of the recipient and dial.
4. Speak with the recipient to introduce the caller.
5. Click **Complete transfer** to connect the caller to the recipient.
The attended transfer and merge windows each have a keypad button that opens a dial pad. Use it to send touch-tone digits to the party you dialed — to pick an option in an interpreter service's menu, for example, or to enter an access code — before you complete the transfer or merge.
## Post-call summary
After a call ends, a post-call summary may appear with a transcript and call insights.
The summary includes:
* **Transcript** — a full text record of the conversation.
* **Call highlights** — key moments automatically identified from the call.
* **Tracked topics** — subjects detected based on your configured tracking settings.
Post-call summaries and the live Copilot panel require call transcription to be enabled for your account. This is an administrator setting — contact your VOXO administrator if you do not see these features.
## Copilot
When transcription is enabled for your account, a **Copilot** panel is available during active calls. It provides real-time AI analysis with four tabs: **Transcript**, **Questions**, **Sentiment**, and **Intent**. Access it from the in-call controls while a call is connected.
# Channels
Source: https://docs.voxo.co/connect/channels
Use channels to organize group conversations with your team by topic or team.
Channels are group conversations that let your team communicate in a shared space, organized by topic or team. They work similarly to chat rooms — anyone with access can read and post messages.
Channels are listed in the left sidebar under **Channels**. Click the arrow next to the heading to expand the list.
## Browsing and joining a channel
1. Click the **...** options menu next to **Channels** in the sidebar.
2. Select **Browse channels** to see the channels available in your organization.
3. Click a channel to open it and preview its contents.
4. Click **Join** to become a member of the channel.
## Creating a channel
1. Click the **...** options menu next to **Channels** in the sidebar.
2. Select **Create channel**.
3. Enter a name for the channel.
4. Choose a visibility setting:
* **Public** — anyone in your organization can find and join this channel.
* **Private** — only people you invite can access this channel.
5. Add members you want to include.
6. Click **Create**.
## Adding members to a channel
To add teammates to an existing channel:
1. Open the channel.
2. Click the members icon in the top-right corner.
3. Search for a teammate by name.
4. Click **Add** to invite them to the channel.
You can only add members to a private channel if you are already a member of it.
## Unread indicators
A badge next to a channel name shows how many unread messages you have in that channel. If there are more than 9 unread messages, the badge displays **9+**.
## Typing indicators
When someone in a channel is typing a message, a typing indicator appears at the bottom of the conversation view. This updates in real time and disappears once the message is sent or the person stops typing.
# Contacts
Source: https://docs.voxo.co/connect/contacts
Manage your company directory, personal contacts, and contact groups in VOXO Connect.
The Contacts section gives you access to your organization's full user directory alongside personal contacts and groups you manage yourself. You can search, call, or message anyone in your directory directly from this section.
## How to open Contacts
Click **Contacts** in the left sidebar.
## The four tabs
### Recents
Shows the people you have most recently called or messaged. This tab gives you quick access to your frequent contacts without searching.
### Directory
Lists every user in your organization. You can search by name or extension to find a specific person. Click any entry to view their profile, call them, or start a message.
### Groups
Displays contact groups — collections of contacts you have organized together. Use groups to message or reach multiple people at once.
### Personal
Contains contacts you have added manually that are not part of the company directory. These are visible only to you.
## How to add a personal contact
1. Click the **Personal** tab.
2. Click **Add contact**.
3. Fill in the contact's name, phone number, and email address.
4. Click **Save**.
Personal contacts are private to your account. Other users in your organization cannot see them.
## How to create a group
1. Click the **Groups** tab.
2. Click **New group**.
3. Enter a name for the group.
4. Add the contacts you want to include.
5. Click **Save**.
## How to import contacts via CSV
If you have a list of contacts in a spreadsheet, you can import them all at once using a CSV file.
1. Click the import icon in the Contacts section.
2. Click **Download example CSV** to get the template file.
3. Open the template and fill in your contacts following the column format provided.
4. Return to Contacts and upload your completed CSV file.
Use the example CSV template as a guide. Contacts with missing required fields may be skipped during import.
## How to export contacts
Click the export icon in the Contacts section. Your contacts download as a CSV file that you can open in any spreadsheet application.
# Direct messages
Source: https://docs.voxo.co/connect/direct-messages
Send private messages to one or more colleagues using direct messages in VOXO Connect.
Direct messages (DMs) are private conversations between you and one or more colleagues. Unlike channels, direct messages are not visible to the rest of your organization.
Direct messages appear in the left sidebar under **Direct Messages**.
## Starting a new direct message
1. Click the **+** icon next to **Direct Messages** in the sidebar.
2. Search for a colleague by name.
3. Select their name from the results.
4. Click **Open** to start the conversation.
## Creating a group message
Group messages work the same way as one-on-one direct messages, but include multiple participants.
1. Click the **+** icon next to **Direct Messages** in the sidebar.
2. Search for and select each person you want to include.
3. Click **Open** to start the group conversation.
Group DMs display a combined avatar made up of the participants' profile pictures.
## Messaging yourself
You can send a message to yourself to save notes, links, or reminders. Your own name appears in the DM list as **Personal notes**.
Personal notes are only visible to you and are a useful place to collect information before sharing it with your team.
## Muting a conversation
To stop receiving notifications from a specific conversation without leaving it:
1. Right-click the conversation in the sidebar.
2. Select **Mute**.
To unmute, right-click the conversation again and select **Unmute**.
## Unread badges
The number of unread messages in a conversation appears as a badge next to the conversation name in the sidebar. The badge clears once you open and view the conversation.
## Draft indicators
If you have started typing a message but have not sent it, a draft indicator appears next to that conversation in the sidebar. This helps you identify conversations where you have an unsent message waiting.
# Fax
Source: https://docs.voxo.co/connect/fax
Send and receive faxes from VOXO Connect without a physical fax machine.
VOXO Connect lets you send faxes directly from the app. You don't need a physical fax machine or a separate fax service.
## Sending a fax
1. Click the fax/printer icon at the top of the left sidebar.
2. In the dialog that opens, enter the recipient's fax number.
3. Upload the PDF you want to fax. Only PDF files are supported.
4. Click **Send**.
## Checking fax status
After sending, you can track the status of your fax:
1. Go to **Activity** in the left sidebar.
2. Click the **Faxes** tab.
Each fax shows one of the following statuses:
* **Sent** — the fax was delivered successfully.
* **Received** — an incoming fax was received.
* **Failed** — the fax was not delivered.
If a fax fails, try resending it or verify that you entered the correct fax number for the recipient.
## Receiving faxes
Incoming faxes appear automatically in **Activity → Faxes**. Click a received fax to view or download it.
# VOXO Connect
Source: https://docs.voxo.co/connect/index
Learn what VOXO Connect is and how to log in and navigate the app.
VOXO Connect is a browser-based unified communications app that works alongside your VOXO phone system. It brings voice, video, messaging, and fax into a single interface you can access from any browser — no installation required.
## How to log in
1. Go to [connect.voxo.co](https://connect.voxo.co).
2. Enter your VOXO email address and password.
3. Click **Sign In**.
If your organization uses Google or Microsoft single sign-on (SSO), click the SSO button on the login screen instead of entering your email and password. You are taken to your provider to sign in and returned to VOXO Connect in the same browser tab.
If VOXO Connect loads to a blank page, do a hard refresh to reload it (Ctrl + F5 on Windows, Cmd + Shift + R on Mac).
## Sidebar overview
The left sidebar is your main navigation. Here is what each item does.
### Top action icons
These icons appear at the top of the sidebar and let you start a new interaction quickly.
| Icon | Action |
| ----------- | -------------------------- |
| Phone | Make a call |
| Video | Start a meeting |
| Chat | Start a new direct message |
| Fax/printer | Send a fax |
### Navigation items
| Sidebar item | What it does |
| --------------------- | ----------------------------------------------------------- |
| **Activity** | Your inbox for all calls, voicemails, recordings, and faxes |
| **Contacts** | Your company directory and personal contacts |
| **Your Department** | Monitor your team's live and parked calls in real time |
| **Analytics** | View historical call and messaging reports |
| **Call Center Stats** | Live dashboard showing real-time call center metrics |
| **Channels** | Group conversations with your team |
| **Direct Messages** | Private 1:1 and group conversations |
| **Call Centers** | Your call center queues and availability status |
### Your account
At the bottom of the sidebar, your name and avatar open your account settings, where you can update your profile, configure devices, and manage preferences.
# Meetings
Source: https://docs.voxo.co/connect/meetings
Start and join video meetings directly from VOXO Connect.
VOXO Connect lets you start and join video meetings directly from the app. No external conferencing tool is required.
## Starting a meeting
1. Click the video icon at the top of the left sidebar.
2. A meeting is created and you enter the meeting room immediately.
3. Share the meeting link with participants so they can join.
## Joining a meeting
* If you've been invited to a meeting, click the link in the invitation.
* A pre-join screen appears — check your camera and microphone before entering.
* Click **Join** to enter the room.
## In-meeting controls
Once you're in a meeting, the control bar gives you the following options:
* **Camera** — turn your video on or off.
* **Microphone** — mute or unmute yourself.
* **Screen share** — share your entire screen or a specific window or tab.
* **Reactions** — send emoji reactions visible to all participants.
* **Leave** — exit the meeting.
## Layout options
You can change how participants are displayed during a meeting:
* **Grid view** — shows all participants in equal-sized tiles. This is the default.
* **Active speaker view** — highlights the person currently speaking in a larger tile.
Switch between views using the layout button in the top bar.
# Calling
Source: https://docs.voxo.co/connect/mobile/calling
Make and receive calls from the VOXO Connect mobile app using your business phone number.
VOXO Connect uses VoIP to route calls over your internet connection, so you can make and receive business calls from your mobile device without using your personal phone number.
## Making a call
1. Tap the **Keypad** tab at the bottom of the screen.
2. Enter a phone number or extension using the dial pad.
3. Tap the green call button to dial.
You can also start a call from a contact. Open the Contacts tab, tap a contact, then tap their phone number.
## Receiving a call
Incoming calls appear as a native iOS or Android call notification — even when the app is in the background or your screen is locked. Tap **Answer** to connect the call or **Decline** to send it to voicemail.
To receive calls reliably in the background, allow VOXO Connect to send you notifications when prompted during setup. If you miss this prompt, you can enable it in your device's Settings under Notifications.
## In-call controls
During a call, the following controls are available:
* **Mute** — silences your microphone. The other party cannot hear you while muted.
* **Hold** — places the caller on hold. They hear hold music while you are away.
* **Speaker** — switches audio output to your device's loudspeaker.
* **Transfer** — sends the call to another number or extension.
* **Add Call** — dials a second person so you can merge them into the current call.
If the call is being recorded, a recording indicator appears on screen.
## Transferring a call
**To transfer a call:**
1. While on an active call, tap **Transfer**.
2. Enter the number or extension to transfer to.
3. Choose **Blind transfer** to connect immediately, or **Attended transfer** to speak with the recipient first.
4. For an attended transfer, tap **Complete transfer** after introducing the caller.
## Adding and merging calls
You can add a second person to an active call and merge both calls together.
1. While on an active call, tap **Add Call**.
2. Search for a contact or enter a number, then select the person to dial.
3. The app places your first call on hold and dials the second person.
4. Once connected, tap **Merge** to combine both calls into a conference.
## Conference calls
When two or more calls have been merged, the in-call screen switches to conference mode. A **Conference Call** label appears and the controls update:
* **Participants** — view everyone in the conference and manage individual participants.
* **Hold** — place the entire conference on hold.
* **Add** — dial another person to add to the conference.
## Background calling
Calls continue when you switch to another app or lock your screen. The call controls remain accessible from the notification tray or lock screen.
# Contacts
Source: https://docs.voxo.co/connect/mobile/contacts
Browse your company directory, contact groups, and personal contacts from the Contacts tab.
The Contacts tab organizes your contacts into three sections: Directory, Groups, and Personal.
## Directory
The Directory tab shows every user in your organization. Tap a contact to view their profile, then:
* **Call** — tap the phone number to place a call.
* **Message** — tap the message icon to open a direct message conversation.
Use the search bar at the top to filter the directory by name or extension.
## Groups
The Groups tab shows contact groups configured in your account. Tap a group to see its members.
## Personal
The Personal tab shows contacts you have added yourself. These are private to your account and are not shared with your organization.
**To add a personal contact:**
1. Tap the **+** button in the top-right corner.
2. Enter the contact's name and phone number.
3. Tap **Save**.
**To edit or delete a personal contact:**
1. Tap the contact to open their profile.
2. Tap **Edit** to update their details, or **Delete** to remove them.
# Home
Source: https://docs.voxo.co/connect/mobile/home
Use the Home tab to access your channels, direct messages, call centers, and search for people or conversations.
The Home tab is the main hub of the app. It shows your active channels, direct message conversations, and call center queues in a single scrollable view.
## Conversations list
The Home tab lists every conversation you are a member of, sorted by most recent activity. Unread conversations appear with a bold name and an unread count badge.
Tap any conversation to open it.
## Search
Tap the search icon at the top of the screen to search across channels, users, and contacts. Search results update as you type.
## Call center sections
If you are assigned to one or more call center queues, they appear in a dedicated section on the Home tab. Each queue shows your current availability status.
Tap a queue to open it and manage your status.
## Do Not Disturb and availability
Tap your profile avatar or the availability indicator to change your status:
* **Available** — you are ready to receive calls and messages.
* **Do Not Disturb (DND)** — incoming calls are silenced and routed according to your call forwarding rules.
DND affects incoming calls only. You can still make outbound calls and send messages while DND is on.
# Recents
Source: https://docs.voxo.co/connect/mobile/inbox
Review your call history, missed calls, voicemails, recordings, and faxes from the Recents tab.
The Recents tab organizes your communication history into five tabs: Calls, Missed, Voicemails, Recordings, and Faxes.
## Calls
The Calls tab shows your full call history — inbound and outbound — with the caller name or number, direction, and timestamp.
Tap any entry to call that number back.
## Missed
The Missed tab shows only calls you did not answer.
Tap any entry to return the call immediately.
## Voicemails
The Voicemails tab lists all voicemails left for you. Each entry shows the caller, the date, and the message duration.
* **Listen** — tap the play button to listen to the voicemail.
* **Call back** — tap the caller name or number to call back.
* **Delete** — swipe the entry to delete it.
Voicemails are shared with your extension. A voicemail you delete in the mobile app is also removed from the web app and desk phone.
## Recordings
The Recordings tab shows calls that were recorded. Tap the play button on any entry to listen.
## Faxes
The Faxes tab shows faxes received on your fax number. Tap any entry to view the fax document.
# VOXO Connect mobile
Source: https://docs.voxo.co/connect/mobile/index
Download the VOXO Connect mobile app, log in, and navigate the main sections.
VOXO Connect is available as a mobile app for iOS and Android, giving you access to calling, messaging, contacts, and your communication history from anywhere.
## Download the app
* **iOS** — search "VOXO Connect" in the App Store, or tap the link your administrator shares with you.
* **Android** — search "VOXO Connect" in the Google Play Store, or tap the link your administrator shares with you.
## Log in
1. Open the app and enter your work email address.
2. Choose your login method:
* **Password** — enter your password and tap **Sign in**.
* **Sign in with Microsoft** — use your Microsoft 365 account.
* **Sign in with Google** — use your Google Workspace account.
If you do not know your login credentials, contact your administrator. You can also tap **Forgot password** to receive a reset link by email.
## App navigation
The app is organized into four tabs at the bottom of the screen:
| Tab | Description |
| ------------ | ---------------------------------------------------------------------------- |
| **Home** | Your conversations hub — channels, direct messages, and call center sections |
| **Recents** | Call history, missed calls, voicemails, recordings, and faxes |
| **Contacts** | Your company directory, contact groups, and personal contacts |
| **Keypad** | Dial pad for making calls |
# Messaging
Source: https://docs.voxo.co/connect/mobile/messaging
Send internal team messages and SMS texts from the VOXO Connect mobile app.
VOXO Connect supports two types of messaging: internal messaging for communicating with teammates, and text messaging (SMS/MMS) for sending messages to external phone numbers.
## Internal messaging
Internal messages are delivered through your organization's messaging system. You can send messages to individual teammates or in channels.
### Start a conversation
1. From the Home tab, tap the compose icon in the top-right corner.
2. Search for a teammate's name or a channel.
3. Tap the result to open the conversation.
4. Type your message and tap **Send**.
### Channels
Channels are shared group conversations organized by topic or team. Your Home tab lists all channels you belong to. Tap any channel to open it.
### Compose with rich text
The message editor supports formatting and attachments:
* **Bold, italic, underline, strikethrough** — highlight text and use the formatting toolbar.
* **Mentions** — type `@` followed by a teammate's name to notify them.
* **Links** — paste a URL and it renders as a clickable link.
* **Code** — wrap text in backticks for inline code formatting.
* **GIFs** — tap the GIF button to search and insert an animated GIF.
* **Attachments** — tap the attachment icon to share a file from your device.
### Typing indicators
When someone is composing a reply, a typing indicator appears at the bottom of the conversation.
***
## Text messaging (SMS)
Text messaging lets you send and receive SMS and MMS messages using your provisioned business phone number. Messages go to and from external mobile numbers, not internal teammates.
Text messaging requires a DID (direct inward dial) phone number assigned to your account. If you do not see the text messaging option, contact your administrator. You can also select your outbound number in **Settings → Calls**.
### Start an SMS conversation
1. From the Home tab, tap the compose icon.
2. Enter a mobile phone number in the recipient field.
3. Type your message and tap **Send**.
### View your text conversations
All SMS conversations appear in the Home tab alongside your internal messages. Tap a conversation to open the thread.
### Send MMS
To attach an image or file to an SMS, tap the attachment icon before sending.
# Settings
Source: https://docs.voxo.co/connect/mobile/settings
Configure your profile, call preferences, notifications, and account security in the VOXO Connect mobile app.
Access your settings by tapping your profile avatar or navigating to **Preferences** from the menu. Settings are organized into four tabs: Profile, Calls, Notifications, and Security.
## Profile
The Profile tab shows your account information.
* **Display name** — your name as it appears to teammates.
* **Avatar** — tap your photo to upload a new profile picture from your camera roll.
* **Email** — your login email address (read-only; contact your administrator to change it).
## Calls
The Calls tab controls how incoming calls are handled and where voicemails are delivered.
### Incoming calls
**Ignore all calls** — toggle this on to send all incoming calls directly to voicemail without ringing your device. This is equivalent to Do Not Disturb.
### Call forwarding
**Forward all calls** — check this box to redirect all incoming calls to another number.
**To enable call forwarding:**
1. Check **Forward all calls**.
2. Enter the phone number to forward calls to.
3. Tap **Save changes**.
To stop forwarding, uncheck **Forward all calls** and tap **Save changes**.
### Voicemail
* **PIN** — the numeric PIN used to access your voicemail by phone.
* **Email** — the email address where voicemail notifications are sent.
## Notifications
The Notifications tab lets you manage how and when the app alerts you.
* **Incoming calls** — enable or disable ringing for incoming calls.
* **Messages** — control push notifications for new messages.
* **Missed calls** — receive a notification when you miss a call.
If notifications are not arriving:
* Confirm **Incoming calls** (above) is on, and that **Ignore all calls** on the Calls tab is off — when it's on, calls go straight to voicemail without ringing.
* Confirm VOXO Connect has notification permission in your device's system settings.
* Update the app to the latest version from the App Store or Google Play.
* Sign out and sign back in to refresh your session.
## Security
The Security tab manages your account password and two-factor authentication (2FA).
### Change your password
1. Tap **Change password**.
2. Enter your current password, then enter and confirm your new password.
3. Tap **Save**.
### Set up two-factor authentication
Two-factor authentication adds a second verification step when you log in. Your administrator may require it for your account.
**To enable 2FA:**
1. Tap **Set up two-factor authentication**.
2. Choose your verification method: authenticator app, SMS, or email.
3. Follow the on-screen instructions to link your method and confirm with a verification code.
**To disable 2FA:**
1. Tap **Manage two-factor authentication**.
2. Tap **Remove** and confirm with a verification code.
Disabling 2FA reduces the security of your account. Only remove it if your administrator permits it.
# Settings
Source: https://docs.voxo.co/connect/settings
Configure notifications, sounds, call forwarding, hardware, keyboard shortcuts, and security preferences in VOXO Connect.
To open your settings, click your name or avatar at the bottom-left of the sidebar. A panel appears with quick toggles and links to your full settings.
## Ignore all calls
The **Ignore all calls** toggle in the user panel enables Do Not Disturb mode. When active, incoming calls are not presented to your softphone — callers are routed based on your organization's call handling rules.
## Disable softphone
The **Disable softphone** toggle in the user panel unregisters your softphone so you no longer receive calls in VOXO Connect. Use this if you want to take calls on a different device. The toggle is disabled if no input device is detected.
When the Connect softphone is unregistered — either because you toggled it off or because no microphone is detected on your computer — the status bar at the bottom of the page shows **Phone disabled**. This only affects whether calls ring inside Connect on this computer; calls still ring on any other device tied to your extension, such as your desk phone or the VOXO mobile app. If you only take calls on a desk phone, it's normal to see **Phone disabled** in Connect and you can ignore it.
## Settings modal
Click **Settings** in the user panel to open the full settings modal. It contains six tabs.
### Notifications
Configure which events trigger desktop notifications:
* **Incoming calls** — receive a notification when a call arrives
* **Chat messages** — receive a notification for new chat messages; choose between notifications for all messages or only direct mentions
* **SMS** — receive a notification for incoming SMS messages
* **Post call summary** — receive a notification when a post-call summary is ready
The **Sounds & volume** section below the notification toggles lets you choose a ringtone and notification sound for incoming calls, chat messages, and SMS, and adjust the volume for each independently.
### Call forwarding
Call forwarding routes your incoming calls to another number when you are unavailable.
To enable call forwarding:
1. Enable the call forwarding toggle.
2. Enter the number you want calls forwarded to.
3. Click **Save**.
### Theme
Choose between **Dark** and **Light** color modes. Your preference is saved to your account and applies across all sessions.
### Hardware
Select the microphone, speaker, and camera you want VOXO Connect to use for calls and meetings. If your organization has a busylight integration enabled, a toggle to activate it also appears here.
### Hot keys
VOXO Connect supports keyboard shortcuts for common softphone actions. All shortcuts use `Alt` on Windows or `⌥` on Mac.
| Shortcut | Action |
| --------------------------------- | -------------------------------------- |
| `Alt + D` | Open the dial pad |
| `Alt + M` | Mute / unmute during a call |
| `Alt + T` | Open the transfer dialog during a call |
| `Alt + B` | Hang up the current call |
| `Alt + 0–9`, `Alt + *`, `Alt + #` | Send DTMF tones during a call |
### Security
#### Changing your password
1. Enter a new password in the **Password** field. It must be at least 8 characters.
2. Click **Save changes**.
#### Multi-factor authentication
The Security tab also lets you configure MFA for your account. Two methods are supported:
* **Authenticator app** — use any TOTP-compatible authenticator app
* **SMS / text message** — receive one-time codes via text
To set up an MFA method, click **Add** next to the method you want to use and follow the prompts. Once at least one method is set up, use the **Preferred 2FA method** dropdown to choose which one is used by default.
If your organization requires MFA, the disable button is unavailable and you cannot remove your preferred method.
# Your department
Source: https://docs.voxo.co/connect/your-department
Monitor your team's live call activity, parked calls, and user availability in real time.
Your Department gives you a real-time view of call activity within your assigned department. Use it to see who is on a call, which calls are waiting to be picked up, and whether your teammates are available.
To open it, click **Your Department** in the left sidebar.
This view only shows activity within your assigned department. You will not see calls or users from other departments.
## Live calls tab
The **Live Calls** tab shows all calls currently active in your department. For each call you can see:
* Caller information (name or number)
* How long the call has been active
* The agent handling the call
## Parked calls tab
The **Parked Calls** tab shows calls that have been placed on a park slot and are waiting to be picked up. Each entry displays how long the call has been parked.
### Pick up a parked call
1. Click the **Parked Calls** tab.
2. Find the call you want to pick up.
3. Click the pickup button next to that call entry.
Your phone will ring and you will be connected to the caller.
Pick up parked calls promptly — the longer a caller waits, the worse the experience. Use the park duration column to prioritize.
## Users tab
The **Users** tab lists everyone in your department along with their current availability status. Use this to quickly check whether a teammate is free before transferring a call to them.
# FAQ
Source: https://docs.voxo.co/faq/index
Answers to the most common questions about VOXO products and features.
Both route an incoming call to multiple users, but they work differently:
* **Call group** — A simple list of extensions that ring together, or in sequence. Best for small teams where anyone can pick up.
* **Call queue** — A managed flow with hold times, position announcements, and reporting. Best when you need to track wait times, distribute calls fairly, or run a call center.
You can see what's tied to a queue or group by clicking **Show Relations** before making changes.
**Contact support** if you need help choosing a routing strategy for your queue or changing how calls distribute across agents.
Use Time of Days to add a date-specific entry on top of your regular hours. The same mechanism handles a one-time closure, a holiday, or a one-day shift in your open hours.
Holidays are not preset — Memorial Day, Thanksgiving, and the like need to be added the same way as any other one-day change. Add a separate date-specific entry for each holiday you want covered.
1. If you want callers to hear a custom recording during the closure, record or upload it in [Media Files](/omnia/admin/media-files) first so it's ready to attach when you save the entry.
2. Open [Time of Days](/omnia/admin/time-of-days) in your admin settings.
3. In the date-specific section of the rule, add a new entry with the date plus the start and end time.
4. Point the entry at the destination you want during that window — an IVR with a closure greeting, a voicemail box, or your normal Open destination if you're staying open with different hours.
5. If a media file is required and you don't need a custom prompt, select **Beep**.
6. Save. The rule only applies on the selected date — you don't need to revert it later — and normal hours resume automatically when the date passes.
If you're routing the closure to a voicemail box, open the box in [Voicemails](/omnia/admin/voicemails) and confirm an **Email** address is set on the mailbox so you're notified when callers leave a message during the closure.
To play a "we will be closed" notice to callers in the days leading up to the closure, pharmacy customers can schedule an [announcement](/pharmacy/announcements) with a start date before the closure and an end date on the closure day. The announcement plays inside your IVR until the end date and then stops automatically. An announcement plays a message inside an IVR but doesn't change where calls route on the closure day — you still need the date-specific entry above for the actual closure.
**If a holiday message is still playing after the date passed**, it's coming from one of two places, and neither always clears on its own:
* **A scheduled [announcement](/pharmacy/announcements) with no end date** — it stays active until you turn it off. Open [Announcements](/pharmacy/announcements), find the holiday message, and toggle it **Inactive** (or delete it). Setting an end date when you create the announcement avoids this next time.
* **A manual "closed" or holiday override on the routing** — this does not expire on its own and keeps playing until it's removed. Open [Time of Days](/omnia/admin/time-of-days), find the rule, open its **Manual Override** tab, uncheck **Enable time of day override**, and save.
If you don't see the message in the Announcements list, it's most likely a routing override rather than an announcement.
**Contact support** if you need a same-day change made urgently and can't wait for the schedule to save, if a Time of Days rule is saved but calls aren't following it, or to mark a holiday that falls on the same Monday each year (Memorial Day, Labor Day) as recurring annually so you don't need to re-add it next year.
Most reporting lives in the Omnia admin portal at `app.voxo.co` — sign in and open the **Reports** tab. A few reports answer the most common questions:
* **How many calls each user answered, with total and average talk time** — open **Reports → [Call Statistics → Users](/omnia/admin/call-statistics-user)** and filter by branch or by specific users. The table includes Inbound Answered, Total Answered, Total Talk Time, and Avg Talk Time Per Call, and defaults to today's date.
* **A detailed list of individual calls, including who answered each one** — open **Reports → [Call Summary → Call Records](/omnia/admin/call-records)**, then filter by date range, direction (inbound or outbound), branch, and disposition (such as Answered). You can export the filtered results to CSV.
* **The same report emailed on a schedule** — after applying your filters, choose **Schedule Report** from the **Export** dropdown to have it sent Daily, Weekly, or Monthly to one or more recipients. Manage existing schedules in [Scheduled Reports](/omnia/admin/scheduled-reports).
The Reports tab is permission-based. If you don't see it after signing in — even as an account owner — your user needs Admin Portal access enabled, which is separate from your pharmacy or user role. Ask your account admin or VOXO support to turn it on, then refresh the page.
Pharmacy customers also have call, queue, and IVR reports in the pharmacy portal under [Reports](/pharmacy/reports), and Connect customers can find call and messaging analytics in [Analytics](/connect/analytics).
**Contact support** if a report gives an error, shows no data when you expect some, or if you need a custom export.
Where you record a greeting depends on whether it's your **personal** voicemail or a **system** greeting (IVR menu, announcement, or shared voicemail box).
**Your personal voicemail greeting (softphone)** — record it yourself from [Settings → Voicemail](/omnia/user-guide/settings#voicemail) in the Omnia web softphone:
1. Click **Settings** at the top right, then open the **Voicemail** section.
2. Under **Voicemail Greetings**, pick the greeting you want to set: **Name**, **Unavailable**, **Busy**, or **Out of Office**.
3. Press and hold **Record** to record from your browser, or use **Upload File** to upload a pre-recorded clip.
4. Click **Save Changes**.
If you don't see the Voicemail section, the option is permission-gated — ask your VOXO admin to enable it on your account.
**System greetings (IVR, announcement, shared voicemail box)** — these are stored in your media library and assigned by an admin.
1. Go to [Media Files](/omnia/admin/media-files) and choose **Add new**.
2. Give the file a descriptive name.
3. Click the microphone icon to record from your browser, or enable **Text to Speech** to generate one from typed text.
4. Save, then assign the file wherever you need it (a voicemail box, an [IVR](/pharmacy/ivr) prompt, or an [announcement](/pharmacy/announcements)).
**Contact support** if you need to upload a pre-recorded file and it's not in a supported audio format.
Connect's SMS messaging supports images and files (MMS) through the attach button — pasting from the clipboard isn't a supported way to add an image to an outbound message.
* **Connect web** (`connect.voxo.co`) — Open the conversation, click the attach button next to the message field, and choose the file from your device. JPG, PNG, and PDF are all supported.
* **VOXO mobile app** — In the conversation, tap the attachment icon and pick a file or photo from your device. See [Mobile messaging](/connect/mobile/messaging).
If the attach button doesn't open a file picker on the web, sign out of Connect and sign back in. On mobile, also confirm you're on the latest version of the app.
**Contact support** if the attach button still doesn't open a file picker after a fresh sign-in, or if a sent message with an attachment never reaches the recipient.
Forwarding is a self-serve setting in three places, depending on where you log in:
* **Omnia (web)** — Sign in at `app.voxo.co`, open your profile [Settings](/omnia/user-guide/settings#call-forwarding), then check or uncheck **Enable forwarding** and click **Save**.
* **Connect (web)** — Open [Settings → Call forwarding](/connect/settings#call-forwarding) and toggle the switch, then click **Save**.
* **Connect mobile app** — Tap your avatar → **Preferences → Calls**, then check or uncheck [**Forward all calls**](/connect/mobile/settings#call-forwarding) and tap **Save changes**.
If forwarding was set up on the extension itself rather than on a user's profile, an admin can clear it. Open [Extensions](/omnia/admin/extensions), edit the extension, and uncheck **Enable forwarding all calls** under **Never Miss A Call Settings**, then save.
**Contact support** if forwarding is unchecked in all of the places above and inbound calls are still being redirected.
VOXO offers two ways to deliver a one-time message to patients, depending on whether you want to reach the patients who call you or call out to a patient list:
* **Inbound — IVR announcement.** Create an [announcement](/pharmacy/announcements) that plays inside your IVR menu. Patients who call your pharmacy hear the message before reaching the menu, and you can schedule it to start and end on specific dates.
* **Outbound — call campaign.** Create an [outbound campaign](/pharmacy/outbound-campaigns) using the **Contact Pharmacy** type. Upload a list of patients (name and phone number are required; Rx number and drug name are optional for this type) and the system places automated calls that play your message and let patients press a key to transfer to staff.
Bulk SMS broadcasts to a patient list are not a built-in VOXO feature — Connect SMS is one-to-one. If your pharmacy management system sends SMS messages to patients on its own, set those up in your PMS rather than in VOXO.
**Contact support** if you'd like help recording the announcement audio or setting up your first outbound campaign.
VOXO has two ways to keep an eye on agent activity:
* **Live monitoring during an active call** — In the [Queue Manager](/omnia/user-guide/call-queues-queue-manager), open **Active Calls**. **Listen** silently monitors a call without either party hearing you. **Coach** lets you speak to the agent while the caller cannot hear you.
* **After-the-fact activity** — Open **Reports → [User Logs](/omnia/admin/user-logs)** to see activity across the extensions in a queue, with filters for date range, user, and event.
Both Queue Manager and User Logs are gated by role permissions. If you don't see Queue Manager on a queue, or User Logs doesn't appear in your Reports menu, ask your VOXO admin to grant access on your extension.
**Contact support** if access has been granted but Listen or Coach still aren't visible on an active call, or if User Logs loads with no data for a period you know had activity.
Yealink phones store WiFi credentials locally on the device. There is no way to push credentials to phones from a backend system — each phone must be reconnected manually after a power event drops the connection.
To reconnect a Yealink phone after power is restored:
1. Press **Menu** on the phone.
2. Go to **Settings → Basic Settings → Wi-Fi**.
3. Select **Available Networks**.
4. Choose your network and enter the WiFi password.
**If the phone still shows "No Service" after power returns**, follow the same path — **Menu → Settings → Basic Settings → Wi-Fi → Available Networks** — and re-enter the password.
**Tip:** Unplugging the phone for about 10 seconds before re-entering credentials gives it a clean restart and can help it reconnect more reliably after a power event.
Keeping the WiFi password accessible at the front desk means staff can reconnect phones quickly when power is restored without waiting for IT support.
**Contact support** if a phone continues to show "No Service" after re-entering correct credentials.
You can send a fax two ways:
* **Email to fax** — Email the document as a PDF attachment to `send@voxofax.com` with the 10-digit destination fax number in the subject line. This path accepts PDF attachments only.
* **Web portal** — Sign in at `app.voxo.co` and use the fax interface.
Sent and received faxes are listed under [My Activity](/omnia/user-guide/my-activity).
**Contact support** if your fax number doesn't appear in your account, or if an outbound fax shows as sent but never arrived at the destination.
Most connection and call-quality problems can be fixed locally:
* **Power-cycle the phone** — Unplug it for about 15 seconds, then plug it back in.
* **On your router, enable Multicast and disable SIP ALG** — these two settings cause most VoIP registration and call-quality problems.
For full step-by-step diagnostics, including one-way audio and dropped calls, see [Troubleshooting](/omnia/troubleshooting).
**Contact support** if issues persist after a restart and router-setting check, or if multiple extensions are affected at the same time.
Two things commonly block outbound SMS:
* **Newly registered numbers** can take 1-2 business days to finish provisioning before the first message sends.
* **The sending extension must be SMS-enabled** — not every extension has SMS capability turned on.
Your 10DLC brand and campaigns are managed under [10DLC Messaging](/omnia/admin/10dlc-messaging).
**Contact support** if you're sending from an SMS-enabled extension and still get an error after 2 business days.
No. VOXO desk phones and softphones work on a standard dynamic (DHCP) internet connection — you don't need a static IP for normal use. When your IP address changes, the phone re-registers on its own.
If your firewall only allows traffic from a fixed IP, your IT team still needs to allow VOXO's network ranges, since the phone's own IP can change.
**Contact support** if a phone repeatedly goes offline and back online while your internet connection itself is stable, so we can check whether the IP is changing more than expected.
If your account handles protected health information, VOXO signs you out after a period of inactivity. This is a HIPAA compliance feature working as designed to protect patient data. Sign back in to keep working — there is no setting to leave the session open indefinitely on a healthcare account.
**Contact support** if you're being logged out within seconds of signing in, or while you're actively on a call, since that points to something other than the standard inactivity timeout.
VOXO has two web addresses that do different things. If you can't find call recordings or an admin page, you're most likely on the wrong one.
* **`app.voxo.co`** is the admin and manager portal — call recordings, call records, extension management, and full account settings.
* **`connect.voxo.co`** is the softphone for end users — calls, voicemail, and basic call history. It does not include admin functions.
For call recordings and account configuration, go to `app.voxo.co`. Many notification emails and onboarding links point to `connect.voxo.co`, so admins sometimes land there first.
**Contact support** if you're signed in at `app.voxo.co` and still can't see call recordings, since that points to a role permission on your user account.
VOXO sends SMS one-to-one (one message to one recipient at a time), not as a bulk-blast tool. For higher-volume texting, the ceiling is the **carrier's throughput limit**, not a VOXO setting.
* Carrier throughput is measured in messages per minute. On AT\&T, for example, the practical limit is roughly **75 messages per minute** for a standard 10DLC number.
* Send faster than the carrier allows and messages queue or get filtered. The exact rate depends on the destination carrier and your number's [10DLC](/omnia/admin/10dlc-messaging) campaign registration and trust score.
* Long messages are split into segments by the carrier, and each segment counts toward the rate.
If you need to text a large list, space the sends to stay under the carrier rate, or ask about a campaign-registration tier that supports higher throughput.
**Contact support** if messages are queuing or being filtered while you're sending well under the carrier rate, or to discuss a higher-throughput campaign registration.
A **call recording** and a **PCAP** (packet capture) are different things, and asking for the wrong one slows down a troubleshooting case.
* **Call recording** — the audio of the conversation. You can find recordings yourself, searchable by phone number and date, in [Call Recordings](/omnia/admin/call-recordings).
* **PCAP** — the raw SIP/RTP network capture for a call. Engineers use it to diagnose signaling and media problems such as one-way audio, dropped call legs, choppy audio, or NAT/SDP issues. It is not the conversation audio, so a recording is never a substitute for a PCAP.
A PCAP is usually requested by an IT engineer, partner, or carrier rep diagnosing a live call-quality problem. PCAP retention is short, so request it as soon as the problem call happens, and include the date, time, both numbers, the extension, and a short description of the symptom.
**Contact support** to request a PCAP for a specific call. Support pulls the capture and shares it with the team working the case.
You can check a VOXO voicemail box from any phone, including a cell phone, without the desk handset. From a VOXO extension or a phone that can reach the system, dial **`*`** followed by the mailbox number (for example, `*201`), then enter the box's PIN when prompted.
This reaches the same mailbox the desk phone uses, so messages, greetings, and the read/unread state stay in sync.
* If the PIN is unknown, an admin can reset it from the voicemail box settings in [Voicemails](/omnia/admin/voicemails) (**Phone System → Voicemails**).
* If `*` is not recognized, confirm you're dialing from a line registered to the same account.
**Contact support** if the star code still isn't recognized from a line on your account.
When a phone shows "on a call" but the user is idle, or Live Calls / the [Operator Panel](/omnia/user-guide/operator-panel) shows an impossible duration (multiple hours or days), the call isn't real. The extension is in a stuck status: a prior call ended but the platform never cleared the on-call flag.
Don't inspect Operator Panel details or look up the other party — that assumes a real call and wastes time.
To clear it:
1. Get the extension number (a 3–5 digit internal number, not a 10-digit phone number).
2. In the admin portal, go to **Phone System → [Extensions](/omnia/admin/extensions)**, find the extension, and use **Reset Status**.
3. If you don't have admin access, contact support to clear it.
**Contact support** if you can't reach Reset Status, or list every affected extension number in one message when several are stuck at once so they can be cleared together.
When a single phone never rings while others nearby ring on the same calls, check queue or call group membership and login first — not Auto Answer. (Auto Answer connects the call instantly with no ring; it doesn't silence the phone.)
Work this ladder in order:
1. Confirm which [call queue](/omnia/admin/call-queues) or [call group](/omnia/admin/call-groups) the calls land on (set on the DID or main number).
2. Confirm the extension is a member of that queue or group.
3. Confirm the agent is logged in (Queue Manager, for queues).
4. Confirm the agent is not paused.
5. Only then check extension-level settings like Do Not Disturb, Forwarding, or Auto Answer.
The fix is usually adding the extension to the queue and logging the agent in.
**Contact support** if the extension is a member of the right queue or group, the agent is logged in and not paused, and the phone still doesn't ring.
[VOXO Connect](/connect) is the black-and-white softphone app (web and desktop). The most common fixes:
* **Mic permission error on the web app** — The browser is blocking microphone access. Click the lock/mic icon in the address bar, set the microphone to **Allow** for `app.voxo.co`, and reload. On the desktop app, confirm your operating system grants microphone access to the app.
* **Softphone shows "disabled"** — The **headset icon** toggles availability. Click it so it turns from white to green. If it stays disabled, log out and back in.
* **The app rings at your desk while your desk phone also rings (double-ring)** — Turn **notifications off** in the app rather than using Do Not Disturb. DND stops calls entirely, which isn't what you want here.
Closing the app or shutting down your PC only stops the softphone on that machine — your desk phone and the softphone on other devices keep ringing. If an older red app shows no voicemail or calls, switch to the updated black-and-white VOXO Connect app, which has voicemail built in.
**Contact support** if the microphone is allowed in both the browser and operating system and calls still have no audio, or if the softphone stays "disabled" after a fresh sign-in.
After VOXO ships a platform update, your browser can hold an older cached version of a page. That shows up as settings that look out of date, a form that won't accept input, or a save error naming a field — for example "callerIdUpdated is not allowed" or "call hours can not be empty" when the hours are filled in.
The fix is a hard refresh, which forces the browser to reload the current page instead of the cached copy:
* **Windows** — press **Ctrl + F5** (or Ctrl + Shift + R).
* **Mac** — press **Cmd + Shift + R**.
Then retry the save. If it still fails, sign out and back in, or try a private/incognito window to rule out a stuck session.
**Contact support** only if the error persists after a hard refresh and a fresh sign-in.
# 10DLC Messaging
Source: https://docs.voxo.co/omnia/admin/10dlc-messaging
10DLC (10-digit long code) messaging campaigns are designed for business messaging over standard 10-digit phone numbers.
## 10DLC (10-digit long code) messaging campaigns are designed for business messaging over standard 10-digit phone numbers. They provide a trusted and reliable method for businesses to communicate with customers via SMS. This guide provides step-by-step instructions on how to create, view, and edit 10DLC messaging campaigns within the Omnia Admin Portal.
This document applies to the following user roles within Omnia:
Account Administrator
Partner Administrator
### Accessing 10DLC Messaging
1. **Navigate to 10DLC Messaging**:
Go to the [Admin Portal](https://app.voxo.co/dashboard) and sign in.
Click the **Account** tab to expand it, then select **10DLC Messaging.**
**Prerequisites**: Ensure the SMS Brand registration process is completed for the account. For steps on how to register an SMS brand, please see this document: [SMS Brand Registration](https://scribehow.com/shared/Omnia_Admin_System_Admin__Accounts_Add_New__vbPAJ9Y1RcSPbxPGUfnc6w#7fb70ff4)**.**

2. **Navigate to the Brand Status Section:**
* Click on the **Brand Status** tab.
* Verify that your brand status is marked as **VERIFIED**.

3. **Viewing Brand Details:**
* In the **Brand Details** section, you can view important information such as:
* Brand ID
* Name
* Entity Type
* EIN
* Support Email
* Registration Date
* Website
* Address

4. **Managing Campaigns:**
* Click on **View All Campaigns** under the Campaigns section.

### Campaign Overview
5. #### Campaigns Tab Overview:
In the **Campaigns** tab, you can view and manage all your 10DLC messaging campaigns. This tab displays a list of all campaigns along with the following details:
* **Campaign ID**: Unique identifier for the campaign.
* **Brand ID**: Identifier for the brand associated with the campaign.
* **Brand Name**: Name of the brand associated with the campaign.
* **Assigned Number Count**: Number of phone numbers assigned to the campaign.
* **Start Date**: The date when the campaign starts.
* **DCA Approved Status**: Indicates if the campaign is approved by the Direct Connect Aggregator (DCA).
* **TCR Status**: The status of the campaign with The Campaign Registry (TCR).
You can sort the campaigns by clicking on the column headers, which have sort icons next to them.

6. #### Features in the Campaigns Tab:
**Search**: Use the search bar to quickly find a specific campaign.
**Export**: Export the list of campaigns for further analysis or reporting.

### Create a Campaign
7. **Add New Campaign**:
* Click the **Add New** button in the Campaigns tab.

8. **Enter Campaign Details**:
* **Description**: Provide a description of what the campaign will be used for.
* **Message Flow**: Describe how a consumer opts into the campaign, ensuring the call-to-action is clear and informs the consumer of the nature of the program. List all opt-in methods if multiple methods are used.

9. **Add Sample Messages**:
* **Sample Message 1**: Provide a sample message. For example, "This is a test. Reply STOP to opt out."
* Click **Add Sample Message** to include additional sample messages if needed.

10. **Campaign and Content Attributes**:
* **Opt-in Keywords**: Enter keywords that consumers can text to opt-in, such as "START," "YES," "SUBSCRIBE."
* **Opt-in Message**: Craft an opt-in message that includes the brand name, confirmation of opt-in enrollment, help information, and how to opt-out. For example, "Juvo Technologies: Welcome! Msg & data rates may apply. Reply STOP to opt out. Reply HELP for help. Messaging frequency may vary."
* **Opt-out Keywords**: Enter keywords that consumers can text to opt-out, such as "STOP."
* **Opt-out Message**: Create an opt-out message that acknowledges the opt-out request and confirms that no further messages will be sent. For example, "Juvo Technologies: You have opted out of receiving messages from Juvo Technologies."
* **Help Keywords**: Enter keywords that consumers can text to get help, such as "HELP."
* **Help Message**: Provide a help message with additional support contact information. For example, "Juvo Technologies: Help at support\@. Msg & data rates may apply. Reply HELP for help. Reply STOP to opt out."
* **Manage Keywords**:
* To enter new keywords, type in the field and select it from the dropdown.
* To remove a keyword, click the **x** button next to the keyword.

### Saving the 10DLC Messaging Campaign
11. **Save a 10DLC Messaging Campaign**:
* Click the **Create** button.
* A confirmation message will appear.

### Approval timeframes
After you submit, brand and campaign reviews each have their own timeline. No SMS can send until both are approved.
* **Brand approval** is often automated. If your business details match public records (EIN, address), the brand can verify within **24 hours**, but a manual review can extend this to about **7 days**.
* **Campaign approval** is run by The Campaign Registry and typically takes **3 to 7 business days** under normal conditions. During high-volume periods it can stretch toward 2 weeks.
You can check the current state at any time on the **Brand Status** tab and the **Campaigns** tab. You'll also receive an email notification when each step completes.
### Common reasons campaigns get declined
Most rejections come from a small set of issues. Fixing these before you submit avoids resetting your place in the review queue:
* **No public web presence, or a missing privacy policy.** Every business needs a web presence — a website or even a social media page — with a publicly visible privacy policy describing how you collect and use phone numbers and that message and data rates may apply. This is required regardless of your opt-in mechanism (website, verbal, or keyword/text-to-join). SMS terms and conditions are only required in addition to the privacy policy if opt-in happens on your website.
* **Vague or unclear control/message flow.** The **Message Flow** field should describe exactly how a consumer opts in (web form, in-store sign-up, paper consent, etc.) and what they will receive. Generic descriptions are a common decline reason.
* **Mismatched business details.** If the EIN, legal name, or address on the brand doesn't match registry data, the application is flagged for manual review or denial.
If your campaign has been pending longer than **7–10 days**, contact support so we can check whether it's stuck or needs a specific correction.
### Why outbound SMS isn't sending
If messages won't go out, work through these in order — most failures come from one of them:
* **Brand and campaign aren't both approved.** No SMS sends until your brand shows **VERIFIED** and your campaign is approved. Check both on the **Brand Status** and **Campaigns** tabs above.
* **You're sending from an extension that isn't SMS-enabled.** Not every extension can send SMS — confirm the one you're sending from is enabled.
* **Multiple locations each need their own SMS-enabled extension and login.**
* **A newly registered number is still provisioning.** A number can take 1–2 business days after registration before its first message sends.
If your brand and campaign are both approved, you're sending from the correct extension, and you still get a "cannot send from the provided number" error after 2 business days, contact support.
### Campaign Management
12. **Edit a Campaign**:
* Click on the campaign you want to edit or click the **Edit** button next to it.
* This will open the **Edit Campaign** screen, displaying the campaign details such as Register Date, Share Date, Use Case, and Sharing Status.
* After making the necessary edits, click **Save**.
* A confirmation message will appear.

13. **View Campaign Numbers**:
* Click the **view numbers** icon next to the campaign to see the list of phone numbers assigned to the campaign.
* The **Phone Numbers in Campaign** window will display the numbers and their provisioned dates.
* **Sort**: Click the sort icons next to the column headers to arrange items in ascending or descending order.

14. **Delete a Campaign**:
* To delete a campaign, click the **delete** icon next to the campaign.
* Confirm the deletion by clicking **Yes** in the confirmation dialog.

####
# Account Settings
Source: https://docs.voxo.co/omnia/admin/account-settings
This guide provides step-by-step instructions on how to view and edit account settings within the Omnia Admin Portal.
## This guide provides step-by-step instructions on how to view and edit account settings within the Omnia Admin Portal.
This document applies to the following user roles within Omnia:
Account Administrator: Have limited editing privileges.
Partner Administrator: Have full rights to edit all account details.
### Switching Between Accounts
1. **Locate the Account Dropdown:**
* If you are an account admin assigned to multiple accounts or a partner admin, you can quickly find and switch between accounts to view and edit the account settings by typing keywords or account numbers.
* At the top of the screen, locate the dropdown menu showing the current account name.

2. **Open the Dropdown Menu:**
* Click on the current account name to open the dropdown menu.

3. **Select the Desired Account:**
* Scroll through the list of available accounts.
* Click on the account name you wish to manage.

4. **Type Keywords or Account Number:**
* Start typing the name or account number in the search field.

5. **Select the Desired Account:**
* Once the desired account appears in the dropdown list, click on it to select.

### Accessing Account Settings
6. **Navigate to Settings:**
Go to the [Admin Portal](https://app.voxo.co/dashboard) and sign in.
Click the **Account** tab to expand it, then select **Settings**.
You can also access, view, and edit the settings for an account by navigating to **System Admin** then **Accounts**. For detailed instructions, see the [System Admin - Accounts](https://scribehow.com/shared/Omnia_Admin_System_Admin__Accounts__nJCmA5ccQ6W9mOfgMYQ-ng) document.
**Note**:
* Partner Admins will see all accounts that fall under their administration.
* Account Admins will only see the specific account(s) assigned to them.

### General Settings
7. **General Settings:**
* In the **General** tab, you can view and update the following information:
* **Enforce Two-Factor Authentication for organization**: Check this box to enforce two-factor authentication if not already enabled.
* **Disable Account**: Check this box to disable the account.
* **Residential Account**: Check this box if the account is residential.
* **Name**: View or update the name of the account. This name will be used as the default caller ID.
* **Billing ID**: View or enter the billing ID.
* **Time Zone**: Select or update the appropriate time zone.
* **Bill Start Date**: Set or update the bill start date.
* **Select Music on Hold**: Choose or update the [music on hold](https://scribehow.com/shared/Omnia_Admin_Music_On_Hold__Xm10itWOQ5yINYODN6QQcQ?referrer=documents).
* **Register SMS Brand**: Register an SMS brand if applicable. See the following document for step-by-step instructions on how to register: [SMS Brand Registration](https://scribehow.com/shared/Omnia_Admin_System_Admin__Accounts_Add_New__vbPAJ9Y1RcSPbxPGUfnc6w#7fb70ff4).

8. **Select Music on Hold:**
* Choose the desired music on hold from the dropdown menu. Some options may already be enabled and can be viewed or edited as needed.
* You can also add a new media file by clicking **Create a new music on hold**.

9. T**o add a new media file**:
* Click **Create a new music on hold**.
* Click **Add a Mediafile**.
* Use the controls to record or upload the media file. This will open additional options.

10. **Additional Options**:
* **Playback**: Click to play the media file.
* **Press and Hold To Record:** Click and hold to record a message.
* **Upload File**: Click to add an existing audio file.
* **Cancel Changes**: Click to revert to previous settings.
* **Enter a name**: Type the name in the **Mediafilename** field before saving.
* **Save Changes**: Click to save the recorded or uploaded file. This media file will now be available to choose from and select in the dropdown.

11. **Add New Music on Hold**:
* Enter the name of the new file in the **Enter name** field.
* In the **Select Media Files** field, pick the file from the dropdown menu.
* Click **Create** to save the new music on hold.

### Settings
12. **Edit Account Settings**:
* Navigate to the **Settings** tab within the **Edit Account** screen.
* You can update the following options:
* **Enable password prompt for retrieving voicemails**: Check this box to require a password prompt.
* **Enable same ring for internal and external calling**: Check this box to use the same ring tone for both.
* **Maximum incoming rings**: Select the maximum number of rings from the dropdown menu. This is the default for the account, but it can also be edited for an [Extension](https://scribehow.com/shared/Omnia_Admin_Extensions__-L9BuyfORwK9dnYrMhXwQg#2818d1bd).
* **Parking lot timeout**: How long, in seconds, a parked call stays in a park slot before ringing back to the user who parked it. For example, set this to **600** to give your team 10 minutes to retrieve the call before it returns. Increase this value if parked calls are ringing back before staff can pick them up.
* **Call waiting**: Choose the call waiting option from the dropdown menu. This is the default for the account, but it can also be edited for an extension.
* **Parking lot count**: Select the number of parking lots.

### Integrations
13. **Salesforce Integration**:
Admins can enable and edit the Salesforce integration settings after account creation.
* Navigate to the **Integrations** tab within the **Edit Account** screen.
* **CRM Integrations**: Select the **Salesforce** option to enable the integration.
* **Salesforce Base URL**: Enter the **Domain** for the Salesforce instance.
* **CTI Task Generation**: Specify when to generate tasks using the dropdown menu:
* **Always**: Tasks are generated for every call.
* **Never**: Tasks are never generated.
* **User**: Users can choose whether to generate tasks for each call.
These settings only apply if the Salesforce integration is turned on.

14. **Call Outcomes**:
* **Enable Call Outcomes**: Check the VOXO icon to enable or disable Call Outcomes.
* **Specify Call Outcomes**:
* Select existing outcomes from the dropdown menu.
* To enter new outcomes, type the description in the field and select it.
* To remove an outcome, click the **x** button next to the outcome.

15. **Call Outcomes Explanation**:
* If Call Outcomes are enabled, when a user hangs up a call using the Omnia softphone, they will be prompted to select an outcome from the available options set up on the account.
* These selected outcomes can be used in various reports within Omnia to analyze call results and performance.

16. **Webhooks:**
Webhooks allow Omnia to send real-time data to another application whenever specific events happen (like a call ending or a new voicemail). They enable automatic updates and integrations with other systems without the need for manual intervention.
**Add a Webhook**:
* Select the webhook **Type** from the dropdown menu. Options include:
* **CALLRECORDING**
* **ENDCALL**
* **NEWVOICEMAIL**
* **SALESFORCECRM**
* **STARTCALL**
* Enter the **URL** for the webhook.
* To add additional webhooks, click **Add Web Hook** again and repeat the process if needed.
* To remove a webhook, click the **trash can button** next to the webhook entry.

### Pricing
17. **Pricing:**
Navigate to the **Pricing** tab.
Fill in the pricing details for the voice products. Some options may already be enabled and can be viewed or edited as needed:
* **Unlimited Extension**
* **Toll Free Minutes**
* **SIP Trunk**
* **Fax Service**
* **International Minutes**
* **Live Transcription Service**
For custom products, select the product from the dropdown menu, and enter the price and quantity:
* **Product**: Select from options such as Managed Services or Internet.
* **Price**: Enter the price.
* **Quantity**: Enter the quantity.
* **Description**: Enter a description for the custom product.
* Click **Add a product** to include additional custom products.
Check the **Verify product pricing** box to ensure all product pricing is accurate before saving.

### Conduits
18. **Conduits**:
* Navigate to the **Conduits** tab.
* Enter the **Conduit Prefix**. Note that conduits only work when dialing 6 digits or less.
* Select the conduits to assign:
* Use the **Available** list to search and select conduits. Only accounts with conduit prefixes are listed.
* Move selected conduits to the **Assigned** list using the arrow buttons.
Conduits allow extensions to dial extensions in other accounts by using a prefix and the extension number. This feature enables users from multiple accounts to communicate via extension-to-extension dialing as if they were all part of the same account, facilitating easy internal communication across different departments or locations.

### Save and Update
19. **Save and Update**:
* After making all edits, click **Save**.
* A confirmation dialog will appear. Click **Update** to confirm.
* A success message will confirm that the account has been updated.

# Admin Audit Log
Source: https://docs.voxo.co/omnia/admin/admin-audit-log
The Admin Audit Log in Omnia records administrative activities, helping monitor changes and track user actions.
## The Admin Audit Log in Omnia records administrative activities, helping monitor changes and track user actions. This guide explains how to access and use the Admin Audit Log, including step-by-step instructions for viewing the log, filtering entries by date, actions, and services, and exporting data in CSV format.
Access Report Roles:
Partner Administrator
Account Administrator with the Reporting Feature Enabled
### Accessing the Admin Audit Log
1. **Access the Admin Audit Log Report**:
* Go to the [Admin Portal](https://app.voxo.co/dashboard) and sign in.
* Click the **Reports** tab to expand it, then select **Admin Audit Log**.

### Viewing the Audit Log
2. **View the Audit Log**:
* The audit log displays a table with columns such as **Time, Email, Service, Action,** and **Description**. The initial results shown will be for today's date.
* **Sort:** Click the sort icons next to column headers to arrange items in ascending or descending order.
* The initial results shown will be for today's date.

### Filtering the Audit Log
3. **Preset Filters:**
* **Last 10 Days**: Click this button to quickly filter the log entries from the last 10 days.
* **Last 30 Days**: Click this button to quickly filter the log entries from the last 30 days.

4. **Filter Settings**:
* Click **Filter** to open the filter settings.

5. **Select Date Range**:
* Choose the start and end dates to define the period for which you want to view logs.
* You can also use the preset options like **Last Week, Last Month, Last 3 Months, Last 6 Months,** and **Last Year.**
* In addition to the date range, you can also filter by a specific time range within the selected dates.

6. **Clear Filters:**
* Click **Clear** to remove the filters if needed. This allows you to start over while picking from your date ranges.

7. **Select Actions**:
* Check the boxes for the types of actions you want to filter by (**Create, Update, Delete**).

8. **Filter By Service**:
* Choose **Service** to narrow down the results further. Select your service from the dropdown menu.
* Choose **User** and enter a name in the **Search user** field to narrow down the results to actions performed by a specific user.

9. **Apply Filter**:
* Click **Update** to apply the filter settings.
* The details will be displayed on the screen based on your filters.

10. **Reset Filters**:
* Click **Reset** to remove your filters and start over if needed.

### Exporting the Audit Log
11. **Export Button**:
* Click **Export** to download the filtered audit log data in CSV format.
* Click **OK** to confirm the export.

### Understanding the Audit Log
Saving an item without changing any of its fields is not recorded. Only saves that changed something appear in the log.
12. **Log Details:**
* **Time**: Shows the timestamp of the action performed.
* **Email**: Displays the email address of the user who performed the action.
* **Service**: Indicates the part of the system affected by the action (e.g., User, Call Flow).
* **Action**: Describes the type of action performed (e.g., Create, Update, Delete).
* **Description**: Provides additional details about the service type and the specific item affected.

# Agent Activity
Source: https://docs.voxo.co/omnia/admin/agent-activity
The "Omnia Admin Reports: Agent Activity" guide provides administrators with detailed instructions on accessing and analyzing agent performance metrics withi...
The "Omnia Admin Reports: Agent Activity" guide provides administrators with detailed instructions on accessing and analyzing agent performance metrics within the Omnia Admin Portal. This document includes steps to navigate to the reports section, understand the records table, and use various sorting and filtering options to customize the data view. Additionally, it explains how to export records and schedule reports for regular updates.
Access to this Report:
Access to this report is based on your user role. You may not be able to access and view a specific report and all of its features if your role does not permit it.
### Accessing the Agent Activity Report
1. **Navigate to the Reports Section**:
* Go to the [Admin Portal](https://app.voxo.co/dashboard) and sign in.
* Click the **Reports** tab to expand it.
* Select **Queues,** then **Agent Activity**.

### Viewing Agent Activity Records
2. **Understanding the Records Table:**
* The records table provides detailed information about each agent's activity listed by Queue. The columns include:
* **Name:** The name of the agent.
* **Inbound Complete:** The number of completed inbound calls.
* **Refused:** The number of refused calls.
* **Wait Time:** The total wait time for all calls.
* **Average Wait Time Per Call:** The average wait time per call.
* **Queue Talk Time:** The total talk time within the queue.
* **Avg Queue Talk Time Per Call:** The average queue talk time per call.
* **Outbound Complete:** The number of completed outbound calls.
* **Outbound Talk Time:** The total outbound talk time.
* **Total Talk Time:** The total talk time for all calls.
* **Pause Time Account Review:** The pause time for account review.
* **Pause Time Break:** The pause time for breaks.
* **Pause Time Lunch:** The pause time for lunch.
* **Pause Time Meeting:** The pause time for meetings.
* **Pause Time Personal:** The pause time for personal reasons.
* **Pause Time Other:** The pause time for other reasons.
* **Pause Time Total:** The total pause time.
* **Logged In Time:** The total logged in time.
* **Work Time:** The total work time.

3. **Sorting Columns:**
* All column headers can be sorted. Click on a column header to sort the records based on that column.

### Filtering Agent Activity Records
4. You can quickly filter records by date using the buttons at the top of the page:
* **Yesterday**
* **Last 10 Days**
* **Last 30 Days**

5. **Accessing Filter Settings:**
* Click on the **Filter** button to open the filter settings.

6. **Selecting Date and Time Range:**
* In the filter settings, you can select a specific date and time range:
* Use the calendar to pick start and end dates.
* Adjust the time settings as needed.
* You can also choose from predefined date ranges such as: **Last week, Last Month, Last 3 months, Last 6 months, Last year**.

7. **Selecting Distribution:**
* You can filter the records by distribution: **Hourly, Daily, Monthly, None.**

8. **Filtering by Additional Criteria:**
* You can further filter the records by additional criteria:
* **Queues:** Select specific queues.
* **Users:** Select specific users.
* **Tag:** Enter a specific tag to filter by. Filtering by Tag will only apply to Inbound Queue Calls.
* After setting your desired filters, click **Update** to apply them and update the records table.

9. **Reset Filters**:
* Click **Reset** to remove your filters and start over if needed.

### Exporting Records
10. **Export Records:**
* To export the displayed records, click on the **Export** button located at the top right of the records table.

### Scheduling Agent Activity Reports
11. **Schedule a Report:**
* Click the **Export** button.
* Select **Schedule Report** from the dropdown.

12. **Configure Report Settings:**
* Enter a name for the report.
* Add recipient email addresses. Use commas to separate multiple emails.
* Select the report frequency: Daily, Weekly, or Monthly.
* Review the current filter settings.
* Click **Schedule** to save the report schedule.
* For more information, see the [Scheduled Reports](https://scribehow.com/shared/Omnia_Admin_Reports_Scheduled_Reports__W6AXJX2qQMK2RNHO1Mu0DA?referrer=documents) section.

####
# Billing Dashboard
Source: https://docs.voxo.co/omnia/admin/billing-dashboard
This guide provides step-by-step instructions on how to navigate and use the Billing Dashboard within the Omnia Admin Portal.
## This guide provides step-by-step instructions on how to navigate and use the Billing Dashboard within the Omnia Admin Portal.
This document applies to the following user roles within Omnia:
Partner Administrator
Account Administrator
### Accessing the Billing Dashboard
1. **Navigate to the Billing Dashboard**:
* Go to the [Admin Portal](https://app.voxo.co/dashboard) and sign in.
* Click the **Billing** tab to expand it, then select **Dashboard**.

### Billing Access Overview
2. **Account Admins:**
* For accounts under a white label umbrella, Account Administrators can only access **Extension Count** for the accounts they have access to.
* For accounts not under a white label umbrella, Account Administrators can view the **Dashboard**, **Payment Info**, and **Extension Count** for the accounts they have access to.

### Billing Activity
3. **Billing Activity Chart:**
* The **Billing Activity** chart provides a visual representation of various billing components over time.
* Each bar represents the monthly count and cost of different services, such as **Extensions**, **SIP Trunks**, **Faxes**, **Toll Free Minutes**, **International Minutes**, and **Residential Seats**.
* The green line shows the **Cost Per Month** trend over time.
**Tooltip Details:**
* Hovering over any bar in the chart will display a tooltip with detailed information for that month, including:
* **Cost Per Month** (Green)
* **Extensions** count (Blue)
* **SIP Trunks** count (Orange)
* **Faxes** count (Pink)
* **Toll Free Minutes** count (Lavender)
* **International Minutes** count (Purple)
* **Residential Seats** count (Red)
**Balance:**
* The current balance is displayed in the top right corner of the chart.

### Account Details (Partner Only)
4. **Account Details Tab:**
* In the **Dashboard** section, navigate to the **Account Details** tab to view detailed billing information for each account.
* **Search Name:** Use the search bar to filter accounts by name.
* **Month Filter:** Select the billing month from the dropdown menu.
* **Export Button:** Click to export the billing details for all accounts into a CSV file.
* The table displays the following columns:
* **Account:** The name of the account.
* **Billing Code:** The billing code associated with the account.
* **Extensions:** The number of extensions associated with the account.
* **Faxes:** The number of faxes associated with the account.
* **SIP Trunks:** The number of SIP trunks associated with the account.
* **Phone Numbers:** The number of phone numbers associated with the account.
* **Interstate In:** The count of interstate inbound calls.
* **Interstate Out:** The count of interstate outbound calls.
* **Intrastate In:** The count of intrastate inbound calls.
* **Intrastate Out:** The count of intrastate outbound calls.
* **Toll-Free Mins:** The number of toll-free minutes used.
* **Interstate In Minutes:** The number of minutes for interstate inbound calls.
* **Interstate Out Minutes:** The number of minutes for interstate outbound calls.
* **Intrastate In Minutes:** The number of minutes for intrastate inbound calls.
* **Intrastate Out Minutes:** The number of minutes for intrastate outbound calls.
* **International Minutes:** The number of international call minutes.
* Each column header can be clicked to sort the accounts based on that particular column.

### Viewing Invoices
5. **Invoices**:
* The tab displays a list of invoices with the following details:
* **Date**: The date the invoice was issued.
* **Invoice #**: The unique identifier for the invoice.
* **Total**: The total amount of the invoice.
* **Total W/ Tax**: The total amount of the invoice including tax.
#### Features in the Invoices Tab:
* **Sort Columns**: Click the column headers to sort the invoices in ascending or descending order.
* **Expand Invoice Details**: Click the **list** button next to an invoice to view detailed information.
* **Download Invoice**: Click the **Download Invoice** button to download the invoice.
* **Export**: Click the **Export** button to download a list of all invoices into a CSV file.

### Partner Inventory (Partner Only)
6. **Partner Inventory Tab:**
* In the **Dashboard** section, navigate to the **Partner Inventory** tab to view detailed inventory information for all accounts under partner accounts.
* **Month Filter:** Select the billing month from the dropdown menu.
* **Export Button:** Click to export the inventory details for all accounts into a CSV file.
* The table displays the following columns:
* **Billing Code:** The billing code associated with the account.
* **Account Name:** The name of the account.
* **Extension Number:** The number of the extension.
* **Extension Name:** The name assigned to the extension.
* **Extension Caller ID:** The caller ID associated with the extension.
* **Phone MAC:** The MAC address of the phone associated with the extension.
* **Phone Name:** The name assigned to the phone.
* **Phone Model:** The model of the phone.
* **e911 Location:** The e911 location assigned to the extension.
* Each column header can be clicked to sort the accounts based on that particular column.

# Branches
Source: https://docs.voxo.co/omnia/admin/branches
Branches represent different physical or organizational locations within your company.
## Branches represent different physical or organizational locations within your company. Managing branches allows you to effectively organize by assigning a branch to extensions, phone numbers, virtual receptionists, call groups, and call queues. This guide provides step-by-step instructions for accessing, adding, editing, deleting, and searching branches in the Omnia Admin Portal.
This document applies to the following user roles within Omnia:
Account Administrator
Partner Administrator
### Accessing Branches
1. **Navigate to Branches:**
Go to the [Admin Portal](https://app.voxo.co/dashboard) and sign in.
Click the **Account** tab to expand it, then select **Branches**.

### Adding a New Branch
2. **Add a New Branch:**
* Click **Add New**.

3. **Enter Branch Details**:
* **Name**: Provide a name for the branch by clicking the **Name** field and entering the branch name.

4. **Save the Branch**:
* Click **Create** to create the new branch.
* Click **Yes** to confirm.

### Editing Branches
5. **Edit Branch Details**:
* Click on the branch you want to edit or click the **Edit** button next to it.
* Make your edits.
* Click **Save**.
* Click **Yes** to confirm and save your changes.

### Deleting a Branch
6. **Delete a Branch**:
* Click the **Delete** button next to the Branch.
* **Warning Message**: If the branch is assigned, a message will appear stating, "Any entities assigned to this branch will be reassigned to your Default Branch. Continue?"
* **Confirm Deletion**: Click **Yes** to proceed.

### Search, Sort, and Export
7. **Search for a Branch**:
* Use the **Search Bar** to quickly find specific items by typing the name or a keyword in the search field.
* The system will filter the list based on your search input, displaying the relevant results.

8. **Sort Branches:**
* Click the **sort icons** next to the column headers to arrange items in ascending or descending order.

9. **Export Branch Details:**
* Click the **Export** button next to the search field.
* The system will download a list of the items in CSV format.

# Button Layouts
Source: https://docs.voxo.co/omnia/admin/button-layouts
This guide provides step-by-step instructions for accessing, adding, editing, duplicating, and deleting button layouts in the Omnia Admin Portal.
## This guide provides step-by-step instructions for accessing, adding, editing, duplicating, and deleting button layouts in the Omnia Admin Portal. Button layouts configure programmable keys on VoIP phones for functions like speed dialing, parking calls, or monitoring extensions.
This document applies to the following user roles within Omnia:
Account Administrator
Partner Administrator
### Accessing Button Layouts
1. **Navigate to Button Layouts**:
Go to the [Admin Portal](https://app.voxo.co/dashboard) and sign in.
Click the **Phone System** tab to expand it, then select **Button Layouts**.

### Adding a New Button Layout
2. **Add a New Button Layout:**
* Click **Add New**.
* Enter a name for the button layout in the **Name** field.

3. **Set the Key Range:**
* Enter the **Start Key** number. This is the first button you want to configure.
* Enter the **End Key** number. This should be greater than the start key number, covering all buttons you want to configure.
## 
#### Notes:
The End Key must be greater than the Start Key to create a valid range for button configuration.
The Key type field is required for Yealink devices. Ensure this field is filled to avoid configuration errors.
### Key Assignments
4. **Assign Functions to Keys:**
* **Type**:
* Click on the dropdown menu to select the function for the key. Options include:
* **BLF (Busy Lamp Field)**: Monitors the status of another extension (busy or available).
* **Park**: Allows you to park a call on a specific number.
* **Speed Dial**: Provides quick dialing of a predefined number.
* **BLF (Grandstream)**: Specific to Grandstream devices, similar to BLF.
* **Speed Dial (Grandstream)**: Speed dial for Grandstream devices.
* **Park (Grandstream)**: Park call for Grandstream devices.
* **Name**:
* Enter a descriptive name for the key (e.g., "Park 1" or "Voicemail").
* **Number**:
* Select or enter the number associated with the function. This could be an extension number, a park slot number, or a speed dial number.

5. **Repeat for Additional Keys:**
* Continue assigning **Types**, **Names**, and **Numbers** for each key within the range specified.

6. **Save Changes:**
* After configuring all necessary keys, review your entries to ensure accuracy.
* Click **Create** then **Yes** to apply the changes.

Saved changes should auto-populate on the assigned phones. If the new buttons don't appear, reboot the phone by unplugging it for 15 seconds and plugging it back in.
To pick up a held call from a different phone, use **Park** slots rather than regular Hold. A call placed in a park slot can be retrieved from any phone that has a Park button assigned to that same slot — regular Hold keeps the call on the original phone only.
### Duplicating a Button Layout
7. **Duplicate layout:**
* Click the **Duplicate** button next to a button layout to duplicate.
* Click **Yes** to confirm the duplication.

### Editing a Button Layout
8. **Edit Layout:**
* Click on the button layout you want to edit or click the **Edit** button next to it.
* Make your edits
* Click **Edit**, then **Yes** to confirm and save your changes.

### Deleting a Button Layout
9. **Delete Layout:**
* Click the **Delete** button next to the Button Layout.
* Confirm the deletion by clicking **Yes**.

### Search and Sort
10. **Search Button Layouts:**
* **Search Bar**: Quickly find specific items by typing the name or a keyword in the search field. The system will filter the list based on your search input, displaying the relevant results.
* **Sort**: Click the sort icons next to column headers to arrange items in ascending or descending order.

### Rolling out a layout to multiple phones
There is no one-click bulk edit — button layouts are assigned per device, so each phone gets its layout individually. To roll a layout out to many phones, build it once (or **Duplicate** an existing layout as a starting point), then assign it to each device. Saved changes should auto-populate on the assigned phones; reboot only the phones that don't pick up the change by unplugging them for about 15 seconds and plugging them back in.
# Call Blocking
Source: https://docs.voxo.co/omnia/admin/call-blocking
Call blocking allows administrators to block incoming calls from specific phone numbers on an account.
## Call blocking allows administrators to block incoming calls from specific phone numbers on an account. This guide provides step-by-step instructions for managing call blocking in the Omnia Admin Portal.
This document applies to the following user roles within Omnia:
Account Administrator
Partner Administrator
Call blocking works one number at a time — calls from exactly the numbers on your blocked list are rejected, and that's the only filter the system applies. There is no automated, network-wide spam filter you can turn on. Spam callers commonly rotate caller IDs (a tactic called *neighbor spoofing*) using a large pool of random numbers, so a number you block today may not be reused tomorrow. Block the specific numbers you can identify, but expect to keep adding new ones as patterns shift.
### Accessing Call Blocking
1. **Navigate to Call Blocking:**
Go to the [Admin Portal](https://app.voxo.co/dashboard) and sign in.
Click the **Phone System** tab to expand it, then select **Call Blocking**.

### Adding a New Blocked Number
2. **Add a New Blocked Number:**
* Click **Add New**.
* In the **Enter number** field, type the phone number you want to block.
* In the **Enter reason for blocking** field, type the reason for blocking this number.
* Click **Create**.
* Click **Yes** to confirm and save.

### Editing a Blocked Number
3. **Edit a Blocked Number:**
* Click on the blocked number entry you want to edit or click the **Edit** button next to it.
* Make your edits.
* Click **Save**.
* Click **Yes** to confirm.

### Deleting a Blocked Number
4. **Delete a Blocked Number:**
* Click the **Delete** button next to the Blocked Number.
* Click **Yes** to confirm the deletion.

### Search and Sort
5. **Search Call Blocking:**
* **Search Bar**: Quickly find specific items by typing the name or a keyword in the search field. The system will filter the list based on your search input, displaying the relevant results.
* **Sort**: Click the sort icons next to the column headers to arrange items in ascending or descending order.

### Exporting Call Blocking
6. **Export Call Blocking**:
* Click the **Export** button next to the search field.
* The system will download a list of the items in CSV format.

# Call Groups
Source: https://docs.voxo.co/omnia/admin/call-groups
A call group routes incoming calls to a specific group of users.
## A call group routes incoming calls to a specific group of users. This guide provides step-by-step instructions for creating and managing call groups in the Omnia Admin Portal.
This document applies to the following user roles within Omnia:
Account Administrator
Partner Administrator
### Accessing Call Groups
1. **Navigate to Call Groups**:
* Go to the [Admin Portal](https://app.voxo.co/dashboard)and sign in.
* Click the **Phone System** tab to expand it, then select **Call Groups**.

### Creating a Call Group
2. **Create a Call Group**:
* Click **Add New**.

### General Settings
3. **General Settings:**
* **Call group extension**: Enter the [extension](https://scribehow.com/shared/Omnia_Admin_Extensions__-L9BuyfORwK9dnYrMhXwQg?referrer=documents) number for the call group.
* **Call group name**: Provide a descriptive name for the call group.
* **Branch**: Select a [branch](https://scribehow.com/shared/Omnia_Admin_Branches___UJ4yv5wT1qKlkNTqkRvUA) to assign if applicable.

### Enable Additional Features (Optional)
4. **Enable Additional Features**:
* **Enable music on hold**: Check this box if you want callers to hear [music](https://scribehow.com/shared/Omnia_Admin_Music_On_Hold__Xm10itWOQ5yINYODN6QQcQ?referrer=documents) while on hold.
* **Enable skipping extension if on a call**: Check this box to skip extensions that are currently on a call.

### Configure Ring Strategy
5. **Configure Ring Strategy:**
* **Ring all**: Select this option to ring all extensions in the group simultaneously.
* **Select ring time (rings)**: Choose the number of rings.
* **Sequence**: Select this option to ring extensions one after another in a specific order.
* **Enable looping**: Check this box to loop back to the beginning if not answered. Once all members have been tried, the sequence rings back to the first member and continues attempting members until the dial timeout is reached.
* **Select ring time (rings)**: Choose rings before moving to the next extension.
* **Select dial timeout (rings)**: Choose total rings before forwarding to timeout destination.

Call groups do not support true round-robin distribution, where the starting extension rotates with each new incoming call. For round-robin behavior, use a [call queue](/omnia/admin/call-queues) configured for round-robin distribution.
### Timeout Destination
6. **Timeout Destination:**
* **Destination type**: Select the action if the call isn't answered within the ring time.
* **Select destination**: Choose the specific endpoint based on the destination type.
* **Add a Destination**: Click to configure multiple destinations (button appears based on the selected destination type).
* **Reorder**: Use to reorder destinations by clicking and dragging.
* **Delete**: Click to remove a destination.
To send unanswered group calls to a shared voicemail box, set **Destination type** to **Voicemail** and pick the mailbox. Members of the group can then listen to messages by dialing `*` followed by the voicemail extension number from their phone.

### Unconditional Forwarding
7. **Unconditional Forwarding:**
* **Enable unconditional forwarding**: Check this box to forward all calls to a specified destination unconditionally.
* **Destination type**: Use the dropdown menu to select the type of destination.
* **Select destination**: Choose the specific destination from the available options.
* **Reorder**: Use to reorder destinations by clicking and dragging.
* **Delete**: Click to remove a destination.

### Assigning Specific Extensions or Actions
8. **Navigate to the Destinations Tab:**
**Destination Type:** Select the type of destination, which includes [Custom](https://scribehow.com/shared/Omnia_Admin_Custom_Destinations__UhdCAL0gSv2KBHRBil5DnQ?referrer=documents) or **Ring an Extension**.
**Select Destination:** Choose the specific destination based on the type selected.
**Order of Destinations:** If using the "Sequence" ring strategy, ensure the order reflects the desired call routing sequence.
**Add a Destination:** Click to include additional destinations.
**Reorder**: Use to reorder destinations by clicking and dragging.
**Delete**: Click to remove a destination.

### Review and Create
9. **Review and Create**:
* Review all details to ensure accuracy.
* Click **Create** to save the call group.
* Click **Yes** to confirm.

### Editing a Call Group
10. **Edit a Call Group:**
* Click on the call group you want to edit or click the **Edit** button next to it.
* Make your edits. To add or remove an extension from the group, open the **Destinations** tab — each destination is a ringing member. Use **Add a Destination** to add an extension, or click **Delete** next to an extension to remove it.
* Click **Save**.
* Click **Yes** to confirm and save your changes.

### Deleting a Call Group
11. **Delete a Call Group:**
* Click the **Delete** button next to the Call Group.
* Confirm the deletion by clicking **Yes**.

### Search and Sort
12. **Search for a Call Group:**
* **Search Bar**: Quickly find specific items by typing the name or a keyword in the search field. The system will filter the list based on your search input, displaying the relevant results.
* **Sort:** Click the sort icons next to column headers to arrange items in ascending or descending order.

### Export Call Groups
13. **Export Call Group Details**:
* Click the **Export** button next to the search field.
* The system will download a list of the items in CSV format.

# Call Queues
Source: https://docs.voxo.co/omnia/admin/call-queues
Call queues handle incoming calls by holding them until an agent is available.
## Call queues handle incoming calls by holding them until an agent is available. This guide details how to access and configure call queues, including adding new queues, setting general and timeout destinations, managing conditional routing and notifications, and configuring media and agent settings. It also covers how to edit, delete, search, and sort call queues.
This document applies to the following user roles within Omnia:
Account Administrator
Partner Administrator
### Accessing Call Queues
1. **Navigate to Call Queues:**
Go to the [Admin Portal](https://app.voxo.co/dashboard) and sign in.
Click the **Phone System** tab to expand it, then select **Call Queues**.

### Adding a new Call Queue
2. **Add a Call Queue**:
* Click on the **Add New** button.
* Fill in the required details under the **General** tab.

### Configuring Call Queues
3. **General Settings**:
* **Enable recording**: Check this box to enable call recording.
* **Name**: Provide a name for the call queue.
* **Number**: Assign a unique number to the call queue.
* **Select ring strategy**: Choose a ring strategy from the dropdown list:
* **Fewest calls**: Rings the agent who has answered the fewest calls. Use this when you want calls distributed evenly across agents.
* **Linear**: Rings agents in a fixed order, always starting from the top of the list.
* **Random**: Rings agents in a random order.
* **Ring all**: Rings all agents simultaneously.
* **Round robin**: Rotates through the agent list in the order shown under **Assign allowed agents**. The next call goes to the next agent in that list, not the agent who has been waiting longest.
* **Timeout (seconds)**: Set the duration after which the call will timeout.
* **Branch** (Optional): Select the [branch](https://scribehow.com/shared/Omnia_Admin_Branches___UJ4yv5wT1qKlkNTqkRvUA?referrer=documents) associated with this queue.
* **Select max queue length**: Set the maximum number of callers waiting in the queue.

### Timeout and Queue Full Destinations
4. **Configure Destinations**:
* **Timeout destinations**: Select the destination type and specific destination for calls that timeout.
* **If queue is full**: Select the destination type and specific destination for calls when the queue is full.
* **Add a destination:** Click to configure multiple destinations. Note that this button will only appear based on the selected destination type.
* **Reorder**: Use to reorder destinations by clicking and dragging.
* **Delete**: Click to remove a destination.
The **Timeout destinations** and **If queue is full** fields can't point a queue back to itself — the form won't save that configuration. To re-queue a caller in the same queue, create a [Custom Destination](/omnia/admin/custom-destinations) of type **Send call to queue at position** and select it as the destination here.

### Configuring Conditional Routing
5. **Enable Redirecting Call if No Agents are Available**:
* **Enable redirecting call if no agents are available**: Check this box to enable redirection when no agents are available to service a call.
* **If no agents are available**: Select the destination type and specific destination.
* **Destination Type**: Choose from options like [Voicemail](https://scribehow.com/shared/Omnia_Admin_Voicemails__avd1aEdzQJapD-KxgaffoA?referrer=documents), [Call Group](https://scribehow.com/shared/Omnia_Admin_Call_Groups__new4XpZBTwKeEYeYxm88ng?referrer=documents), **Another Queue**, etc.
* **Specific Destination**: Enter or select the specific destination based on the type chosen.

6. **Enable Redirecting Call if All Agents are Busy**:
* **Enable redirecting call if all agents are busy**: Check this box to enable redirection when all agents are busy.
* **If all agents are busy**: Select the destination type and specific destination.
* **Destination Type**: Choose from options like **Voicemail**, [Call Flow](https://scribehow.com/shared/Omnia_Admin_Call_Flows__Pzxem7coSC26XlSCs_AB-g?referrer=documents), **Another Queue**, etc.
* **Specific Destination**: Enter or select the specific destination based on the type chosen.

### Abandoned Call Notifications
7. **Enable Notifications**:
* **Enable abandoned call notifications**: Check this box to receive notifications.
* **Notify abandon email**: Enter the email address to receive notifications.

### Exit and Callback Settings
8. **Open Exit and Callback Settings**:
Click the **Exit and Callback Settings** tab to open the settings for the call queue.
Check the box to enable queue callback.

9. **Queue Callback Settings**:
* **Caller ID number**: Choose the number from the dropdown that will appear as the caller ID.
* **Max attempts**: Set the maximum number of callback attempts.

### Play When Connecting to Agent
10. **Play When Connecting to Agent**:
* Configure media settings to play a specific message when connecting a caller to an agent.
* Use the dropdown to pick from an existing [media file](https://scribehow.com/shared/Omnia_Admin_Media_Files__LxLyMgU7SBqju9ex6tTRBg?referrer=documents) or record a new one.
* Click the **Preview media** button to listen and preview the message.
* Click **X** to remove the selected message.

11. **Add a New Media File:**
* Click **Add a Mediafile** to record or upload a new media file if needed.
* Use the controls to record or upload the media file. This will open additional options.

12. **Additional Options**:
* **Playback**: Click to play the media file.
* **Press and Hold To Record:** Click and hold to record a message.
* **Upload File**: Click to add an existing audio file.
* **Cancel Changes**: Click revert to previous settings.
* **Enter a name:** Type the name in the **Mediafile Name** field before saving.
* **Save Changes**: Click to save the recorded or uploaded file. This media file will now be available to choose from and select in the dropdowns.

### Enabling and Configuring Exit Key
13. **Enabling and Configuring Exit Key**:
* **Enable Queue Exit Key**: Check the box labeled **Enable Queue Exit Key**.
* **Select Exit Key**: Under **Exit key settings**, click the dropdown menu labeled **Exit key**.
* Select the desired exit key from the available options (0-9).

### Configuring Exit Key Destination
14. **Configure Exit Key Destination**:
* After selecting the exit key, configure the destination for calls that use the exit key.
* **Destination Type**: Choose from options like **Voicemail**, [Custom](https://scribehow.com/shared/Omnia_Admin_Custom_Destinations__UhdCAL0gSv2KBHRBil5DnQ?referrer=documents), **Another Queue**, etc.
* **Specific Destination**: Enter or select the specific destination based on the type chosen.

### Media Settings
15. **Access Media Tab**:
* Click the **Media** tab to open the media settings for the call queue.

16. **Add a Media File**:
* Click **Add a Mediafile** to record or upload a new media file if needed. Use the controls to record or upload the media file. This will open additional options.

17. **Additional Options**:
* **Playback**: Click to play the media file.
* **Press and Hold To Record:** Click and hold to record a message.
* **Upload File**: Click to add an existing audio file.
* **Cancel Changes**: Click to revert to previous settings.
* **Enter a name:** Type the name in the **Mediafile name** field before saving.
* **Save Changes**: Click to save the recorded or uploaded file. This media file will now be available to choose from and select in the dropdowns.

18. **Play to the caller while waiting in the queue:**
* Use the dropdown menu to select what will be played to the caller while they are waiting in the queue.
* **Options**:
* **Music on hold**: Plays [music](https://scribehow.com/shared/Omnia_Admin_Music_On_Hold__Xm10itWOQ5yINYODN6QQcQ?referrer=documents) while the caller waits.
* **Ringing**: Plays a ringing sound while the caller waits.
* **Music on hold, then ringing**: Plays music initially and then switches to a ringing sound.

### Setting Up Periodic Announcements
19. **Enable periodic announcements**:
* Check the box labeled **Enable periodic announcements**.

20. **Set Frequency**:
* Use the dropdown menu next to **Frequency** to select how often the announcements should be made.

21. **Select Periodic Announce Message**:
* Click on the dropdown menu under **Periodic Announce Message** and choose the message you want to be periodically announced.
* Click the **Previewmedia** button to listen and preview the message, or click **X** to remove.

### Hold Time Announcements
22. **Enable reporting caller's hold time to agent**:
* Check the box labeled **Enable reporting caller's hold time to agent**.

23. * **Announce hold time to user**:
* Use the dropdown menu next to **Announce hold time to user** to select whether and how the hold time should be announced to the caller.
* **Options**:
* **No**: Do not announce hold time to the caller.
* **Yes**: Announce hold time to the caller continuously.
* **Once**: Announce hold time to the caller once.

24. **Select Estimated Hold Time Message**:
* If you select **Yes or Once** for announcing hold time to the user, the **Est hold time message** option becomes available.
* Click on the dropdown menu under **Est hold time message** and choose the message to be announced regarding the estimated hold time.
* Click the **Previewmedia** button to listen and preview the message, or click **X** to remove.

### Setting Up Position Announcements
25. **Announce position**:
* Use the dropdown menu next to **Announce position** to select whether and how the caller's position in the queue should be announced.
* **Options**:
* **No**: Do not announce the position.
* **Yes**: Announce the position.
* **If less than**: Announce the position if it is less than a specified number. Enter limit in the enter limit field.
* **No more than**: Announce the position if it is no more than a specified number. Enter limit in the enter limit field.

26. **Position Announcement Messages**:
* **You are the next message**:
* Select the message to be announced when the caller is next in line.
* **There are message**:
* Select the message to be announced when there are other callers ahead in the queue.
* **Calls waiting message**:
* Select the message to be announced when there are multiple calls waiting.
* **Thank you message**:
* Select the thank you message to be played to the caller.
* Click the **Previewmedia** button to listen and preview the messages, or click **X** to remove.

27. **Hold and position announcement frequency**:
* Use the dropdown menu next to **Announce frequency** to select how often the hold and position announcements should be made.
* **Options**:
* **0**: No announcements.
* **Other values**: Frequency in minutes (e.g., 5, 10, 15).

### Agent Settings
28. **Access Agent Settings**:
* Click the **Agent Settings** tab to open the agent settings for the call queue.

29. **Enable ringing agent with in use status**:
* Check the box labeled **Enable ringing agent with in use status.**
* Allows agents to receive calls even when their status is "in use."

30. **Enable auto pause**
* Check the box labeled **Enable auto pause.**
* Automatically pauses agents after a call to give them time to wrap up.

31. **Enable auto logout**:
* Check the box labeled **Enable auto logout**.
* Automatically logs out agents after a specified period of inactivity.

32. **Enable ringing agents only once**:
* Check the box labeled **Enable ringing agents only once**.
* Rings each agent only once for a call.

33. **Enable auto fill**:
* Check the box labeled **Enable auto fill**.
* Automatically assigns available agents to calls.

34. **Enable agent call pickup**:
* Check the box labeled **Enable agent call pickup**.
* Allows agents to pick up calls from other agents.

35. **Set Agent Timeout (rings)**:
* Use the dropdown menu next to **Agent timeout (rings)** to select the number of rings before timeout.
* **Options**: Various options (e.g., 6 rings).
* Defines how many rings before the call is redirected.
**Set Agent Wrap Up Time**:
* Enter the desired time in the **Agent wrap up time** field (in seconds). This is how long after an agent finishes a queue call before they are eligible to receive the next queue call.

### Assign Allowed Agents
36. **Assign Allowed Agents:**
* Click on the dropdown menu under **Assign allowed agents** to select agents to be assigned to this queue.
* Click **Add Agent** to include additional agents.
* **Order of Destinations**: If using the "Linear" or "Round Robin" ring strategies, ensure that the order of the agents reflects the desired call routing sequence.
* **Reorder**: Click and drag to change the order of the items in the list.
* **Remove Agent**: Click to remove an agent from the list.

### Create and Save
37. **Create and Save**
* Click **Create** and then **Yes** to confirm and save the Call Queue.

### Editing Existing Call Queues
38. **Edit an Existing Call Queues:**
* Click on the call queue you want to edit or click the **Edit** button next to it.
* Make your edits. To add or remove agents from the queue, open the **Agent Settings** tab and use the **Assign allowed agents** list — click **Add Agent** to add a member, or **Remove Agent** to take one off the queue.
* Click **Save**.
* Click **Yes** to confirm and save your changes.

### Deleting a Call Queue
39. **Delete a Call Queue:**
* Click **Delete** next to the Call Queue.
* Click **Yes** to confirm the deletion.

### Search and Sort
40. **Search for a Call Queue:**
* **Search Bar**: Quickly find specific items by typing the name or a keyword in the search field. The system will filter the list based on your search input, displaying the relevant results.
* **Sort**: Click the sort icons next to the column headers to arrange items in ascending or descending order.

### Exporting Call Queues
41. **Export**:
* **Export Button**: Click the **Export** button next to the search field.
* The system will download a list of the items in CSV format.

# Call Recordings
Source: https://docs.voxo.co/omnia/admin/call-recordings
The Call Recordings report allows you to view and filter call recordings within Omnia.
###
The Call Recordings report allows you to view and filter call recordings within Omnia. This guide provides step-by-step instructions on how to access and view call recordings in the Omnia Admin Reports. It includes information on filtering the recordings, playing and saving them, and accessing the call flow view.
Access to this Report:
Access to this report is based on your user role. You may not be able to access and view a specific report and all of its features if your role does not permit it.
Recording is **off by default** on every extension and phone number — it has to be turned on before any calls are captured, so an empty report is almost always a setting that was never enabled rather than lost recordings. Recording is configured in two places depending on direction: **inbound** recording lives on the [phone number](/omnia/admin/phone-numbers), and **outbound** recording lives on the [extension](/omnia/admin/extensions). Only **answered** calls generate a recording, and the setting isn't inherited by extensions or numbers added later — enable it on each new one.
### Accessing Call Recordings
1. **Access Call Recordings**:
* Go to the [Admin Portal](https://app.voxo.co/dashboard) and sign in.
* Click the **Reports** tab to expand it, then select **Call Recordings**.

### Viewing Call Recordings
2. **View Call Recordings**:
* The call recordings are displayed in a table with columns for **Time, Caller Number, Caller Name, Dialed Number, Direction, Disposition, Duration, Who Answered, Packet Loss,** and **Jitter.**
* Initially, the results shown are for today's date.

### Filtering Call Recordings
3. **Preset Filters:**
* **Yesterday**: Click this button to quickly filter data from the previous day.
* **Last 10 Days**: Click this button to quickly filter data from the last 10 days.
* **Last 30 Days**: Click this button to quickly filter data from the last 30 days

4. **Filter Settings**:
* Click **Filter** to open the filter settings.

5. **Select Date Range**:
* Choose the start and end dates to define the period for which you want to view the Call Recordings.
* You can also use the preset options like **Last Week, Last Month, Last 3 Months, Last 6 Months,** and **Last Year.**
* In addition to the date range, you can also filter by a specific time range within the selected dates.

6. **Clear Filters:**
* Click **Clear** to remove the filters if needed. This allows you to start over while picking from your date ranges.

7. **Select Call Direction**:
* Choose the direction of the calls you want to filter (**Inbound, Outbound, Internal, All**).

8. **Filter By**:
* Choose additional filters such as **Branch, Caller Name, Phone Number, Call ID,** or **User** to narrow down the results further.
* Enter specific criteria based on the selected filter.

9. **Select Dispositions**:
* Check the boxes for the **call outcomes** you want to filter by (**Answered, No Answer, Busy, Failed**).

10. **Apply Filter**:
* Click **Update** to apply the filter settings.
* The details will be displayed on the screen based on your filters.

11. **Reset Filters**:
* Click **Reset** to remove your filters and start over if needed.

### Playing and Saving Recordings
12. **Playing and Saving Recordings**
* **Access a Recording:** Click on a call recording in the displayed list or click the music note next to a call recording.
* **Playback Controls**: A popup will appear with details of the recording, including **Unique ID, Start Time, Caller Name, Caller Number, Dialed Number, Disposition,** and **Duration**.
* **Play Recording**: Use the play button to listen to the recording.
* **Save Recording**: Click the **Save recording** button to download the recording.

Call recordings are saved as audio only. You can play and download the audio here, but the report does not generate a written transcript of a recording. If you need a text transcript, download the audio file and run it through a separate transcription tool.
### Accessing Call Flow View
13. **Call Flow View:**
* **Access Call Flow View:** Click the call flow icon next to a call recording record. This will open the detailed call flow view, providing insights into the specific call path and related actions taken during the call.
* **Call Flow Details:** A popup will display the call flow details, including **Unique ID, Start Time, Caller Number, Dialed Number, Disposition**, and a graphical representation of the call flow.

### Understanding the Call Recordings Table
14. **Understanding the Call Recordings Table:**
* **Time**: Shows the timestamp of the call.
* **Caller Number**: Displays the number of the caller.
* **Caller Name**: Shows the name associated with the caller.
* **Dialed Number**: Displays the number that was dialed.
* **Direction**: Indicates the direction of the call (Inbound, Outbound, Internal).
* **Disposition**: Describes the outcome of the call (Answered, No Answer, Busy, Failed).
* **Duration**: Displays the length of the call.
* **Who Answered**: Shows the name or extension of the person who answered the call.
* **Packet Loss**: Indicates the percentage of packet loss during the call.
* **Jitter**: Displays the amount of jitter (variation in packet arrival times) during the call.

# Call Records
Source: https://docs.voxo.co/omnia/admin/call-records
This guide provides step-by-step instructions on how to access, view, and manage call records within the Omnia Admin Portal.
This guide provides step-by-step instructions on how to access, view, and manage call records within the Omnia Admin Portal.
Access to this Report:
Access to this report is based on your user role. You may not be able to access and view a specific report and all of its features if your role does not permit it.
### Accessing Call Records
1. **Access the Call Records Report**:
* Go to the [Admin Portal](https://app.voxo.co/dashboard) and sign in.
* Click the **Reports** tab to expand it.
* Select **Call Summary**, then **Call Records**.

### Viewing Call Records
2. **View Call Records:**
* The table displays the following columns:
* **Time**: The time the call was made.
* **Caller Number**: The number of the caller.
* **Caller Name**: The name of the caller.
* **Dialed Number**: The number dialed.
* **Direction**: The direction of the call (inbound or outbound).
* **Disposition**: The call's outcome (answered, no answer, busy, failed).
* **Presented**: Indicates if the call was presented to the user.
* **Duration**: The duration of the call.
* **Who Answered**: The person who answered the call.
* [Outcome](https://scribehow.com/shared/Omnia_Admin_Account_Settings__gaYuDNCBQbCCA_1-ZWU0GQ#a3ddfd02): The result of the call.
* **Packet Loss**: The percentage of packet loss during the call.
* **Jitter**: The jitter during the call.
* **MOS**: The Mean Opinion Score for the call quality.
* The initial results shown will be for today's date.

### Filtering Call Records
3. **Preset Filters:**
* Use the **Yesterday**, **Last 10 Days**, or **Last 30 Days** buttons to quickly filter the call records.

4. **Filter Settings**:
* Click **Filter** to open the filter settings.

5. **Select Date Range**:
* Choose the start and end dates to define the period for which you want to view the call records.
* You can use preset options like **Last Week, Last Month, Last 3 Months, Last 6 Months,** and **Last Year.**
* In addition to the date range, you can also filter by a specific time range within the selected dates.

6. **Clear Filters:**
* Click **Clear** to remove the filters if needed. This allows you to start over while picking from your date ranges.

7. **Advanced Filters**:
* Select the call direction, filter by specific criteria (branch, phone number, caller name, etc.), dispositions (answered, no answer, busy, failed), and whether the call was presented.
* Presented means a call attempted to reach a user.
* A phone number entered in the filter matches both the **Caller Number** and the **Dialed Number**, so a single search returns both inbound and outbound calls involving that number.
* For calls that were answered and then transferred between extensions, the **Duration** is the total answered duration of the call — it isn't split per extension, so summing Duration counts the full time the call was connected, including any time spent on the original extension before the transfer.

8. **Apply Filter**:
* Click **Update** to apply the filter settings.
* The details will be displayed on the screen based on your filters.

9. **Reset Filters**:
* Click **Reset** to remove your filters and start over if needed.

### Exporting Call Records
10. **Export Call Records:**
* Use the **Export** button to download the call records data in CSV format.
* Click **OK** to confirm the export.
* If you don't see the **Export** button above the calls table after applying a filter, do a hard reload of the page (Ctrl + F5 on Windows, Cmd + Shift + R on Mac) — the toolbar can stay cached after a long-running session, and a hard reload brings the Export button back.

### Scheduling Call Record Reports
11. **Schedule a Report:**
* Click the **Export** button.
* Select **Schedule Report** from the dropdown.

12. **Configure Report Settings:**
* Enter a name for the report.
* Add recipient email addresses. Use commas to separate multiple emails.
* Select the report frequency: Daily, Weekly, or Monthly.
* Review the current filter settings.
* Click **Schedule** to save the report schedule.
* For more information, see the [Scheduled Reports](https://scribehow.com/shared/Omnia_Admin_Reports_Scheduled_Reports__W6AXJX2qQMK2RNHO1Mu0DA?referrer=documents) section.

### Accessing the Call Flow View
13. **View Call Flow:**
* Click on a specific call record or click the call flow icon next to a call record to open the call flow view for that record.

### Understanding the Call Flow View
14. **Call Flow View Details:**
* The **Call Flow View** provides a visual representation of the call's journey from start to finish. It includes the following elements:
* **Unique ID**: A unique identifier for the call.
* **Caller Number**: The number of the person who initiated the call.
* **Number Dialed**: The number that was dialed.
* **Start Time**: The time when the call started.
* **Duration**: The total duration of the call.
* **Disposition**: The outcome of the call (e.g., answered, no answer).
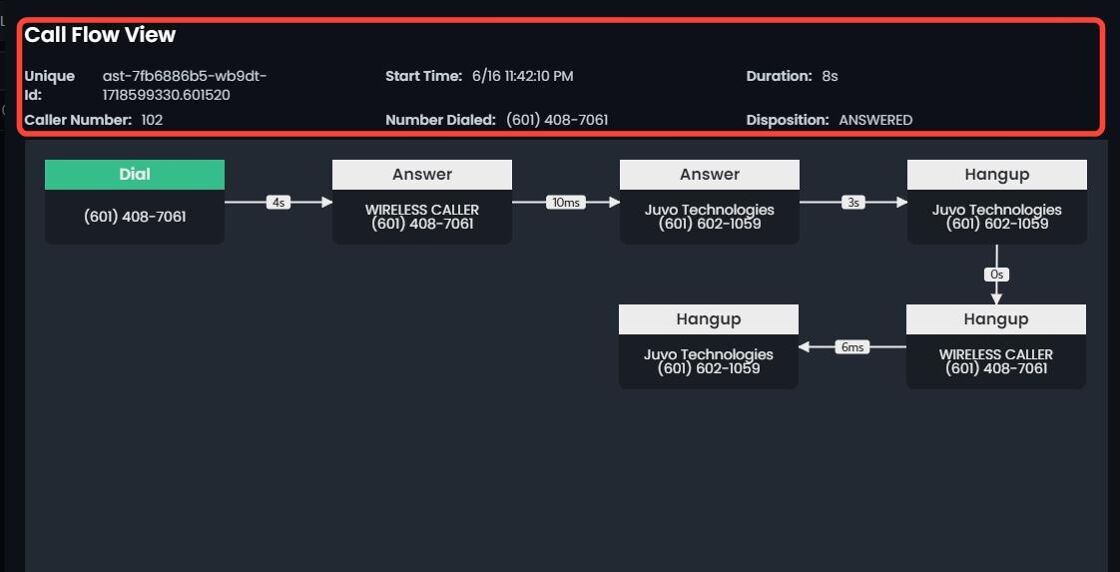
15. **Flowchart Path**:
* The flowchart shows the path of the call through various stages, such as:
* **Dial**: The call is dialed out to the specified number.
* **Answer**: The call is answered.
* **Hangup**: The call is terminated by either party.
* **Note:** The provided flowchart is an example of an outbound call. The stages and details may vary based on the direction and nature of the call.
* Each stage is accompanied by details such as the time taken to reach the next stage, providing a comprehensive view of the call's progression.

# Call Statistics - User
Source: https://docs.voxo.co/omnia/admin/call-statistics-user
The Call Statistics report provides a detailed analysis of call activity within Omnia.
The Call Statistics report provides a detailed analysis of call activity within Omnia. This guide offers step-by-step instructions on how to access and view call statistics for users, as well as how to filter, sort, and export the data.
Access to this Report:
Access to this report is based on your user role. You may not be able to access and view a specific report and all of its features if your role does not permit it.
### Accessing User Call Statistics
1. **Access User Call Statistics**:
* Go to the [Admin Portal](https://app.voxo.co/dashboard) and sign in.
* Click the **Reports** tab to expand it.
* Select **Call Statistics**, then **Users**.

### Viewing User Call Statistics
2. **View User Call Statistics:**
* The table displays the following columns:
* **Number**: The user's extension number.
* **Name**: The user's name.
* **Call Types**: Various call metrics, including:
* **Inbound Answered**
* **Inbound Duration**
* **Outbound Answered**
* **Outbound No Answer**
* **Outbound Busy**
* **Outbound Failed**
* **Outbound Duration**
* **Inbound Total**
* **Outbound Total**
* **Total Answered**
* **Total Talk Time**
* **Avg Talk Time Per Call**
* **Total Outbound No Answer Duration**
* The initial results shown will be for today's date.

### Sorting Data
3. #### Sorting Data:
* Click the **sort** icons next to column headers to arrange items in ascending or descending order.

### Filtering Data
4. **Preset Filters:**
* **Yesterday**: Click this button to quickly filter data from the previous day.
* **Last 10 Days**: Click this button to quickly filter data from the last 10 days.
* **Last 30 Days**: Click this button to quickly filter data from the last 30 days.

5. **Filter Settings**:
* Click **Filter** to open the filter settings.

6. **Select Date Range**:
* Choose the start and end dates to define the period for which you want to view the Call Statistics.
* You can use preset options like **Last Week, Last Month, Last 3 Months, Last 6 Months,** and **Last Year**.
* In addition to the date range, you can also filter by a specific time range within the selected dates.

7. **Clear Filters:**
* Click **Clear** to remove the filters if needed. This allows you to start over while picking from your date ranges.

8. **Choose the Distribution Type:**
* Choose the distribution type (**Daily, Monthly, or None**).

9. **Filter By**:
* **Branch**: Filter call statistics by specific branches.
* **Users**: Filter by specific users or extension numbers.
* Enter the specific criteria based to narrow down the results.

10. **Apply Filter**:
* Click **Update** to apply the filter settings.
* The details will be displayed on the screen based on your filters.

11. **Reset Filters**:
* Click **Reset** to remove your filters and start over if needed.

12. **Export Data**:
* Use the **Export** button to download the User call statistics data in CSV format.
* Click **OK** to confirm the export.

### Understanding the User Call Statistics
13. **Call Metrics:**
* **Inbound Answered:** The total number of incoming calls that were answered by the user.
* **Inbound Duration:** The total duration of all answered inbound calls, typically measured in minutes and/or seconds.
* **Outbound Answered:** The total number of outgoing calls made by the user that were successfully answered by the recipient.
* **Outbound No Answer:** The total number of outgoing calls made by the user that were not answered by the recipient.
* **Outbound Busy:** The total number of outgoing calls made by the user that received a busy signal.
* **Outbound Failed:** The total number of outgoing calls made by the user that failed to connect due to technical issues or incorrect numbers.
* **Outbound Duration:** The total duration of all successfully connected outbound calls, typically measured in minutes and/or seconds.
* **Inbound Total:** The total number of all inbound call attempts, regardless of whether they were answered, missed, or failed.
* **Outbound Total:** The total number of all outbound call attempts, regardless of whether they were answered, not answered, busy, or failed.

####
# Campaigns
Source: https://docs.voxo.co/omnia/admin/campaigns
A Call Campaign allows you to systematically contact a list of numbers, managing details like scheduling, caller ID, and call handling.
## A Call Campaign allows you to systematically contact a list of numbers, managing details like scheduling, caller ID, and call handling. This is useful for sales, customer service follow-ups, and other organized call needs. This guide provides step-by-step instructions for accessing and managing call campaigns in the Omnia Admin Portal, including adding, scheduling, defining calling hours, handling connections, managing numbers, editing, searching, and exporting campaigns.
This document applies to the following user roles within Omnia:
Account Administrator
Partner Administrator
### Accessing Call Campaigns
1. **Navigate to Call Campaigns:**
Go to the [Admin Portal](https://app.voxo.co/dashboard) and sign in.
Click the **Phone System** tab to expand it, then select **Campaigns**.

### Adding a New Call Campaign
2. **Add a New Call Campaign:**
* Click **Add New**.
* Click **Voice**.

### General Settings
3. **General Settings:**
**Always record**: Check this box if you want to record all calls in this campaign.
**Enter name**: Type a descriptive name for your campaign (e.g., "June Sales Outreach").
**State**: Set the initial state of the campaign (e.g., READY, PAUSED).
**Time zone**: Select the appropriate time zone for your campaign. Default is "Use account default."
**Select caller ID**: Choose the caller ID that will be displayed to call recipients.

### Schedule the Campaign
4. **Schedule the Campaign**
* **Start Date / Time**: Set the start date and time for the campaign.
* **End Date / Time**: Set the end date and time for the campaign.
**Note**: Don't forget to select a time!

### Define Calling Hours
5. **Define Calling Hours**:
* **Start time**: Select the time when calling should begin each day.
* **End time**: Select the time when calling should stop each day.
* **Enter call frequency**: Specify the frequency of calls, including how many seconds to wait between calls. This helps manage the pacing of the campaign.

### Handle Call Connections
6. **Handle Call Connections**:
* **Enable Voicemail Detection**: Check this box to have the system detect and handle voicemail when a call connects.
* **Destination Type(s)**: Select the action to take when a call connects (e.g., play a message, forward to an agent).
* **Select Destination**: Choose the specific action or endpoint for the connected call based on the selected destination type(s).

### Manage Numbers
7. **Add Individual Numbers:**
* Click **Manage Numbers.**
* **Number**: Enter a **phone number** you wish to include in the campaign.
* **Description**: Enter a description for the number. This could include the contact's name or any relevant notes.
* Click **Reset** to remove an entry.
* Click **Add number** "+" to add the number.
* Continue to add multiple numbers by following this process. Added entries will appear in the list below.

8. **Remove an Entry:**
* If you need to remove a number from the list after selecting add, clicking **Remove number** (-) will remove an entry before saving.

9. **Search the List:**
* Enter a number or description in the **Search** field to find a specific entry.
* **Sort**: Click the sort icons next to column headers to arrange items in ascending or descending order.

10. **Save the Call Campaign:**
* Once you have completed adding entries, click **Create**.
* Click **Yes** to confirm and save.

### Import Numbers from a CSV File
11. **Import from CSV**:
* Hover over **Import from csv** and click **Download example csv** to get a template. Complete the template, save it, and click **Import from csv** to upload the spreadsheet.

12. **Map CSV Fields**:
* Select **Number** and **Description** from the dropdown menus for each corresponding column.
* All listed fields must be selected to continue.
* Click **Reset** to remove the CSV and reupload if needed.
* Click **Add**.
* Added entries will appear in the list below.

13. **Remove an Entry:**
* If you need to remove a phone number entry from the list after selecting add, clicking **Remove number** (-) will remove an entry before saving.

14. **Save the Call Campaign:**
* Once you have completed adding entries, click **Create**.
* Click **Yes** to confirm and save.

### Set Campaign State to READY
15. **Set Campaign State to READY:**
* Click **READY** to ensure the campaign is ready to begin.

### Edit a Call Campaign
16. **Edit a Call Campaign**:
* Click on the campaign you want to edit or click the **Edit** button next to it.
* Make your edits.
* Click **Save**.
* Click **Yes** to confirm.

### Deleting Call Campaigns
17. **Delete a Call Campaign:**
* Click the **Delete** button next to the Call Campaign.
* Confirm the deletion by clicking **Yes**.

### Search and Sort
18. **Search for a Call Campaign:**
* **Search Bar**: Quickly find specific items by typing the name or a keyword in the search field. The system will filter the list based on your search input, displaying the relevant results.
* **Sort**: Click the sort icons next to column headers to arrange items in ascending or descending order.

### Export Call Campaigns
19. **Export Call Campaign List**:
* Click the **Export** button next to the search field.
* The system will download a list of the items in CSV format.

# Conference Rooms
Source: https://docs.voxo.co/omnia/admin/conference-rooms
A conference bridge allows multiple users to join a conference call using a dedicated phone number and PINs for secure access.
## A conference bridge allows multiple users to join a conference call using a dedicated phone number and PINs for secure access. This guide provides step-by-step instructions for creating, editing, and deleting conference rooms in the Omnia Admin Portal. It covers general settings, media settings, and additional settings for customizing conference room features.
This document applies to the following user roles within Omnia:
Account Administrator
Partner Administrator
### Accessing Conference Rooms
1. **Navigate to Conference Rooms:**
Go to the [Admin Portal](https://app.voxo.co/dashboard) and sign in.
Click the **Phone System** tab to expand it, then select **Conference Rooms**.

### Creating a Conference Room
2. **Add a Conference Room:**
* Click **Add New**.

### General Settings
3. **Configure General Settings**:
* **Enter Number**: Provide the conference bridge number.
* **Enter Name**: Give a name to the conference bridge.
* **Enter PIN**: Set a PIN for users to join the conference.
* **Enter Admin PIN**: Set an admin PIN for administrative control over the conference.
* **Enter Conference Report Email**: Provide an email address to receive conference reports.
* **Max Allowed Users**: Select the maximum number of allowed users for the conference.

### Media Settings
4. #### Configure Media Settings:
* Click **Media**.

5. **Add a New Media File:**
* **Click Add a Mediafile** to record or upload a new [media file](https://scribehow.com/shared/Omnia_Admin_Media_Files__LxLyMgU7SBqju9ex6tTRBg?referrer=documents) if needed.
* Use the controls to record or upload the media file. This will open additional options.

6. **Additional Options**:
* **Playback**: Click to play the media file.
* **Press and Hold To Record:** Click and hold to record a message.
* **Upload File**: Click to add an existing audio file.
* **Cancel Changes**: Click to revert to previous settings.
* **Enter a name:** Type the name in the **Mediafile** Name field before saving.
* **Save Changes**: Click to save the recorded or uploaded file. This media file will now be available to choose from and select in the dropdowns.

7. #### Media Settings:
* **Request PIN Message**: Select the message to play when requesting a PIN. Click the **Preview media** button to listen and preview the message, or click **X** to remove.
* **Correct PIN Message**: Select the message to play when the correct PIN is entered. Click the **Preview media** button to listen and preview the message, or click **X** to remove.
* **Correct Admin PIN Message**: Select the message to play when the correct admin PIN is entered. Click the **Preview media** button to listen and preview the message, or click **X** to remove.

### Additional Settings
8. **Configure Additional Settings:**
* Click **Settings**.
* Place a checkmark by the following to enable:
* **Announce Users Count:** Announce the number of users in the conference.
* **Announce User Join/Leave With Review:** Announce when users join or leave with review.
* **Announce User Join/Leave Without Review:** Announce when users join or leave without review.
* **Play MOH When Only One User:** Play [music on hold](https://scribehow.com/shared/Omnia_Admin_Music_On_Hold__Xm10itWOQ5yINYODN6QQcQ?referrer=documents) when only one user is in the conference.
* \**Allow Access to Menu With *:** Allow users to access the menu using \* .
* **Do Not Play Message When First Person Enters:** Disable the message when the first person enters.
* **Wait For Admin Before Starting Conference:** Wait for the admin before starting the conference.
* **Join User Muted:** Have users join the conference muted.
* **End The Conference When The Admin Leaves:** End the conference when the admin leaves.
* **Record The Conference:** Record the conference.

### Saving the Conference Room
9. **Save the Conference Room:**
* Click **Create** and then **Yes** to confirm and save the conference room.

### Joining a Conference Room
Once a conference room is set up, participants join as follows:
* **Internal participants**: Dial the extension number assigned to the conference room, then enter the PIN or admin PIN and follow the prompts. You can also dial the 10-digit number (DID) associated with the conference room.
* **External participants**: Call the organization's main number and ask to be transferred to the conference room extension, then enter the PIN or admin PIN and follow the prompts.
The conference room stays open until the last internal participant hangs up, at which point it closes automatically and the conference call ends.
### Editing Existing Conference Rooms
10. **Edit an Existing Conference Room:**
* Click on the conference room you want to edit or click the **Edit** button next to it.
* Make your edits.
* Click **Save**.
* Click **Yes** to confirm and save your changes.

### Deleting a Conference Room
11. **Delete a Conference Room:**
* Click the **Delete** button next to the Conference Room.
* Click **Yes** to confirm the deletion.

### Search and Sort
12. **Search for a Conference Room:**
* **Search Bar**: Quickly find specific items by typing the name or a keyword in the search field. The system will filter the list based on your search input, displaying the relevant results.
* **Sort**: Click the sort icons next to the column headers to arrange items in ascending or descending order.

### Exporting Conference Rooms
13. **Export**:
* **Export Button**: Click the **Export** button next to the search field.
* The system will download a list of the items in CSV format.

# Creating a New 10DLC Messaging Campaign
Source: https://docs.voxo.co/omnia/admin/creating-a-new-10dlc-messaging-campaign
Learn how to create a new 10DLC messaging campaign.
### 1. Navigate to [https://app.voxo.co/accounts](https://app.voxo.co/accounts)
2. Click "Account"

3. Click "10DLC Messaging"

4. Click "Campaigns"

5. Click "Add New"

6. Click the "Campaign Description" and add a detailed description of why your business will be using SMS.
**Example:**
"Messaging campaign to allow VOXO employees to receive SMS from customers along with 2FA codes"

7. Click the "Call-to-Action / Message Flow" field. This has to show how a customer logs in and must match with the business web presence.
**Example:**
Customer opts in by sending the first message to the number requested stating "Sending this text to receive messages from VOXO in regard to my account or service received from VOXO"

8. Click the "Sample Message" field. Messages Must include Brand name (Business name) and opt out and help disclaimer
Example:
"VOXO: Yes we will be available for a call this afternoon at 5p.m. CST. Msg & data rates may apply. Reply Help for help, and STOP to cancel."

9. At the bottom of the page in the help message field, make sure to add a help at "your businesses email" for contact.

10. This is example of a contact page that passes regulations that are set forth. Note anywhere on a webpage a number is required, SMS disclosure is needed and a link that leads to terms and conditions is required.

### Compliance requirements that prevent rejection
Most campaign denials come from a few specific, avoidable gaps. Before you submit, confirm all of these:
* **Disclosures must be on the same page where you collect phone numbers.** The opt-in language, "Msg & data rates may apply," message frequency, and STOP/HELP instructions all have to appear on the sign-up/opt-in page itself. A separate Terms & Conditions page reachable only from a footer link does **not** satisfy this.
* **Your HELP reply must include a way to contact the business.** A bare "Reply STOP to opt out" is not enough — the HELP response has to contain a support email **or** phone number. For example: `For help, contact support@yourbusiness.com. Msg and data rates may apply, frequency may vary. Reply HELP for help and STOP to stop.`
* **Healthcare brands (pharmacies, clinics, telehealth) face extra scrutiny.** Your privacy policy must be hosted at a publicly accessible URL (no login required) and must explicitly state that mobile/phone-number information will **not** be shared with third parties for marketing. A generic privacy policy will be denied even if the URL works.
* **A public privacy policy is required regardless of opt-in mechanism.** 10DLC rules require every business to have a web presence — even a social media page — with a linked, publicly accessible privacy policy, whether the customer opts in on your website, verbally, or by texting a keyword. Only businesses that collect opt-in on a website need the SMS Terms & Conditions link; if you use keyword (text-to-join) opt-in instead, set an opt-in keyword (such as START, YES, or SUBSCRIBE) and describe that flow in the **Call-to-Action / Message Flow** field (for example, "Customers opt in by texting START to our number") — you still need the privacy policy. Healthcare brands' privacy policy must explicitly state that mobile/phone-number information will not be shared with third parties for marketing.
* **Use an email you can check for brand verification.** Brand registration sends a 2FA code to the email on the brand application. A stale, shared, or unmonitored inbox will stall brand approval indefinitely.
11. **Sample Terms and Conditions for SMS Service**\[Your Company Name] SMS Terms of Service
12. Acceptance of TermsBy opting into receiving communication via SMS, you accept these Terms of Service and agree to receivetext messages from \[Your Company Name] on your mobile device.
13. User Opt-InYou can opt into our SMS service by texting Subscribe to (insert number here). By opting in, youconsent to receive text messages from us.
14. Message FrequencyMessage frequency will vary based on our promotions, alerts, and notifications.
15. Standard Message and Data RatesStandard message and data rates may apply to all text messages sent and received.
16. Opt-Out ProcedureTo stop receiving messages, text STOP to \[Your SMS Number] at any time.
17. Limitation of Liability\[Your Company Name] is not liable for delayed or undelivered messages.
18. Amendment of TermsWe reserve the right to change these terms by notifying you through SMS or on our website.SMS Privacy Policy
19. Information CollectionWe collect information you provide directly to us when you opt into our SMS service, such as your mobilephone number.
20. Use of InformationThe information collected will be used to send SMS messages and for internal analytics purposes.
21. Information SharingYour personal information will not be shared with third parties, except as required by law.
22. Data SecurityWe implement security measures to ensure the safety of your personal information.
23. Access to Your InformationYou may request access to your personal information that we hold.
24. Changes to This Privacy PolicyOur Privacy Policy may change from time to time. We will notify you of any changes by posting the newpolicy on our website.
25. Contact UsIf you have questions about this privacy policy, please contact us at \[Your Contact Information].You can email [blal@ha.com](mailto:blal@ha.com) or text HELP to (your business number)SMS status within the VOXO portalTo access details regarding SMS click account in the admin portal and go to 10DLC Messaging. That willshow a Brand Status page and Campaign page, Campaign can not be submitted until Brand is approved.
# Custom Destinations
Source: https://docs.voxo.co/omnia/admin/custom-destinations
Custom destinations are call routing specifications defined by a system administrator, such as forwards to external numbers.
## Custom destinations are call routing specifications defined by a system administrator, such as forwards to external numbers. They can be used across various features in Omnia to route phone numbers, IVRs, and other call handling elements. This guide explains how to manage custom destinations in the Omnia Admin Portal, including adding, editing, deleting, searching, and exporting them.
This document applies to the following user roles within Omnia:
Account Administrator
Partner Administrator
### Accessing Custom Destinations
1. **Navigate to Custom Destinations:**
Go to the [Admin Portal](https://app.voxo.co/dashboard) and sign in.
Click the **Phone System** tab to expand it, then select **Custom Destinations**.

### Adding New Custom Destinations
2. **Add a New Custom Destination:**
* Click the **Add New** button to create a new custom destination.
* In the **Enter name** field, type a descriptive name for the custom destination. This helps in easily identifying the purpose of this configuration later.

3. **Select the Destination Type:**
* Click on the **Select type** dropdown menu to choose the action you want to configure. The available options include:
* **Alter caller ID**: Change the caller ID for the incoming call.
* **Forward call to**: Forward the call to another number.
* **Send a text message**: Send a predefined text message.
* **Send call to queue at position**: Place the call in a queue at a specified position.
* **Read a tag**: Read a specific tag associated with the call.
* **Route by previous call**: Route the call based on the previous call's handling.
* **Tag a call**: Apply a tag to the call for identification or tracking purposes.

4. **Configure Additional Details:**
* Depending on the selected type, additional fields may appear. Fill in these fields as required. For example:
* If you choose **Forward call to**, enter the number to which the call should be forwarded.
* If you select **Send a text message**, provide the text message content.

5. **Save the Custom Destination:**
* After filling in all necessary details, review your entries for accuracy.
* Click **Create** then **Yes** to save the custom destination.

### Editing a Custom Destination
6. **Edit a Custom Destination**:
* Click on the custom destination you want to edit or click on the **Edit** button next to it.
* Make your edits.
* Click **Save**.
* Click **Yes** to confirm and save your changes.

### Deleting Custom Destinations
7. **Delete a Custom Destination**:
* Click the **Delete** button next to the Custom Destination.
* Confirm the deletion by clicking **Yes**.

### Search and Sort
8. **Search Custom Destinations:**
* **Search Bar**: Quickly find specific items by typing the name or a keyword in the search field. The system will filter the list based on your search input, displaying the relevant results.
* **Sort**: Click the sort icons next to the column headers to arrange items in ascending or descending order.

### Exporting Custom Destinations
9. **Export Custom Destinations:**
* Click the **Export** button next to the search field.
* The system will download a list of the items in CSV format.

# Dashboard
Source: https://docs.voxo.co/omnia/admin/dashboard
This guide provides step-by-step instructions on how to access and navigate the Omnia Admin Dashboard.
## This guide provides step-by-step instructions on how to access and navigate the Omnia Admin Dashboard.
This document applies to the following user roles within Omnia:
Account Administrator
Partner Administrator
### Accessing the Admin Dashboard
1. **Access the Admin Dashboard**:
* Go to the [Admin Portal](https://app.voxo.co/dashboard) and sign in.
* If you see the **User Panel**, click **Go to admin** to switch to the admin view.
* Click **Dashboard**.

### Call Report Overview
2. * **Understanding the Call Report Graph:**
* The Y-axis on the left side represents the number of presented calls (inbound).
* The Y-axis on the right side represents the number of calls (outbound).
* The X-axis represents the date range.

3. **Color-Coded Call Statuses:**
* **Blue:** ANSWERED (IN)
* **Orange:** NO ANSWER (IN)
* **Yellow:** ANSWERED (Outbound Calls)
* **Light Blue:** NO ANSWER (Outbound Calls)

4. **Date Range Selection:**
* Use the options to filter the data displayed on the graph:
* **Last 10 Days**
* **Last 30 Days**

5. **Hover for Details:**
* Hover over data points on the graph to see detailed information about the calls on a specific date.

### System Status
6. **System Status:**
* Displays the status of various services:
* **Fax:** Indicates the status of the fax service.
* **Mobile:** Indicates the status of the mobile service.
* **Voice:** Indicates the status of the voice service.
* **Features:** Indicates the status of additional features.
* **SMS:** Indicates the status of SMS service.
* **PSTN:** Indicates the status of the PSTN service.
* All services show a green checkmark if they are operational.

### Users
7. **Users:**
* Displays the total number of [users](https://scribehow.com/shared/Omnia_Admin_Users__u9fT5HJQQ0-Bgzm7m7g5Vw?referrer=documents) in the account (e.g., 5 Users).
* Click **View All Users** to see detailed information about each user.

### Extensions
8. #### **Extensions:**
* Displays the total number of [extensions](https://scribehow.com/shared/Omnia_Admin_Extensions__-L9BuyfORwK9dnYrMhXwQg?referrer=documents) in the account (e.g., 5 Extensions).
* Click **View All Extensions** to see detailed information about each extension.

### Port Your Number
9. **Port Your Number:**
* Allows admins to transfer their existing numbers to VOXO.
* Click **Create Request** to start the [porting](https://scribehow.com/shared/Omnia_Admin_Number_Porting__m0jgfN1qQeSPXHrDAEaqOg?referrer=documents) process.

### Phone Numbers
10. #### **Phone Numbers:**
* Displays the total number of [phone numbers](https://scribehow.com/shared/Omnia_Admin_Phone_Numbers__LWFIyZMrQtOdnAQBiVLT9w?referrer=documents) in the account (e.g., 9 Numbers).
* Click **New Number** to add a new phone number.

### Get Help
11. **Get Help:**
* Provides access to support and frequently asked questions.
* Click **Get Support** to contact support or view FAQs.

# Do Not Call Lists
Source: https://docs.voxo.co/omnia/admin/do-not-call-lists
This guide provides step-by-step instructions for managing Do Not Call (DNC) lists in Omnia.
## This guide provides step-by-step instructions for managing Do Not Call (DNC) lists in Omnia. It covers how to access, add, import, delete, search, and export lists and numbers. Using DNC lists ensures compliance and privacy by preventing users from dialing numbers on the internal DNC list.
This document applies to the following user roles within Omnia:
Account Administrator
Partner Administrator
### Accessing Do Not Call Lists
1. **Navigate to Do Not Call Lists**:
* Go to the [Admin Portal](https://app.voxo.co/dashboard) and sign in.
* Click the **Phone System** tab to expand it, then select **Do Not Call Lists**.

### Adding a New Do Not Call List
2. **Add a New Do Not Call List:**
* Click **Add New**.
* Enter a name for the list in the **Enter name** field.
* Enter a description in the **Enter description** field.

### Adding Numbers to the Do Not Call List
3. **Add Numbers**:
* Enter a phone number in the **Enter number** field.
* Enter a description in the **Enter description** field.
* Click the **Delete** button to delete an entry before adding it to the list.
* Click the **Add** "+" button to add an entry to the list.
* Continue to add additional phone numbers to the list as needed. Added entries will appear in the list below.

4. **Search the List:**
* Enter a number or description in the **Search** field to find a specific entry.
* **Sort**: Click the sort icons next to column headers to arrange items in ascending or descending order.

5. **Remove an Entry:**
* If you need to remove a phone number entry from the list after selecting add, clicking **Remove** (-) will remove an entry before saving.

6. **Save the List:**
* Once you have completed adding entries, click **Create**.
* Click **Yes** to confirm and save.

### Bulk Adding Numbers to the Do Not Call List
7. **Import from CSV:**
* Hover over **Import from csv** and click **Download example csv** to get a template to add your phone numbers in bulk to the list.
* Complete the template, save it, and click **Import from csv** to upload the spreadsheet.

8. **Map CSV Fields**:
* Select **Number** and **Description** from the dropdown menus for each corresponding column.
* All listed fields must be selected to continue.
* Click **Reset** to remove the CSV and reupload if needed.
* Click **Add**.
* Added entries will appear in the list below.

9. **Remove an Entry:**
* If you need to remove a phone number entry from the list after selecting add, clicking **Remove number** (-) will remove an entry before saving.

10. **Save the Do Not Call List**:
* Once you have completed adding entries, click **Create**.
* Click **Yes** to confirm and save.

### Editing a Do Not Call List
11. **Edit a List:**
* Click on the do not call list you want to edit or click the **Edit** button next to it.
* Make your edits.
* Click **Save**.
* Click **Yes** to confirm and save your changes.

### Deleting a Do Not Call List
12. **Delete a List:**
* Click the **Delete** button next to the Do Not Call List.
* Confirm the deletion by clicking **Yes**.

### Search and Sort
13. **Search for a Specific List:**
* **Search Bar**: Quickly find specific items by typing the name or a keyword in the search field. The system will filter the list based on your search input, displaying the relevant results.
* **Sort**: Click the sort icons next to column headers to arrange items in ascending or descending order.

### Exporting Do Not Call Lists
14. **Export Do Not Call Lists**:
* Click the **Export** button next to the search field.
* The system will download a list of the items in CSV format.

# e911 Locations
Source: https://docs.voxo.co/omnia/admin/e911-locations
E911 locations are vital for emergency services to accurately locate callers.
## E911 locations are vital for emergency services to accurately locate callers. Keeping an updated list is essential for compliance and safety. This guide offers step-by-step instructions for managing e911 locations in the Omnia Admin Portal.
This document applies to the following user roles within Omnia:
Account Administrator
Partner Administrator
### Accessing e911 Locations
1. **Navigate to e911 Locations:**
Go to the [Admin Portal](https://app.voxo.co/dashboard) and sign in.
Click the **Account** tab to expand it, then select **e911 Locations**.

### Adding New e911 Locations
2. **Add a New e911 Location:**
* Click **Add New** to create a new e911 location.

### Enter Location Details
3. **Enter Location Details**:
* **Name**: Provide a name for the location.
* **Search address**: Enter the full address and use the search functionality to auto-fill other address fields.
* **Street number**: Enter the street number if not auto-filled.
* **Street Name**: Enter the street name if not auto-filled.
* **Select location type**: Choose the type of location from the available options:
* **BLDG**: Building
* **FL**: Floor
* **STE**: Suite
* **APT**: Apartment
* **Enter building / suite number**: Enter the specific building or suite number if applicable.
* **City**: Enter the city name if not auto-filled.
* **State**: Enter the state abbreviation if not auto-filled.
* **Zip code**: Enter the zip code if not auto-filled.
* **Latitude**: Confirm or enter the latitude coordinates.
* **Longitude**: Confirm or enter the longitude coordinates.

### Verify Location on Map
4. **Verify Location on Map**:
* Click **Validate**. If the address can't be validated, the message names the reason the carrier's address database gave — an unrecognized street or a zip code that doesn't match the city, for example — so you can correct the entry and validate again.
* Use the map view to verify the accuracy of the location. Adjust the pin if necessary to ensure the correct location is marked.
* Place a checkmark next to **Location Verified**.

### Save the Location
5. **Save the Location**:
* After filling in all necessary details, review your entries for accuracy.
* Click the **Create** to save the new e911 location.
* Click **Yes**.

### Editing e911 locations
6. **Edit e911 Locations**:
* Click on the e911 Location you want to edit or click the **Edit** button next to it.
* Make your edits.
* Click **Save.**
* Click **Yes**.

### Deleting 911 locations
7. **Delete an e911 Location:**
* Click the **Delete** button next to the e911 Location.
* Confirm the deletion by clicking **Yes**.
* Note: You cannot remove locations with assigned extensions. Remove the e911 location from the extensions and assign a different e911 location before deletion.

### Search, Sort, and Export
8. **Search for a Location**:
* **Search Bar**: Quickly find specific items by typing the name or a keyword in the search field.
* The system will filter the list based on your search input, displaying the relevant results.

9. **Sort Locations:**
* Click the **sort** icons next to the column headers to arrange items in ascending or descending order.

10. **Export Location Details**:
* Click the **Export** button next to the search field.
* The system will download a list of the items in CSV format.

# Extension Count
Source: https://docs.voxo.co/omnia/admin/extension-count
This guide provides step-by-step instructions on how to access and view the extension count within the Omnia Admin Portal.
## This guide provides step-by-step instructions on how to access and view the extension count within the Omnia Admin Portal.
This document applies to the following user roles within Omnia:
Account Administrator
Partner Administrator
### Accessing Extension Counts
1. **Navigate to Extension Count:**
* Go to the [Admin Portal](https://app.voxo.co/dashboard) and sign in.
* Click the **Billing** tab to expand it, then select **Extension Count**.

### Viewing Extension Counts
2. #### Extension Chart:
**Extension Chart**: The chart visually represents the extensions count over a selected date range.
You can hover over any data point in the chart to see the exact number of extensions for that date.
**Date Range Selection**: Adjust the date range using the date picker at the top of the chart to view extension counts over a specific period.

### Extension Table
3. **Extension Table**:
* The table displays a detailed count of the extensions with the following columns:
* **Date**
* **Extensions**
* **Paging Extensions**
* **SIP Trunks**
* **Residential Extensions**
* **Total Extensions**
* You can sort the data in the table by clicking the column headers.
* **Export**: Click the **Export** button to download a list of extensions in CSV format.

### Viewing Extension Counts (Partner Only)
4. **Extension Chart**:
* Provides a detailed chart displaying the following data:
* **Partner Extensions**: Total number of partner extensions.
* **Partner Residential Extensions**: Total number of partner residential extensions.
* **Account Extensions**: Total number of account extensions.
* The chart visually represents the extensions count over a selected date range.
* **Green Line**: Partner Extensions
* **Blue Line**: Partner Residential Extensions
* **Orange Bars**: Account Extensions
* Hover over any data point in the chart to see the exact number of extensions for that date. Adjust the date range using the date picker at the top of the chart.

### Extension Table (Partner Only)
5. **Extension Table**:
* The table displays a detailed count of the extensions for the partner account, with the following columns:
* **Date**
* **Extensions**
* **Paging Extensions**
* **SIP Trunks**
* **Residential Extensions**
* **Total Extensions**
* **Partner Extensions**
* **Partner Paging Extensions**
* **Partner SIP Trunks**
* **Partner Residential Extensions**
* **Partner Total Extensions**
* You can sort the data in the table by clicking the column headers.
* **Export**: Click the **Export** button to download a list of extensions in CSV format.

####
# Extensions
Source: https://docs.voxo.co/omnia/admin/extensions
This guide provides instructions for accessing, viewing, managing, and editing extensions in the Omnia Admin Portal.
## This guide provides instructions for accessing, viewing, managing, and editing extensions in the Omnia Admin Portal. It covers actions like searching, filtering, exporting, adding, editing, and deleting extensions. Additionally, it includes details on adding fax ATAs, paging, and SIP trunk extensions, as well as bulk creating and editing extensions.
This document applies to the following user roles within Omnia:
Account Administrator
Partner Administrator
A new extension can register and place outbound calls as soon as it's online, but it won't receive **inbound** calls until it's added to a routing destination — a [call group](/omnia/admin/call-groups), a [call queue](/omnia/admin/call-queues), or directly on a [phone number](/omnia/admin/phone-numbers). If a phone has dial tone and can call out but never rings, this is usually why.
### Accessing Extensions
1. **Navigate to Extensions:**
Go to the [Admin Portal](https://app.voxo.co/dashboard) and sign in.
Click the **Phone System** tab to expand it, then select **Extensions**.

### Viewing and Managing Extensions
2. **Extensions List**:
* The main screen displays a list of extensions with details such as **Name, Email, Number, Caller ID, Direct Dials,** and **Branch.**

3. **Extensions Count**:
**Total:** Displays the total number of extensions.
**Online:** Shows the number of extensions that are currently online.
**Offline:** Indicates the number of extensions that are currently offline.

4. **Status Indicators**:
* Extensions with a **green** icon are online, meaning a device (deskphone or softphone) is currently registered to the extension.
* Extensions with a **red** icon are offline. This indicates that no device is currently registered — the deskphone may be powered off, the user may not be signed in to the softphone, or no device has been configured yet. To see which specific devices have been registered to an extension, open the extension and use **Load online devices** on the **Devices** tab.

5. **Search and Filter**:
* **Search Extensions**: Use the **Search** bar to quickly find specific extensions by typing the name or a keyword. The system will filter the list based on your search input, displaying relevant results.
* **Filter Extensions**: Use the dropdown menu to filter the extensions by type (**All, Extension, Fax ATA, Paging, SIP Trunk**).
* **Sort**: Click the sort icons next to column headers to arrange items in ascending or descending order.

6. **Export Button**:
* Click the **Export** button to download a list of the extensions in CSV format.

7. **Add New Extension**:
* Click the **Add New** button to add a new **Extension, Fax ATA, Paging,** or **SIP Trunk**.

8. **Bulk Create**:
* Click the **Bulk Create** button to add multiple extensions.

9. **Bulk Edit**:
* Click the **Bulk Edit** button to edit options such as **Send Invite, Call Waiting, e911 Location, Branch, Outbound Recording, Outbound Caller ID, Outbound Faxing, Do Not Calls** for multiple extensions.

### Extensions Actions
10. The actions available for each extension are represented by icons/buttons next to each extension:
* **Edit Extension:** Click the **Edit** button to edit the extension.
* **Delete Extension:** Click the **Delete** button to remove the extension.
* **Reset Status:** Click the **Reset Status** button to reset the extension.
* **Reboot Devices:** Click the **Reboot Devices** button to reboot associated devices.
* **Wiretap:** Click the **Wiretap** button to initiate a wiretap.

### Adding a New Extension
11. **Add New Extension:**
* Click the **Add New** button and select **Extension** from the dropdown menu.

12. **Enter General Information:**
* **Enable Video Meetings**: Check to enable video meetings for this extension.
* **Extension Number**: Enter the extension number.
* **Extension Name**: Enter the name for the extension.
* **Email**: Enter the email address.
* This automatically creates a **User** account for access to the Omnia Portal.
* To manage user accounts, go to [Users](https://scribehow.com/shared/Omnia_Admin_Users__u9fT5HJQQ0-Bgzm7m7g5Vw?referrer=documents). Here, you can manage options like resetting passwords, enabling/disabling the Operator Panel, adjusting time zones, assigning roles, managing reporting features, and assigning users to queues.
* **Send Invite**: Check to send an invite for the Omnia portal to the provided email.

13. **Select e911 Location:**
* Choose the [e911 location](https://scribehow.com/shared/Omnia_Admin_e911_Locations__0NCbKFBoQom-1z2p-JcW_Q?referrer=documents) from the dropdown menu. This is a required field and must be completed to save the extension.
* Enter specific room or building details for e911 purposes.

14. **Branch:**
* Select the [branch](https://scribehow.com/shared/Omnia_Admin_Branches___UJ4yv5wT1qKlkNTqkRvUA?referrer=documents) associated with this extension if applicable.

15. **Outbound Recording:**
* Select the option for outbound recording (**Yes, No, or No, but allow start/stop**). Outbound recording is **off by default** and captures only answered calls. It isn't inherited by extensions added later, so enable it on each new extension — use **Bulk Edit** to set it on many at once.
* To enable inbound call recording, edit the [phone numbers](https://scribehow.com/shared/Omnia_Admin_Phone_Numbers__LWFIyZMrQtOdnAQBiVLT9w#ffc13138).
* **Email Recording:** Enter the email addresses to receive recorded call files.

16. **Outbound Caller ID:**
* Select the caller ID for outbound calls.

17. **Advanced Settings:**
* **Include in Dial by Name Directory:** Check this box if you want the extension to be included in the dial by name directory.
* **Include in Default Phonebook:** Check this box if you want the extension to be included in the default [phonebook](https://scribehow.com/shared/Omnia_Admin_Phone_Books__GoMpVuHLSFGqIrfMQNiPuQ?referrer=documents).
* **Account Number:** Enter the associated account number.
* **Department:** Enter the department if applicable.
* **Assign Do Not Call Lists:** Select the applicable [do not call lists](https://scribehow.com/shared/Omnia_Admin_Do_Not_Call_Lists__-g3NV0Y5RdmB3cAAkpeP8A?referrer=documents), containing numbers the extension may not dial.
* **7-digit Dialing:** Enter the area code to enable calls without dialing the area code first.

18. **Devices:**
* Navigate to the **Devices** tab.
* Click the **New Device** button.
* **Select Phone Model:** Choose the phone model from the dropdown menu.
* **Enter Device Name:** Enter the name for the device.
* **Enter Device MAC:** Enter the MAC address for the device.
* Once added, the settings for this device must be edited in the [Devices](https://scribehow.com/shared/Omnia_Admin_Devices__he9fosrYR8qcWUiGTyv6lw?referrer=documents) section of the portal.

19. **Never Miss A Call**:
Navigate to the **NeverMiss A Call** tab.
**Additional Destinations**: Select the type of destination ([Call Group](https://scribehow.com/shared/Omnia_Admin_Call_Groups__new4XpZBTwKeEYeYxm88ng?referrer=documents)**, [Call Queue](https://scribehow.com/shared/Omnia_Admin_Call_Queues__EwJRiWOMRUOgZJyX-YuQbQ?referrer=documents), [Time of Day](https://scribehow.com/shared/Omnia_Admin_Time_of_Days__xlwTGQXtSpmT4nMpHnmq-w?referrer=documents), [Virtual Receptionist](https://scribehow.com/shared/Omnia_Admin_Virtual_Receptionists__0zu-MuY_TbSnbNKkwRzptw?referrer=documents)**) and choose the specific destination.
This selection sets the offline, busy, and no answer destinations for the extension. If left blank, these default to voicemail, which is created automatically for the extension.
If an additional destination is chosen, a voicemail will not be created automatically.
To manage and create voicemails, go to [Voicemails](https://scribehow.com/shared/Omnia_Admin_Voicemails__avd1aEdzQJapD-KxgaffoA?referrer=documents).

20. **Faxing:**
Navigate to the **Faxing** tab.
**Enable Outbound Faxing:** Check this box to enable outbound faxing.
**Enable Direct Fax:** Check this box to enable direct fax. Note that an email must be provided to enable faxing features.
**Fax Outbound Caller ID:** Select the caller ID for outbound faxes.
Incoming faxes are managed through assigned [phone numbers](https://scribehow.com/shared/Omnia_Admin_Phone_Numbers__LWFIyZMrQtOdnAQBiVLT9w#fa1f8b87).

21. **Save the Extension:**
* Click **Create** to add the new extension.
* If the outbound caller ID chosen for the extension is an unrouted number, a popup will appear asking to assign it as the direct dial number.
* Click **Yes** to route the phone number to the extension.
* Click **No** to skip this step.

### Editing an Extension
22. **Edit Extension:**
* Once an extension is created, you can view and modify additional features and settings. You can also update existing information.

23. **General Settings**:
* **Enable Do Not Disturb:** Check this box to enable the Do Not Disturb feature.
* **Enable Voicemail Message Waiting Indicator:** Check this box to turn on the voicemail message waiting indicator for this extension.

24. **Invite and Update Email:**
* Updating an extension's email address automatically creates a new user account for the updated email address if **Send Invite** is selected. Otherwise, you must manually create the user account.
* Manage user accounts in **Users** to reset passwords, enable/disable the Operator Panel, adjust time zones, assign roles, manage reporting features, and assign users to queues.
* **Send Invite:** Check this to send an Omnia portal invite to the updated email.
**Note**: If you update the email address associated with the extension, you will need to delete the user account associated with the old email address. To delete the user account, go to [Users](https://scribehow.com/shared/Omnia_Admin_Users__u9fT5HJQQ0-Bgzm7m7g5Vw?referrer=documents).

25. **Update Email Address:**
* If the extension has Voicemail set up, updating the email address for the extension will automatically update the email address for the Voicemail. To manage Voicemail, go to [Voicemails](https://scribehow.com/shared/Omnia_Admin_Voicemails__avd1aEdzQJapD-KxgaffoA?referrer=documents).
* If the email address tied to the extension is set up to receive incoming faxes, go to the phone number associated with the fax and update or remove the email address.

26. **Advanced Settings:**
* **Max Inbound Rings:** Set the maximum number of inbound rings (default can be edited after creation).
* **Hold Music:** Select the hold music option (default can be edited after creation).
* **Call Waiting:** Enable or disable call waiting (default can be edited here).
* **Routing Profile:** Select the routing profile from the dropdown menu (default can be edited here).

27. **Devices:**
* **Manual Provision Settings:** Hover over the blue question mark icon next to **Devices** to view the manual provision settings. This includes details like:
* SIP Proxy
* DNS Type
* SIP Username
* SIP Password
* Register Expires
* Codec Support

28. **Viewing Online Devices:**
* Click **Load online devices** to refresh and see the latest online devices.
**Options Include:**
* **User Agent**: Displays the device type and model.
* **Address**: Shows the SIP address.
* **Expires**: Time for which the registration is valid.
* **Received**: IP address and port from which the registration was received.
* **Path**: Routing path of the SIP messages.
* **Last Keep Alive:** Timestamp of the last keep-alive message.
* **Server Id:** Identifier of the server handling the registration.

29. **Remove Device:**
* **Phone Model**: Use the dropdown menu to select the phone model.
* **Remove Device**: Check this box if you want to remove the device from the extension.

30. **Never Miss A Call Settings:**
**Enable Simultaneous Ring:** Check this box to enable simultaneous ring.
* This feature allows incoming calls to ring on all the user's devices simultaneously.
**Enable Forwarding All Calls:** Check the box next to **Enable forwarding all calls** to forward all calls to a specified number.
* **Destination Type:** Choose the type (e.g., Extension, Voicemail).
* **Select Destination:** Choose the specific destination.
* **Add a Destination:** Click **Add a destination** to include multiple destinations.
* Uncheck the box to remove call forwarding.

31. **Save the Changes:**
* Complete all edits.
* Click **Save**.
* Click **Yes** to apply the changes.

### Deleting an Extension
32. **Delete an Extension**:
* Deleting an extension will automatically delete its associated voicemail.
* Deleting an extension will not delete the user account or the device assigned to the extension.
* The device will remain active and available to reassign to another user. To delete a device, go to [Devices](https://scribehow.com/shared/Omnia_Admin_Devices__he9fosrYR8qcWUiGTyv6lw?referrer=workspace).
* To delete the user account, go to **Users**.

33. **Remove Email from Fax Settings:**
* If the email address tied to the extension is set up to receive incoming faxes, go to the phone number associated with the fax and remove the email address.

### Adding a Fax ATA
34. **Add New Fax ATA:**
* Click the **Add New** button.
* **Select Fax ATA:** From the dropdown menu, select **Fax ATA**.

35. **General Settings:**
* **Extension Number:** Enter the extension number.
* **Extension Name:** Enter the name for the extension.
* **Select e911 Location:** Choose the e911 location from the dropdown menu.
* **e911 Specific Room/Building:** Enter specific room or building details for e911 purposes.
* **Branch** (**Optional**)**:** Select the branch associated with this extension.
* **Outbound Caller ID:** Select the caller ID for outbound calls.

36. **Advanced Settings:**
* **Include in Dial by Name Directory:** Check this box if you want the extension to be included in the dial by name directory.
* **Include in Default Phonebook:** Check this box if you want the extension to be included in the default phonebook.
* **Account Number:** Enter the account number associated with this extension.
* **Department:** Enter the department if applicable.
* **7-digit Dialing:** Enter your area code to allow making calls without dialing the area code first.

37. **Configure Devices:**
* **New Device:** Click the **New Device** button.
* **Phone Model:** Select the phone model from the dropdown menu (e.g., Grandstream).
* **Enter Device Name:** Enter the name for the device.
* **Enter Device MAC:** Enter the MAC address for the device.
* Once added, the settings for this device must be edited in the [Devices](https://scribehow.com/shared/Omnia_Admin_Devices__he9fosrYR8qcWUiGTyv6lw?referrer=documents) section of the portal.

38. **Save the Fax ATA:**
* Click **Create** to add the new Fax ATA.
* Click **Yes** to confirm the creation.

### Editing a Fax ATA
39. **Edit Fax ATA**:
Once a Fax ATA Extension is created, you can view and modify additional features and settings. You can also update existing information.

40. **Advanced Settings:**
* **Max Inbound Rings:** Set the maximum number of inbound rings (default can be edited after creation).
* **Hold Music:** Select the [hold music](https://scribehow.com/shared/Omnia_Admin_Music_On_Hold__Xm10itWOQ5yINYODN6QQcQ?referrer=documents) option (default can be edited after creation).
* **Call Waiting:** Enable or disable call waiting (default can be edited here).
* **Routing Profile:** Select the routing profile from the dropdown menu (default can be edited here).

41. **Devices:**
* **Manual Provision Settings:** Hover over the blue question mark icon next to **Devices** to view the manual provision settings. This includes details like:
* SIP Proxy
* DNS Type
* SIP Username
* SIP Password
* Register Expires
* Codec Support

42. **Viewing Online Devices:**
* Click **Load online devices** to refresh and see the latest online devices.
**Options Include:**
* **User Agent**: Displays the device type and model.
* **Address**: Shows the SIP address.
* **Expires**: Time for which the registration is valid.
* **Received**: IP address and port from which the registration was received.
* **Path**: Routing path of the SIP messages.
* **Last Keep Alive:** Timestamp of the last keep-alive message.
* **Server Id:** Identifier of the server handling the registration.

43. **Remove Device:**
* **Phone Model**: Use the dropdown menu to select the phone model.
* **Remove Device**: Check this box if you want to remove the device from the extension.

44. **Save the Changes:**
* Complete all edits.
* Click **Save**.
* Click **Yes** to apply the changes.

### Adding Paging
45. **Add New Extension**:
* **Add New Extension:** Click the **Add New** button.
* **Select Paging:** From the dropdown menu, select **Paging**.

46. **General Settings**:
* **Include in Dial by Name Directory:** Check this box if you want the extension to be included in the dial by name directory.
* **Include in Default Phonebook:** Check this box if you want the extension to be included in the default phonebook.
* **Account Number:** Enter the account number associated with this extension.
* **Extension Number:** Enter the extension number for the paging extension.
* **Extension Name:** Enter the name for the extension.
* **e911 Location:** Enter the specific e911 location details for this extension.

47. **Create the Extension:**
* Click **Create** to add the new paging extension.
* Click **Yes** to confirm the creation.

### Editing a Paging Extension
48. **Edit Paging**:
* Once a paging extension is created, you can view and modify additional features and settings. You can also update existing information.

49. **Devices:**
* **Manual Provision Settings:** View the manual provision settings for the device.
* Click the **Load online devices** button to refresh and view the latest online devices.

50. **Save the Changes:**
* Complete all edits.
* Click **Save**.
* Click **Yes** to apply the changes.

### Adding a SIP Trunk
51. **Add New SIP Trunk:**
* Click the **Add New** button and select **SIP Trunk** from the dropdown menu.

52. **Enter the Required Information:**
* **Enable e911 Override:** Check this box if you want to enable e911 override.
* **Extension Number:** Enter the extension number.
* **Extension Name:** Enter the name for the extension.
* **Select e911 Location:** Choose the e911 location from the dropdown menu.
* **e911 Specific Room/Building:** Enter specific room or building details for e911 purposes.
* **Branch(Optional):** Select the branch associated with this extension.

53. **Authentication Method**:
* **Normal Auth:** Use normal authentication.
* **IP Based Auth:** Select IP-based authentication and enter the public IP.

54. **Call Paths:**
* Enter the number of call paths.

55. **CID Source:**
* Select the CID Source from the dropdown menu (e.g., PAI, RPID, FROM).

56. **Outbound Caller ID:**
* Select the caller ID for outbound calls.

57. **Advanced Settings:**
* **Include in Dial by Name Directory:** Check this box if you want the extension to be included in the dial by name directory.
* **Include in Default Phonebook:** Check this box if you want the extension to be included in the default phonebook.
* **Account Number:** Enter the account number associated with this extension.
* **Department:** Enter the department if applicable.
* **7-digit Dialing:** Enter your area code to allow making calls without dialing the area code first.

58. **Save the SIP Trunk:**
* Click **Create** to add the new SIP Trunk.
* Click **Yes** to confirm the creation.

### Editing a SIP Trunk
59. **Edit SIP Trunk:**
* Once a SIP Trunk is created, you can access and modify additional settings.

60. **Authentication method**:
* **Manual Provision Settings:** Hover over the blue question mark icon next to **Devices** to view the manual provision settings. This includes details like:
* SIP Proxy
* DNS Type
* SIP Username
* SIP Password
* Register Expires
* Codec Support

61. **Advanced Settings:**
* **Max Inbound Rings:** Set the maximum number of inbound rings (default can be edited after creation).
* **Hold Music:** Select the hold music option (default can be edited after creation).
* **Call Waiting:** Enable or disable call waiting (default can be edited here).
* **Routing Profile:** Select the routing profile from the dropdown menu (default can be edited here).

62. **Save Changes**:
* Click **Save**.
* Click **Yes** to confirm and save the changes.

### Creating Extensions in Bulk
63. **Bulk Create Extensions**:
Click the **Bulk Create** button.

64. **Import from CSV**:
* Hover over **Import from CSV** and click **Download Example CSV** to get a template.
* Complete the template, save it, and click **Import from CSV** to upload the spreadsheet.

65. **Map CSV Columns:**
* **Send User Invites**: Check this box if you want to send invites to the users upon creating their extensions.
* **Map CSV Columns:** Match each CSV column to the corresponding field (**Number, Name, Email, Branch, Department, Account Number, Device Name, Do Not Call List, Caller ID Number, E911 Location, E911 Location Override, Additional Destination Type, Additional Destination Name, MAC, Description,** and **Phonebook**).
* Ensure all listed fields are selected to continue.
* Click **Reset** to remove the CSV and reupload if needed.
* Click the **Add** button to complete the bulk upload.
* Added entries will appear in the list below.

66. **Remove an Entry:**
* If you need to remove an entry from the list after selecting add, clicking **Remove** (-) will remove an extension entry before saving.

67. **Save Extensions**:
* Click **Create.**
* Click **Yes** to confirm and save.

### Editing Extensions in Bulk
68. **Bulk Edit**:
* Click **Bulk Edit.**

69. **General Tab:**
* **Select a Branch**: Use the dropdown menu to choose the branch for editing extensions. If you do not utilize the branch feature, select **General**, which is assigned by default.
* **Apply to All Extensions**: Choose this option if the changes should be applied across all extensions in the selected branch.

70. **Available and Assigned Extensions**:
* **Select Extensions**:
* In the **Available** section, check the boxes next to the extensions you want to edit.
* Check the **Available** box to select all extensions in this column.
* **Move Extensions**:
* Click the right arrow to move selected extensions to the **Assigned** section.
* **Remove Extensions**:
* To remove an extension from the **Assigned** section, select it and click the left arrow.
* Check the **Assigned** box to select all extensions in this column and move them back to the **Available** section.
* **Filter Extensions**:
* Use keywords to filter available extensions.
* **Verify Selection**:
* Ensure all desired extensions are listed in the **Assigned** section for editing.

71. **Edit Fields:**
* Modify settings like **Send Invite, Call Waiting, e911 location, Branch, Department, Outbound recording, Caller ID, Faxing, Do Not Calls,** and **Additional Destinations**.

72. **Save Changes**:
* Click **Edit,** then **Yes** to save the changes.

# Faxes
Source: https://docs.voxo.co/omnia/admin/faxes
This guide provides step-by-step instructions on managing fax communications within the Omnia Admin Portal.
## This guide provides step-by-step instructions on managing fax communications within the Omnia Admin Portal. It covers accessing, viewing, filtering, and sorting faxes, as well as performing actions such as downloading and retrying faxes.
This document applies to the following user roles within Omnia:
Account Administrator
Partner Administrator
### Accessing Faxes
1. **Navigate to Faxes:**
Go to the [Admin Portal](https://app.voxo.co/dashboard) and sign in.
Click the **Phone System** tab to expand it, then select **Faxes**.

### Viewing Faxes
2. **Main Screen:**
* The main screen displays a list of faxes with details such as:
* **Date:** The date the fax was sent or received.
* **From Number:** The number the fax was sent from.
* **From Name:** The name associated with the sending number.
* **To Number:** The number the fax was sent to.
* **Direction:** Indicates whether the fax was inbound or outbound.
* **Status:** The current status of the fax (e.g., Success, Failed).
* **Error:** Any error messages associated with the fax.

### Filtering Faxes
3. * **Filter Faxes:**
* Click the **Filter** button to open the filter settings.
* **Select Date Range:** Choose the start and end dates for the faxes you want to view, or select from predefined ranges such as Last week, Last month, or Last 3 months.
* **Select Time Range**: In addition to the date range, you can also filter by a specific time range within the selected dates.
* **Search by Phone Number:** Enter a phone number to filter the faxes sent or received by that number.
* Click **Update** to apply the filters.
* Click **Reset Filter** to remove the filters.

### Actions
4. **Perform Actions on Faxes:**
* **Download Fax:** Click the **Download** button next to a fax entry to download the fax.
* **Force resend Fax:** Click the **Force resend** button next to a failed fax entry to resend the fax.

# Feature Codes
Source: https://docs.voxo.co/omnia/admin/feature-codes
This guide explains how to access, search, add, and edit feature codes in the Omnia Admin Portal.
## This guide explains how to access, search, add, and edit feature codes in the Omnia Admin Portal. It includes navigation steps, a list of feature codes with descriptions, and instructions for adding and editing codes. Feature codes activate functions like call forwarding, call recording, or DND, and can be used on the phone or within the application.
This document applies to the following user roles within Omnia:
Account Administrator
Partner Administrator
### Accessing Feature Codes
1. **Navigate to Feature Codes:**
Go to the [Admin Portal](https://app.voxo.co/dashboard) and sign in.
Click the **Phone System** tab to expand it, then select **Feature Codes**.

### Understanding Feature Codes
2. **Feature Codes List:**
* The list of feature codes provides a description of each code and its function.

**Picking up a call ringing on another extension:** dial `*88` followed by the extension number from any handset. Use this when you don't have a Busy Lamp Field (BLF) key programmed for that extension to grab the call.
**Logging an ACD agent in or out of a call queue from the handset:** create a feature code for each action (one for log in, one for log out) and set the destination to the specific queue. Agents can then dial the code from any phone without opening the desktop app. If an agent serves multiple queues, you'll need a separate login and logout code for each queue.
### Adding New Feature Codes
3. **Adding New Feature Codes**:
**Click Add New:**
* Click the **Add New** button to create a new feature code.
**Ensure Criteria:**
* Ensure the feature code meets these criteria:
* Does not match: #0, #1, ##, #\*
* Must start with: # or \*
* Must be unique and not already exist.
**Enter Details:**
* Fill in the necessary details:
* **Code**
* **Variable:** Choose between **EXT** (specific to an extension) or **NUM** (not specific to an extension).
* **Description**
* **When this code is dialed:**
* **Destination Type**
* **Select Destination**
**Save:**
* Select **Create**, then click **Yes** to confirm and save the new feature code.
**Note**: The variable EXT requires specifying an extension when dialing the code, while NUM does not require entering a specific extension.

### Editing Feature Codes
4. **Edit Existing Feature Codes:**
* Click on the feature code you want to edit or click the **Edit** button next to it.
* Make your edits.
* Click **Save.**
* Click **Yes** to confirm and save your change.
**Note**: Feature codes with a blue globe or world symbol are global across all Omnia accounts and cannot be edited.

### Deleting Feature Codes
5. **Delete a Feature Code**:
* Click the **Delete** button next to the Feature Code.
* Click **Yes** to confirm.
**Note**: Feature codes with a blue globe or world symbol are global across all Omnia accounts and cannot be deleted.

### Search and Sort
6. **Search Feature Codes:**
* **Search Bar**: Quickly find specific items by typing the name or a keyword in the search field. The system will filter the list based on your search input, displaying the relevant results.
* **Sort**: Click the sort icons next to the column headers to arrange items in ascending or descending order.

### Exporting Feature Codes
7. **Export Feature Codes**:
* Click the **Export** button next to the search field.
* The system will download a list of the items in CSV format.

# Getting Started
Source: https://docs.voxo.co/omnia/admin/getting-started
This guide provides step-by-step instructions for getting started with the Omnia Admin Portal.
## This guide provides step-by-step instructions for getting started with the Omnia Admin Portal. It includes logging in, switching between user and admin panels, changing passwords, managing multiple accounts, and using features like show relations, audit logs, sorting items, and viewing total count information. Designed to help administrators navigate the Omnia Admin Portal smoothly.
This document applies to the following user roles within Omnia:
Account Administrator
Partner Administrator
### Email Invitation
1. **Email Invitation Details:**
You will receive an email invitation with the following details:
* **Extension Number:** Your unique extension identifier.
* **Login Information:** Includes your Username and Password.
* **Omnia Desktop URL:** The link to access the Omnia Desktop Experience.
* **Mobile Apps:** App Store and Google Play buttons for downloading VOXO Connect.
* **Quick Dial Chrome Plugin:** A link to install this plugin for easy dialing from websites through the Omnia portal.
* **Support:** A direct link to email support for any questions or issues.

### Logging In
2. **Standard Login:**
* Go to the [Admin Portal](https://app.voxo.co/dashboard) and sign in.
* Enter the username and password from your email invitation.
* Click on **Login** to access your account.

3. **Login with Microsoft Account:**
* Go to the [Admin Portal](https://app.voxo.co/dashboard) and sign in.
* Click on **Continue with Microsoft** to log in using your Microsoft account.

4. **Login with Google Account:**
* Go to the [Admin Portal](https://app.voxo.co/dashboard) and sign in.
* Click on **Continue with Google** to log in using your Google account.
## 
We recommend changing your password after your initial login for enhanced security. Follow these steps:
Log in using the username and password provided in your email invitation.
Navigate to your Profile, then Settings, and click on My Profile.
Select Reset Password to create a new password.
### Switching Between User Panel and Admin Portal
5. **Navigate to the Admin Portal:**
* Click the **Go to admin** button at the bottom of the user panel menu.

6. **Navigate to the User Panel:**
* Click the **Go to user panel** button at the bottom of the admin panel menu.

### Switching Between Accounts
7. **Locate the Account Dropdown:**
If you are an admin assigned to multiple accounts or a partner admin, you can quickly find and switch between accounts to manage by typing keywords or account numbers.
* At the top of the screen, locate the dropdown menu showing the current account name.

8. **Open the Dropdown Menu:**
* Click on the current account name to open the dropdown menu.

9. **Select the Desired Account:**
* Scroll through the list of available accounts.
* Click on the account name you wish to manage.

10. **Type Keywords or Account Number:**
* Start typing the name or account number in the search field.

11. **Select the Desired Account:**
* Once the desired account appears in the dropdown list, click on it to select.

### Relations and Audit Trail
12. **Show Relations**:
* Helps administrators identify linked elements within the system.
* For example, you can click into an extension and see related phone numbers, call groups, call queues, etc.
* **How to Access**: Click the **Show Relations** button when editing an element like an extension.
* This feature is available throughout the portal in areas such as Call Queues, Voicemails, and more. If you see this icon while editing an item, click it to view related elements.

13. **Show Audit Logs**:
* Allows administrators to see changes made by previous administrators, providing transparency and accountability.
* View the update time, email of the user who made the update, and the action taken.
* Click the **Show Audit Logs** button to view the update history of an element like an extension.
* Displays the last 10 days of activity.
* Click **Export** to export the log.
* Available throughout the portal in areas such as Call Queues, Voicemails, and more. If you see this icon while editing an item, click it to view the Audit Logs.

### Sort Items
14. **Sort Items**:
* Click the sort icons next to column headers to arrange items in ascending or descending order.
* This feature is available throughout the portal for various elements.

### Total Count Information
15. **Total Count**:
* This icon provides the total count of items in a list, such as call queues, phone numbers, etc.
* The count displayed helps admins quickly see the number of items they are managing.
* This feature is available throughout the portal.

### Subscribe to the Status Page
16. **Status Page**:
* Stay updated with the latest information on VOXO services and incidents by subscribing to the status page:
* **Visit the VOXO Status Page**: Go to [VOXO Status](https://status.voxo.co/?_gl=1*1yeh8po*_ga*NjUwNDQ3MTgxLjE3MTg0NzUxNDk.*_ga_N8PD5XTNXT*MTcxOTQzMzU5Ni4xMC4xLjE3MTk0MzQwNzcuMC4wLjA.).
* **Subscribe to Updates**: Click on the **Subscribe to Updates** button at the top right corner of the page.
* **Choose Your Subscription Method**: Select how you want to receive updates (Email, Slack, Atom Feed, or RSS feed).
* **Confirm Subscription**: Follow the prompts to confirm your subscription.

17. **VOXO Website**:
* For more details about VOXO products and support, visit the [VOXO Website](https://voxo.co/).
* Important Links:
* [Developer Docs](https://developers.voxo.co/)
* [Uptime Status](https://status.voxo.co/)
* [Changelog](/changelog)

# Inbound Activity
Source: https://docs.voxo.co/omnia/admin/inbound-activity
This guide provides detailed instructions on how to access and utilize the Inbound Activity report in Omnia.
This guide provides detailed instructions on how to access and utilize the Inbound Activity report in Omnia. It includes information on how to view and analyze inbound call activities, apply filters, select date ranges, and export data. The guide also explains how to use the Inbound Heatmap features to visualize call volumes over specific periods.
Access to this Report:
Access to this report is based on your user role. You may not be able to access and view a specific report and all of its features if your role does not permit it.
### Accessing Inbound Activity
1. **Access Inbound Activity Report**:
* Go to the [Admin Portal](https://app.voxo.co/dashboard) and sign in.
* Click the **Reports** tab to expand it.
* Select **Call Summary**, then **Inbound Activity**.

### Viewing Inbound Call Activity
2. **Overview:**
* This section provides a detailed summary of incoming call activities, helping you to analyze call patterns and performance over specific periods.
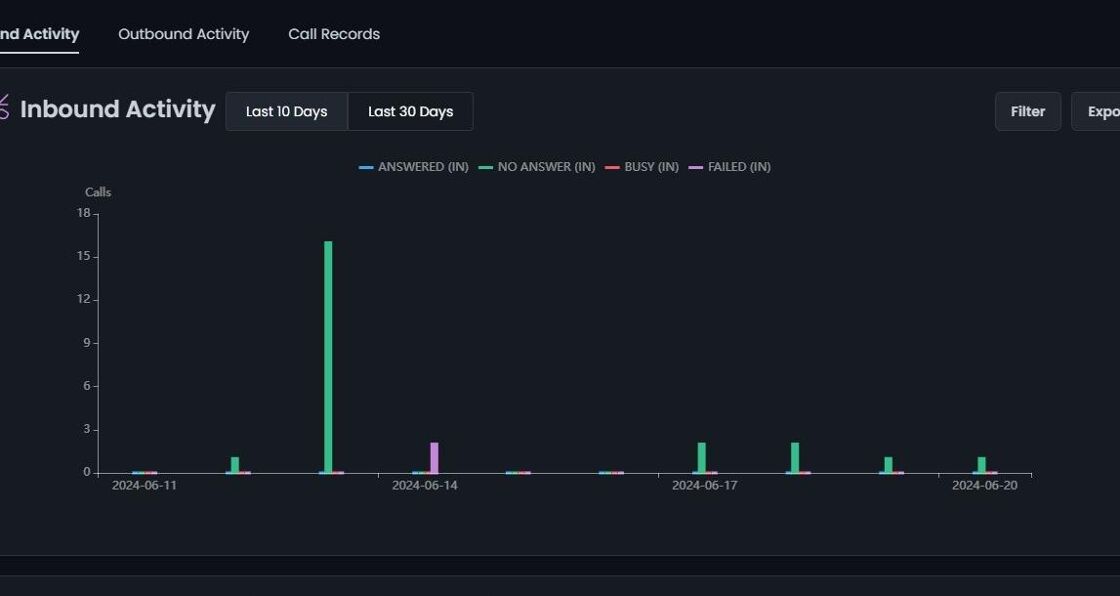
3. #### Last 10 Days:
* View a bar graph showing the status of inbound calls.
* Categories displayed:
* **Answered (IN):** Calls answered. **(Blue)**
* **No Answer (IN):** Calls not answered. **(Green)**
* **Busy (IN):** Calls with a busy signal. **(Red)**
* **Failed (IN):** Calls failed to connect. **(Purple)**
#### Last 30 Days:
* View a similar bar graph for the last 30 days.
* Categories and colors remain consistent as above.
#### Graph Details:
* The graph displays data based on your selection (last 10 days or last 30 days).
* Hover over the bars to see daily stats.
* Each bar represents a different category of call status (Answered, No Answer, Busy, Failed).

### Filters
4. **Filter Settings:**
* **Select Date Range:** Choose the start and end dates for the report to customize the period for which you want to view the data.
* **Predefined Date Filters:** Quickly filter data by predefined date ranges such as **Last week**, **Last month**, **Last 3 months**, **Last 6 months**, and **Last year**.

5. **Select Distribution:**
* Choose to view data daily, monthly, or hourly.

6. **Filter By:**
* **Branch:** Filter data by specific branches.
* **Call Outcome:** Filter by the [outcome](https://scribehow.com/shared/Omnia_Admin_Account_Settings__gaYuDNCBQbCCA_1-ZWU0GQ#a3ddfd02) of calls.
* **Phone Number (Inbound Only):** Filter data by specific inbound phone numbers.
* **User (Answered Only):** Filter data based on the users who answered the calls.

7. **Select Inbound Activity Dispositions:**
* Choose between different call outcomes to display in the report:
* **Answered**
* **No Answer**
* **Busy**
* **Failed**

8. **Select Presented Filter:**
* Presented means a call attempted to reach a user.
* Choose to view:
* **Presented:** Calls that were presented.
* **Not Presented:** Calls that were not presented.
* **All:** All calls regardless of presentation status.

9. **Select a Secondary Metric:**
* Display additional metrics alongside primary data:
* **Call Quality:** Quality of the call connections.
* **Internal Calls:** Number of internal calls.
* **Outbound Calls:** Number of outbound calls.
* **Talk Time:** Total talk time for the calls.
* **Total Calls:** Total number of calls.
* Additional filters based on the selected secondary metric:
* **Outbound Calls:** Filter by Answered, No Answer, Busy, Failed.
* **Talk Time:** Filter by Inbound, Outbound, Total.
* **Total Calls:** Filter by Answered, No Answer, Busy, Failed.

10. #### Apply Filters:
* After setting your desired filters, click on the **Update** button to apply them. This will update the report to reflect the selected criteria.
* Click **Reset** to remove the filters.

11. **Graph Details:**
* **Data Points:** Hovering over the bars in the graph now provides detailed statistics based on the filters selected.

12. **Exporting Data**:
* Click **Export** to download the displayed data in CSV format.

### Inbound Heatmap
13. * The **Inbound Heatmap** visualizes the volume of inbound calls over a selected period. Each square represents a day, with colors indicating the number of calls.

14. **Select Date Range:**
Select a date range to get started.
Choose the date range to analyze by selecting either **Last 6 Months** or **Last 1 Year**.

15. **View Heatmap:**
* The heatmap will display the volume of inbound calls, with the following color coding:
* **Yellow: 1 - 11 calls**
* **Light Orange: 11 - 21 calls**
* **Orange: 21 - 31 calls**
* **Dark Orange: 31 - 41 calls**
* **Red: 41 - 51 calls**

16. **Filter by Call Volume:**
* Click on the color labels at the top to filter the heatmap. Clicking on a label will remove it from the view, allowing you to focus on specific call volume ranges. For example, clicking on the **Yellow** label will exclude days with 1 - 11 calls from the heatmap.

17. **Analyze Data:**
* Hover over any square to see the specific details of the call activity for that day. The tooltip will show:
* **Answered (IN)**
* **No Answer (IN)**
* **Busy (IN)**
* **Failed (IN)**

####
# IVR Activity
Source: https://docs.voxo.co/omnia/admin/ivr-activity
This document provides a comprehensive guide for accessing and analyzing IVR activity reports within the Omnia Admin Portal.
This document provides a comprehensive guide for accessing and analyzing IVR activity reports within the Omnia Admin Portal. It covers navigating to the reports section, selecting specific IVRs, filtering data, understanding key metrics, and exporting data. The guide also explains how to interpret various metrics such as total entries, valid and wrong key presses, and other IVR events to help optimize the performance of virtual receptionists.
Access to this Report:
Access to this report is based on your user role. You may not be able to access and view a specific report and all of its features if your role does not permit it.
### Accessing IVR Activity
1. **Navigate to the Reports Section**:
* Go to the [Admin Portal](https://app.voxo.co/dashboard) and sign in.
* Click the **Reports** tab to expand it.
* Select **Virtual Receptionists**, then **IVR Activity**.

### Filtering the Data
2. **Choose an IVR:**
* Click on the dropdown menu to select the desired IVR from the list.

3. **Select a Date Range:**
* You can quickly select the last 10 days or last 30 days using the buttons provided.

4. **Select Count or Ratio:**
* Toggle between **Count** and **Ratio** to view the data in the preferred format.

5. **Filter Settings**:
* Click the **Filter** button to open the settings and choose the desired date range and time. Additional options include: Last week, Last month, Last 3 months, Last 6 months, and Last year.
* Select the data distribution: Daily, Monthly, or Hourly.
* Click **Update** to apply the filters.

6. **Reset Filters:**
* Click the **Reset** button to remove all applied filters.

### Understanding the Metrics
7. **IVR Activity Metrics:**
* **Total Entries** (Blue): The total number of entries into the IVR system.
* **Unique Entries** (Green): The number of unique entries.
* **Valid Key Presses** (Red): The number of valid key presses detected.
* **Ext Dials** (Purple): The number of extension dials.
* **Timeouts** (Pink): The number of times callers were timed out.
* **Hangups** (Teal): The number of hang-ups detected.
* **Wrong Key Presses** (Orange): The number of incorrect key presses.

8. **Interpreting the Data:**
* The graph displays these metrics over the selected date range.
* Hover over the graph points to see detailed information for each metric.

9. **Use the Legend to Filter Metrics:**
* Click on any metric in the legend to remove it from the view.
* This feature allows you to focus on specific metrics by filtering out the others.

### Exporting Data
10. **Export IVR Data:**
* After applying the desired filters, click the **Export Data** button to download the report based on the selected criteria.

### Viewing Additional Metrics
11. **Loop Ratio**:
* The loop ratio measures the number of loops per unique entry to the virtual receptionist.
* Shows the total number of entries and unique entries.

12. **Valid Keys:**
* Displays data on valid key presses in the IVR system.
* Click **Total** to view the total number of valid key presses.
* Click **Avg** to see the average number of valid key presses per day.
* Click **%** to view the percentage of valid key presses compared to all key presses.

13. **Wrong Keys:**
* Displays data on incorrect key presses in the IVR system.
* Click **Total** to view the total number of wrong key presses.
* Click **Avg** to see the average number of wrong key presses per day.
* Click **%** to view the percentage of wrong key presses compared to all key presses.

14. **Valid Key Presses**:
* Displays the number of valid key presses in the IVR system.
* **Pie Chart:**
* Each segment represents a different key press.
* Hover over a segment to see the exact count (e.g., key "2" was pressed 18 times).
* **Legend:**
* Color-coded for each key press.
* Click on a legend item to highlight or remove the corresponding segment from the pie chart.

15. **Valid Key Presses**:
* Shows the count of valid key presses in the IVR system.
* X-axis: Number of key presses.
* Y-axis: Specific keys pressed.
* Hover over a bar to see the exact count.
* Green color indicates valid key presses.

16. **Wrong Key Presses**:
* Displays the count of incorrect key presses in the IVR system.
* **Axes:**
* X-axis: Number of key presses.
* Y-axis: Specific keys pressed.
* **Bars:**
* Each bar shows a wrong key press.
* Bar length = Number of incorrect presses.
* Hover over a bar to see the exact count (e.g., key "1" was pressed 5 times).
* **Legend:**
* Red color indicates the count of wrong key presses.

17. **Extension Dialing**:
* Displays the frequency of extension dialing attempts.
**Table Columns**:
* **Extension:** Lists the dialed extensions. Click the column header to sort by extension number.
* **Count:** Number of times each extension was dialed. Click the column header to sort by count.
* **%:** Percentage of total extension dialing attempts. Click the column header to sort by percentage.

18. **Other Events**:
* Displays various events in the IVR system.
**Graph Elements**:
* **X-axis:** Shows different events (Ext Dials, Timeouts, Hangups).
* **Y-axis:** Represents the count of each event.
* **Bars:**
* Each bar represents the count of a specific event.
* Hover over a bar to see the exact count (e.g., Timeouts = 50).
### Options:
* **Total:** Shows the total number of each event.
* **Avg:** Displays the average number of each event.
* **%:** Shows the percentage of each event.

# IVR Log
Source: https://docs.voxo.co/omnia/admin/ivr-log
This document provides a step-by-step guide for accessing and utilizing the IVR Log report in the Omnia Admin Portal.
This document provides a step-by-step guide for accessing and utilizing the IVR Log report in the Omnia Admin Portal. It includes instructions for navigating to the reports section, understanding the records table, and filtering the data by date range and additional criteria. The guide also explains how to access the detailed Call Flow View for in-depth analysis of specific call paths and actions. This document ensures efficient tracking and management of IVR activities within the Omnia platform
Access to this Report:
Access to this report is based on your user role. You may not be able to access and view a specific report and all of its features if your role does not permit it.
### Accessing the IVR Log
1. **Navigate to the Reports Section**:
* Go to the [Admin Portal](https://app.voxo.co/dashboard) and sign in.
* Click the **Reports** tab to expand it.
* Select **Virtual Receptionists**, then **IVR Log.**

### Viewing Virtual Receptionist Records
2. **Understanding the Records Table:**
* The records table provides detailed information about each call handled by the Virtual Receptionist. The columns include:
* **Time:** The date and time when the event was logged.
* **IVR:** The IVR system that handled the call.
* **Event:** The event type (e.g., Enter, Hangup, Valid Key, Timeout).
* **Caller Num:** The phone number of the caller.
* **Loop #:** The number of loops per unique entry to the virtual receptionist.
* **Ext Dialed:** The extension dialed by the caller.
* **Key:** The key pressed by the caller.
* **Caller Name:** The phone number of the caller (if available).
* The initial results shown will be for today's date.

### Filtering Virtual Receptionist Records
3. **Using Quick Filters:**
* You can quickly filter records by date using the buttons at the top of the page:
* **Yesterday**
* **Last 10 Days**
* **Last 30 Days**

4. **Accessing Filter Settings:**
* Click on the **Filter** button to open the filter settings.

5. **Selecting Date and Time Range:**
In the filter settings, you can select a specific date and time range:
* Use the calendar to pick start and end dates.
* Adjust the time settings as needed.
Alternatively, you can choose from predefined date ranges such as: **Last week,Last month, Last 3 months, Last 6 months,** or **Last year**.
After setting your desired filters, click **OK.**

6. **Filtering by Additional Criteria:**
* You can further filter the records by additional criteria:
* **Virtual Receptionist:** Select specific IVRs.
* **Call ID:** Enter a specific Call ID.
* **Events:** Select specific events to filter by (e.g., Valid Key, Wrong Key, Ext Dial, Timeout, Hangup, Enter).
* After setting your desired filters, click **Update** to apply them and update the records table.

7. **Reset Filters**:
* Click **Reset** to remove your filters and start over if needed.

### Exporting the IVR Log
8. **Export Data**:
* Click the **Export** button to download the data in CSV format.

### Accessing the Call Flow View
9. **Accessing Call Flow View:**
To access the detailed Call Flow View, click the call flow button next to a record or click on the record itself.
**Viewing the Call Flow:** This will open the detailed Call Flow View, providing insights into the specific call path and related actions taken.

####
# IVR Summary
Source: https://docs.voxo.co/omnia/admin/ivr-summary
This document provides a concise guide for accessing and utilizing the IVR Summary report in the Omnia Admin Portal.
This document provides a concise guide for accessing and utilizing the IVR Summary report in the Omnia Admin Portal. It details steps to navigate the reports section, filter data by date range, and understand key metrics such as unique entries, loop ratio, and key press statistics. Additionally, it explains how to export the summary data for further analysis. This guide ensures efficient monitoring and management of IVR activities within the Omnia platform.
Access to this Report:
Access to this report is based on your user role. You may not be able to access and view a specific report and all of its features if your role does not permit it.
### Accessing the IVR Summary
1. **Navigate to the Reports Section**:
* Go to the [Admin Portal](https://app.voxo.co/dashboard) and sign in.
* Click the **Reports** tab to expand it.
* Select **Virtual Receptionists**, then **IVR Summary.**

### IVR Summary
2. **IVR Summary**:
* Displays summary data of IVR system activities.
* The initial results shown will be for today's date.

3. **Column Headers**:
* **Unique Entries:** Number of distinct entries.
* **Total Entries:** Total number of entries.
* **Loop Ratio:** Ratio of repeated entries.
* **Valid Key Total:** Total valid key presses.
* **Valid Key %:** Percentage of valid key presses.
* **Wrong Key Total:** Total wrong key presses.
* **Wrong Ext Dial:** Total wrong extension dials.
* **Wrong Key %:** Percentage of wrong key presses.
* **Extension Dial Total:** Total extension dials.
* **Ext Dial %:** Percentage of extension dials.
* **Hangups Total:** Total number of hangups.
* **Hangup %:** Percentage of hangups.
* **Time Outs Total:** Total number of timeouts.
* **Time Out %:** Percentage of timeouts.
* **Sort Columns**: Click on any column header to sort the data by that column.

### Filtering the Data
4. **Select a Date Range:**
* **Quick Selection Options:** Click on one of the provided buttons to quickly select the desired date range:
* **Yesterday**: View the data from the previous day.
* **Last 10 Days**: View the data from the past 10 days.
* **Last 30 Days**: View the data from the past 30 days.

5. **Select Date Range:**
* Use the calendar to select the start and end dates.
* Click the **Filter** button.
* **Set Date Range and Time:**
* Choose the start date and set the time.
* Choose the end date and set the time.
* Use predefined options (e.g., Last week) for quick selection.
* **Confirm:** Click **OK** to apply.

6. **Filter Settings:**
* **Select Distribution:** Choose how you want the data to be distributed (Hourly, Daily, Monthly, None).
* **Filter By:** Select **Virtual Receptionists** from the dropdown menu.
* **Select IVRs:** Click the dropdown and select the desired IVRs.
* **Update**: Click the **Update** button to apply all changes.

7. **Reset Filters**:
* Click **Reset** to remove your filters and start over if needed.

### Exporting the IVR Summary
8. **Export Data**:
* Click the **Export** button to download the summary data in CSV format.

# Media Files
Source: https://docs.voxo.co/omnia/admin/media-files
This guide provides step-by-step instructions for managing media files in the Omnia platform.
## This guide provides step-by-step instructions for managing media files in the Omnia platform. It includes instructions for accessing, creating, editing, and deleting media files, as well as using text-to-speech features. Media files can be utilized across various functions in the Omnia Admin Portal, including call campaigns and conference rooms.
This document applies to the following user roles within Omnia:
Account Administrator
Partner Administrator
### Accessing Media Files
1. **Navigate to Media Files:**
Go to the [Admin Portal](https://app.voxo.co/dashboard) and sign in.
Click the **Phone System** tab to expand it, then select **Media Files**.

### Creating a Media File
2. **Add a New Media File**:
* Click **Add New**.
* Enter the name of the media file in the **Enter name** field.

3. **Record or upload**:
* Use the controls to record or upload a media file. This will open additional options.

4. **Additional Options**:
* **Playback**: Click to play the media file.
* **Press and Hold To Record:** Click and hold to record a message.
* **Upload File**: Click to add an existing audio file
* **Cancel Changes**: Click to revert to previous settings.

5. **Save Changes**:
* Click **Create,** then **Yes** to save the new media file.

### Generating a Media File from Text
6. **Generate Media File from Text**:
Enter the name of the media file in the **Enter name** field.
**Enable**: Check the **Generate media file from text** box.
**Select Gender**: Choose the gender for the text-to-speech voice.
**Enter Text**: Type the text to be converted to speech in the provided text box.
**Generate**: Click **Text to Speech** to generate the media file.
**Playback**: Click to play the media file.
**Download File**: Click to download the generated media file.
**Cancel**: Click **Cancel** if you do not want to save the changes.

7. **Save Changes**:
* Click **Create,** then **Yes** to save the new media file.

### Editing Media Files
8. **Edit Media File:**
* Click on the media file you want to edit, or click on the **Edit** button next to it.

9. **Edit Options:**
* **Name:** Edit the existing name as needed.
* **Download Current:** Click to download the current media file.
* **Upload File:** Click to add an existing audio file.
* **Press and Hold To Record:** Click and hold to record a message.
* **Playback:** Click to play the media file.
* **Cancel Changes:** Click to revert to previous settings.
* **Save:** Click **Save** to confirm and save your changes.
* **Confirm:** Click **Yes** to finalize and save your changes.

### Editing Text to Speech
10. **Edit Text to Speech**:
* **Search and Find**: Locate the media file you want to edit.
* **Generate Media File from Text**: Click this option to display the most recently saved text-to-speech (TTS) text.
* **Select Voice Gender**: Choose an option from the dropdown menu.
* **Enter/Remove Text**: Modify the text in the text field as needed, then click **Text to Speech** to generate the new media file.
* **Playback**: Click the play button to listen to the generated speech before saving.
* **Cancel Changes**: Click if you do not want to save the changes.
* **Save**: Click **Save**.
* **Confirm**: Click **Yes** to confirm the changes.

### Deleting a Media File
11. **Delete a Media File:**
* Click the **Delete** button next to the Media File.
* Confirm the deletion by clicking **Yes**.

### Search and Sort
12. **Search for a Media File:**
* **Search Bar**: Quickly find specific items by typing the name or a keyword in the search field. The system will filter the list based on your search input, displaying the relevant results.
* **Sort**: Click the sort icons next to column headers to arrange items in ascending or descending order.

# Music On Hold
Source: https://docs.voxo.co/omnia/admin/music-on-hold
This guide provides step-by-step instructions on how to add, edit, and delete Music on Hold (MoH).
## This guide provides step-by-step instructions on how to add, edit, and delete Music on Hold (MoH). MoH plays music or messages to callers on hold, enhancing their experience with entertainment or information while they wait. Music on Hold can also be applied to specific call flows, such as call groups and consultative transfers.
This document applies to the following user roles within Omnia:
Account Administrator
Partner Administrator
### Accessing Music On Hold
1. **Navigate to Music On Hold:**
Go to the [Admin Portal](https://app.voxo.co/dashboard) and sign in.
Click the **Phone System** tab to expand it, then select **Music On Hold**.

### Adding New Music on Hold
2. **Add New Music on Hold:**
* Click **Add New**.

3. **Name the Music on Hold:**
* Enter a name for the music on hold in the **Name** field.

4. **Set as Default Tenant:**
* Check the **Set as Default Tenant** box if you want this music on hold to be the default for the tenant.

5. **Select a Media File:**
* Choose a media file from the **Mediafiles** dropdown. This will be an already saved file in the media files section of the portal.

6. **Add a New Media File:**
* Click **Add a Mediafile** to record or upload a new media file if needed.
* Use the controls to record or upload the media file. This will open additional options.

7. **Additional Options**:
* **Playback**: Click to play the media file.
* **Press and Hold To Record:** Click and hold to record a message.
* **Upload File**: Click to add an existing audio file.
* **Cancel Changes**: Click to revert to previous settings.
* **Enter a name**: Type the name in the **Mediafile** name field before saving.
* **Save Changes**: Click to save the recorded or uploaded file. This media file will now be available to choose from and select in the dropdown.

8. **Save the Music on Hold:**
* Click **Create**.
* Click **Yes** to confirm and save your changes.

When a Music on Hold has more than one media file, you can choose how its tracks play: in a fixed order or shuffled randomly.
### Editing Existing Music on Hold
9. **Edit Existing Music on Hold:**
* Click on the **Music on Hold** you want to edit or click the **Edit** button next to it.
* Make your edits.
* Click **Save**.
* Click **Yes** to confirm and save your changes.

If the previous audio keeps playing after you update the track, remove the old media file from the Music On Hold record, select the new file, and save.
### Deleting Music on Hold
10. **Delete Music on Hold:**
* Click the **Delete** button next to the Music on Hold.
* Confirm the deletion by clicking **Yes**.

### Search and Sort
11. **Search for Music on Hold:**
* **Search Bar**: Quickly find specific items by typing the name or a keyword in the search field. The system will filter the list based on your search input, Displaying the relevant results.
* **Sort**: Click the sort icons next to column headers to arrange items in ascending or descending order.

# Number Porting
Source: https://docs.voxo.co/omnia/admin/number-porting
This guide provides step-by-step instructions for number porting in the Omnia Admin portal.
## This guide provides step-by-step instructions for number porting in the Omnia Admin portal. It explains how to access and view port requests, filter them, create new port requests, check number portability, edit port requests, activate ports, cancel port requests, and create toll-free port requests. The guide also includes information on attaching documents, verifying email notifications, and accessing order details.
This document applies to the following user roles within Omnia:
Account Administrator
Partner Administrator
The steps below cover porting numbers **in** to VOXO. To port a number **out** to a different carrier (including a fax number), the new carrier submits the port request from their side. VOXO does not hold or prohibit port-outs, and approval is automatic — the port date is set once the request is approved.
### Before you submit a port-in
A port-in moves your existing number(s) to VOXO from another carrier. Two requirements prevent most rejections:
* **Match the CSR exactly.** Enter every field — authorized name, account number, service address, and BTN — exactly as it appears on the customer's official Customer Service Record (CSR) and most recent bill. Even small differences cause the losing carrier to reject the request. Requesting a CSR from your current carrier first cuts down on rejections.
* **Attach a recent bill.** Include a bill dated within the last 30 days that shows **all** the numbers being ported.
VOXO and our carrier do not approve or deny port-ins. We submit the request, and your current (losing) carrier approves or rejects it based on their own records.
**Porting cost** — Porting fees depend on your plan and agreement. For pricing specific to your account, email VOXO support at [support@voxo.co](mailto:support@voxo.co).
**If a port-in is rejected** — Rejections come from the losing carrier with a reason code. Open the port request and use **View Order Notes** to see the carrier's reason — usually an address, account number, or authorized-name mismatch — then correct it and resubmit.
### Accessing Port Requests
1. **Navigate to Port Requests:**
Go to the [Admin Portal](https://app.voxo.co/dashboard) and sign in.
Click the **Account** tab to expand it, then select **Number Porting**.

### Viewing Port Requests
2. **View Port Requests:**
* The table displays the following columns:
* **Order Id**: The unique identifier for the port request.
* **PON**: The Port Order Number associated with the request.
* **Order Date**: The date the port order was submitted.
* **Status**: The current status of the port request.
* **Req Date**: The port date requested.
* **Type**: The type of port request (e.g., Normal, Toll Free).
* **Next Port**: FOC Date (Firm Order Commitment Date). This is the date and time for the port.
* **On Demand**: Indicates if the port is on-demand. An on-demand port allows an admin to activate the port anytime on the port date. If you do not activate the numbers on the port date, they will automatically activate at 11:00 PM CST on the date of the port.
* **TN Status**: The status of the telephone number(s) in the port request, indicated by various color codes. This also includes the total number of telephone numbers for each status.
* Click the **sort icons** next to the column headers to arrange items in ascending or descending order.

### Filtering Port Requests
3. **Filter Port Requests:**
* You can use the search bar to find specific port requests and the filter dropdown to view requests by type (All, Normal, Toll Free).
* Click the **Filter** button to open the filter settings.
* You can filter port requests by:
* **Date Range**: Select the start and end dates for the port requests you want to view.
* **Status**: Select the status of the port requests (e.g., Canceled, Closed, Incomplete, Pending, Pending Cancel).

4. **Apply Filters:**
* After selecting the desired filters, click **Update** to view the filtered port requests.

### Creating a New Port Request
5. **New Port Request - Phone Numbers**:
* Click the **New Request** button.
* Select **Phone Number** for standard phone number port requests.

6. **Enter Telephone Numbers:**
* Type the phone numbers you wish to port, one per line.
* Click **Submit** once you have entered all the numbers.

### Checking Number Portability
7. **View Portable Number Summary**:
* The system will check the portability of the entered numbers.
* A summary of the portable numbers will be displayed, including the provider information.

8. **View Unportable Numbers**:
* The system will also display any numbers that are not portable and the reason why.
* You can go back to modify the list if needed.

9. **Proceed with Portable Numbers:**
* After reviewing the portability, click **Next** to continue with the portable numbers.

### Account Details - Automated CSR Lookup
10. **Automated CSR Lookup:**
* If the system can automatically retrieve the CSR, the available data will be populated automatically.
* A **CSR (Customer Service Record)** contains important information about your account with your current phone service provider, such as the authorized person, account number, and service address.

11. **Complete All Necessary fields**:
* Ensure the details are correct and fill in any missing information.
Fields include:
**Authorized Person**: The person authorized to make changes on the account.
**Account Number**: The account number is only required if it is displayed on your monthly bill.
**Account PIN**: The PIN number for the account. Your account may or may not have an account PIN. Please check with your provider.
**Company Name**: The name of the company associated with the account.
**BTN**: The Billing Telephone Number, which is the primary number associated with the account.
**Port Date**: The date you want the port to occur. A calendar will be provided to select the date, with unavailable dates grayed out.
**Physical Address**: The address you enter should be the location where your numbers are registered with your current provider.
You can click **Back to Number Summary** if needed to review or change the numbers to be ported.
**Note:** When porting multiple numbers, if they are split into separate groups, you must complete the required information for each group separately.

### Account Details - Manual CSR Entry
12. **Manual CSR Entry:**
* If the system cannot automatically retrieve the CSR, you will need to enter the details manually.

### Submitting the Port Request
13. **Submit the Port Request:**
Once all the information is completed and verified, click the **Submit** button to finalize the port request.
A confirmation warning will appear asking you to confirm the submission with the desired port date.
Click **Yes** to confirm and submit the port request.

14. **Confirmation:**
* After submitting the request, you will see the port request listed in the Port Requests table with its status set to **Pending**.
* Some carriers may need a recent phone bill or other verification. If so, we'll help you provide the necessary information. Once verified, we'll coordinate with your existing carrier to port your number(s).

15. **Email Verification**:
A confirmation email with port request details will be sent to your email address.
You will receive email notifications about the status of your order as it progresses (e.g., Canceled, Closed, Incomplete, Pending, Pending Cancel).
You can check the status of your order anytime by visiting the **Number Porting** section in the Omnia Admin Portal.

### View/Edit Port Request
16. **Accessing the Edit Option:**
* Click on the **edit button** next to the specific port request you want to edit.
* Alternatively, you can click on the specific port request to open the edit view.

17. **Order Number Summary:**
* In the View/Edit Port Request screen, you can see the summary of the order, including the order number and status.
* To edit the details, click the edit button next to the summary.

18. **Edit Order Details:**
* You can modify details such as the authorized person, account number, company name, BTN, service address, and Account PIN.
* Click **Submit Edits** when finished, then **Yes** to confirm.

19. **Add Order Notes**:
* You can add notes to the order by clicking on **Add order note**.
* Enter the relevant notes in the provided text box.

20. **View Order Notes:**
* Click on the **View order notes** button to see any notes pertaining to the port request.
* The notes will display detailed information about the port request, including any actions taken, rejections, and reasons for rejections.
* This information can be useful for troubleshooting and understanding the status of the port request.

21. **Edit Requested Port Date**:
* You can update the requested port date by clicking on **New desired port date** and selecting a new date from the calendar.

22. **Attach Documents:**
* Click **Click to upload** to attach files. Some carriers may require a recent phone bill or other verification information.

23. **Submit Edits:**
* After making the necessary changes, click the **Submit** button to save your changes, then select **Update** to confirm.
* A confirmation message will appear to confirm that your changes have been successfully submitted.

### Activating an On Demand Port
24. **Activating a Port**:
Once your port date is confirmed, you will receive an email with the port date and instructions. If you do not activate the numbers on the port date, they will automatically activate at 11:00 PM CST.
**Steps to activate the port:**
* Log in to the admin portal.
* Go to **Account** > **Number Porting**.
* Find your order ID (e.g., 117429509).
* Click **Activate Numbers**.
After activation, you will receive two emails confirming the activation and completion of your port order, including all relevant details and a link to access the order.

### Canceling a Port Request
25. **Deleting/Canceling a Port Request:**
* To cancel a port request, click the **Delete** button (red icon) next to the specific request.
* A confirmation dialog will appear. Click **Yes** to confirm the cancellation.
* A success message will appear confirming the order has been deleted.

### Creating a New Toll-Free Port Request
26. **New Request - Toll-Free Numbers:**
* Click the **New Request** button.
* Select **Toll Free** for toll-free number port requests.

27. **Enter Toll-Free Numbers:**
* Type the toll-free numbers you wish to port, one per line.

28. **Attach Required Documents:**
* **Attach LOA (Letter of Authorization)**:
* Click the **Click to upload** button under **Attach LOA** to upload the LOA document. Note: Uploading a LOA is required (only PNG, JPEG, PDF, and DOCX formats are supported).
* A Letter of Authorization authorizes VOXO to port your numbers from your current provider. Contact VOXO support for any questions regarding the LOA.

29. **Attach Recent Bill**:
* Click the **Click to upload** button under **Attach Recent Bill** to upload a recent bill from your current service provider.

30. **Submit the Toll-Free Port Request:**
* After entering the numbers and attaching the required documents, click the **Submit** button to proceed.
* After submitting the request, you will see the port request listed in the Port Requests table with its status set to **Pending**.

31. **Email Verification**:
* A confirmation email with port request details will be sent to your email address.
* You will receive email notifications about the status of your order as it progresses (e.g., Canceled, Closed, Incomplete, Pending, Pending Cancel).
* You can check the status of your order anytime by visiting the **Number Porting** section in the Omnia Admin Portal.
### Viewing and Editing Toll-Free Port Requests
32. **View Toll-Free Port Request**:
* Locate your toll-free port request in the **Port Requests** table.
* Click the **Edit** button to view the details of the request.
* Alternatively, you can click on the specific port request to open the edit view.

33. **Order Number Summary:**
* In the View/Edit Port Request screen, you can see the summary of the order, including the order number and status.

34. **Add Order Notes**:
* You can add notes to the order by clicking on **Add order note**.
* Enter the relevant notes in the provided text box.

35. **View Order Notes:**
* Click on the **View order notes** button to see any notes pertaining to the port request.
* The notes will display detailed information about the port request, including any actions taken, rejections, and reasons for rejections.
* This information can be useful for troubleshooting and understanding the status of the port request.

36. **View and Download Order Documents**:
* You can view and download the attached documents from the request.
* Click to upload additional documents, such as the Letter of Authorization (LOA) and a recent bill.

37. **Submit Edits**:
* After making necessary changes, click the **Submit** button at the top right of the screen.
* Confirm the update by clicking **Update** in the warning prompt.
* A success message will appear confirming that the edited order was submitted.

### Deleting/Canceling a Toll-Free Port Request
38. **Deleting/Canceling a Toll-Free Port Request**:
* Click the **delete icon** next to the specific toll-free port request you want to cancel in the port requests table.
* Confirm the deletion by clicking **Yes** in the warning dialog.
* You will see a success message indicating the order was deleted successfully.

# Outbound Activity
Source: https://docs.voxo.co/omnia/admin/outbound-activity
This guide provides detailed instructions on how to access and utilize the Outbound Activity report in Omnia.
This guide provides detailed instructions on how to access and utilize the Outbound Activity report in Omnia. It includes information on how to view and analyze outbound call activities, apply filters, select date ranges, and export data. The guide also explains how to use the Outbound Heatmap features to visualize call volumes over specific periods.
Access to this Report:
Access to this report is based on your user role. You may not be able to access and view a specific report and all of its features if your role does not permit it.
### Accessing Outbound Activity
1. **Access Outbound Activity**:
* Go to the [Admin Portal](https://app.voxo.co/dashboard) and sign in.
* Click the **Reports** tab to expand it.
* Select **Call Summary**, then **Outbound Activity**.

### Viewing Outbound Activity
2. **Overview**:
* This section provides a detailed summary of outbound call activities, helping you analyze call patterns and performance over specific periods.

3. #### Last 10 Days:
* View a bar graph showing the status of outbound calls.
* Categories displayed:
* **Answered (OUT):** Calls answered. **(Blue)**
* **No Answer (OUT):** Calls not answered. **(Green)**
* **Busy (OUT):** Calls with a busy signal. **(Red)**
* **Failed (OUT):** Calls failed to connect. **(Purple)**
#### Last 30 Days:
* View a similar bar graph for the last 30 days.
* Categories and colors remain consistent as above.
#### Graph Details:
* The graph displays data based on your selection (last 10 days or last 30 days).
* Hover over the bars to see daily stats.
* Each bar represents a different category of call status (Answered, No Answer, Busy, Failed).

### Filters
4. **Filter Settings:**
* **Select Date Range:** Choose the start and end dates for the report to customize the period for which you want to view the data.
* **Predefined Date Filters:** Quickly filter data by predefined date ranges such as **Last week**, **Last month**, **Last 3 months**, **Last 6 months**, and **Last year**.

5. **Select Distribution:**
* Choose to view data daily, monthly, or hourly.

6. **Filter By**:
* **Branch:** Filter data by specific a specific branch.
* **Call Outcome:** Filter by the [outcome](https://scribehow.com/shared/Omnia_Admin_Account_Settings__gaYuDNCBQbCCA_1-ZWU0GQ#a3ddfd02) of calls.
* **User:** Filter data based on the users who made outbound calls.

7. **Select Outbound Activity Dispositions:**
* Choose between different call outcomes to display in the report:
* **Answered**
* **No Answer**
* **Busy**
* **Failed**

8. **Select a Secondary Metric:**
* Display additional metrics alongside primary data:
* **Call Quality:** Quality of the call connections.
* **Inbound Calls:** Number of inbound calls.
* **Internal Calls:** Number of internal calls.
* **Talk Time:** Total talk time for the calls.
* **Total Calls:** Total number of calls.
* Additional filters based on the selected secondary metric:
* **Inbound Calls**: Filter by Answered, No Answer, Busy, Failed.
* **Talk Time:** Filter by Inbound, Outbound, Total.
* **Total Calls:** Filter by Answered, No Answer, Busy, Failed.

9. #### Apply Filters:
* After setting your desired filters, click on the **Update** button to apply them. This will update the report to reflect the selected criteria.
* Click **Reset** to remove the filters.

10. **Graph Details**:
* **Data Points:** Hovering over the bars in the graph now provides detailed statistics based on the filters selected.

11. **Exporting Data**:
* Click **Export** to download the displayed data in CSV format.

### Outbound Heatmap
12. **Outbound Heatmap Overview**:
* The **Outbound Heatmap** visualizes the volume of outbound calls over a selected period. Each square represents a day, with colors indicating the number of calls.

13. **Select Date Range:**
* Select a date range to get started.
* **Last 6 Months:** Displays a heatmap representing the number of outbound calls over the past six months.
* **Last 1 Year:** Displays a similar heatmap for the past year.

14. **View Heatmap:**
* The heatmap will display the volume of outbound calls, with the following color coding:
* **Yellow: 4 - 26 calls**
* **Light Orange: 26 - 48 calls**
* **Orange: 48 - 69 calls**
* **Dark Orange: 69 - 91 calls**
* **Red: 91 - 112 calls**

15. **Filter by Call Volume:**
* Click on the color labels at the top to filter the heatmap. Clicking on a label will remove it from the view, allowing you to focus on specific call volume ranges. For example, clicking on the **Yellow** label will exclude days with 4 - 26 calls from the heatmap.

16. **Analyze Data:**
* **Data Points:** Hovering over the cells in the heatmap provides detailed statistics for each day, including:
* **Answered (OUT) in blue**
* **No Answer (OUT) in green**
* **Busy (OUT) in red**
* **Failed (OUT) in purple**

# Paging Groups
Source: https://docs.voxo.co/omnia/admin/paging-groups
A Paging Group allows you to broadcast a message to multiple extensions, useful for announcements, emergency notifications, or communicating with multiple us...
## A Paging Group allows you to broadcast a message to multiple extensions, useful for announcements, emergency notifications, or communicating with multiple users simultaneously. This guide provides step-by-step instructions for accessing, adding, editing, deleting, searching, and exporting paging groups in the Omnia Admin Portal.
This document applies to the following user roles within Omnia:
Account Administrator
Partner Administrator
### Accessing Paging Groups
1. **Navigate to Paging Groups:**
Go to the [Admin Portal](https://app.voxo.co/dashboard) and sign in.
Click the **Phone System** tab to expand it, then select **Paging Groups**.

### Adding a New Paging Group
2. **Add a New Paging Group:**
* Click **Add New**.

3. **Enter Paging Group Details**:
* **Enter number**: Type the number that will be used to dial the paging group.
* **Enter name**: Provide a descriptive name for the paging group (e.g., "Sales Team Announcements").

### Enable Additional Features
4. **Enable Additional Features**:
* **Enable two way audio**: Check this box if you want to allow two-way communication within the paging group.
* **Enable checking if extension is in use**: Check this box if you want the system to verify if an extension is in use before paging.

### Assign Extensions to the Paging Group
5. **Assign extensions**:
* Click on the field and select the extensions you want to include in the paging group.
* You can select multiple extensions to ensure all relevant parties are included.

### Play Intro Message (Optional)
6. **Play Intro Message:**
* **Select Play Intro Message**: Choose from an existing [media file](https://scribehow.com/shared/Omnia_Admin_Media_Files__LxLyMgU7SBqju9ex6tTRBg?referrer=documents) to play before the paging announcement. This can be useful for introducing the page or providing context.
* Click the **Preview media** button to listen and preview the message.
* Click **X** to remove the selected message.

7. **Add a New Media File:**
* **Click Add a Mediafile** to record or upload a new media file if needed.
* Use the controls to record or upload the media file. This will open additional options.

8. **Additional Options**:
* **Playback**: Click to play the media file.
* **Press and Hold To Record:** Click and hold to record a message.
* **Upload File**: Click to add an existing audio file.
* **Cancel Changes**: Click to revert to previous settings.
* **Enter a name**: Type the name in the **Mediafile Name** field before saving.
* **Save Changes**: Click to save the recorded or uploaded file. This media file will now be available to choose from and select in the dropdown.

### Save the Paging Group
9. **Save the Paging Group**:
* Click **Create**.
* Click **Yes** to confirm and save the paging group.

### Editing Paging Groups
10. **Edit Existing Paging Groups:**
* Click on the paging group you want to edit or click the **Edit** button next to it.
* Make your edits.
* Click **Save**.
* Click **Yes** to confirm and save your change.

### Deleting Paging Groups
11. **Delete a Paging Group:**
* Click the **Delete** button next to the Paging Group.
* Confirm the deletion by clicking **Yes**.

### Search and Sort
12. **Search for a Paging Group:**
* **Search Bar:** Quickly find specific items by typing the name or a keyword in the search field. The system will filter the list based on your search input, displaying the relevant results.
* **Sort**: Click the sort icons next to column headers to arrange items in ascending or descending order.

### Exporting Paging Groups
13. **Export Paging Groups**:
* Click the **Export** button next to the search field.
* The system will download a list of the items in CSV format.

# Payment Info
Source: https://docs.voxo.co/omnia/admin/payment-info
This guide provides step-by-step instructions on how to manage payment information within the Omnia Admin Portal.
## This guide provides step-by-step instructions on how to manage payment information within the Omnia Admin Portal.
This document applies to the following user roles within Omnia:
Account Administrator
Partner Administrator
### Accessing Payment Info
1. **Navigate to Payment Info**:
* Go to the [Admin Portal](https://app.voxo.co/dashboard) and sign in.
* Click the **Billing** tab to expand it, then select **Payment Info**.

### Payment Information
2. **Payment Info Tab:**
* **Add New Bank Account:** Click this button to add a new bank account for payments.
* **Primary Bank Account:** The primary bank account details are displayed here, with an option to remove it if necessary.
* **Add New Credit Card:** Click this button to add a new credit card for payments.
* **Credit Card Payment Methods:** Any credit card payment methods will be listed here, with options to remove them if necessary.
* **Automatic Payments:** This section shows the status of automatic payments.
* If enabled, you'll see an option to disable automatic payments.
* If disabled, you'll see an option to enable automatic payments.

# Phone Books
Source: https://docs.voxo.co/omnia/admin/phone-books
This document provides a step-by-step guide for managing phone books within the Omnia Admin Portal.
## This document provides a step-by-step guide for managing phone books within the Omnia Admin Portal. It includes instructions for accessing, adding, editing, deleting, searching, and bulk importing contacts. Phone books populate the **Directory** on auto-provisioned Yealink and Polycom desk phones — if a phone's Directory shows as blank or "None," check that the assigned phone book has entries.
This document applies to the following user roles within Omnia:
Account Administrator
Partner Administrator
### Accessing Phone Books
1. **Navigate to Phone Books:**
Go to the [Admin Portal](https://app.voxo.co/dashboard) and sign in.
Click the **Phone System** tab to expand it, then select **Phone Books**.

### Adding a New Phone book
2. **Add a New Phone Book:**
* Click **Add New**.
* Enter a name for the phonebook in the **Name** field.

### Adding Contacts
3. **Add Contacts**:
* **First Name**: Enter the first name of the contact.
* **Last Name**: Enter the last name of the contact.
* **Phone Number**: Enter the phone number of the contact.
* **Email**: Enter the email address of the contact.
* **Company**: Enter the company name associated with the contact.
* Click **Clear** to remove.
* Click the **Add "+"** button to add this contact.
* Continue to add additional contacts as needed. Added contacts will appear in the list below.

4. **Search the Phone Book:**
* Enter a number or description in the **Search** field to find specific contacts from the list.

5. **Remove a Contact:**
* If you need to remove a contact from the list after selecting add, clicking **Remove** (-) will remove an entry before saving.

6. **Save the Phone Book:**
* Once you have completed adding contacts, click **Create**.
* Click **Yes** to confirm and save.

### Bulk Adding
7. **Import from CSV:**
* Hover over **Import from csv** and click **Download example csv** to get a template to add your contacts in bulk to the phone book.
* Complete the template, save it, and click **Import from csv** to upload the spreadsheet.

8. **Map CSV Fields**:
Select **First Name**, **Last Name**, **Phone,Email,** and **Company** from the dropdown menus for each corresponding column.
All listed fields must be selected to continue.
Click **Reset** to remove the CSV and reupload if needed.
Click **Add**.
Added entries will appear in the list below.

9. **Remove an Entry:**
* If you need to remove a phone number entry from the list after selecting add, clicking **Remove number** (-) will remove an entry before saving.

10. **Save the Phone Book:**
* Once you have completed adding entries, click **Create**.
* Click **Yes** to confirm and save.

### Editing a Phone Book
11. **Edit a Phone Book:**
* Click on the phone book you want to edit or click the **Edit** button next to it.
* Make your edits.
* Click **Save**.
* Click **Yes** to confirm and save your changes.

### Assigning a Phone Book to a Device
After you create a phone book, assign it to each desk phone so the directory pushes to the device. The assignment control lives under **Phone System > Devices**, not on the Phone Books page.
* Go to **Phone System**, then **Devices**, and click the device you want to update.
* Under the **Phonebook** dropdown, select the phone book you created.
* Save. The phone pulls the new directory on its next reboot or re-provision.
### Deleting a Phone Book
12. **Delete a Phone Book:**
* Click the **Delete** button next to the Phone Book.
* Confirm the deletion by clicking **Yes**.

### Search and Sort
13. **Search for a Specific Phone Book:**
* **Search Bar**: Quickly find specific items by typing the name or a keyword in the search field. The system will filter the list based on your search input, displaying the relevant results.
* **Sort:** Click the sort icons next to column headers to arrange items in ascending or descending order.

# Phone Numbers
Source: https://docs.voxo.co/omnia/admin/phone-numbers
This guide provides step-by-step instructions on how to manage phone numbers in the Omnia Admin Portal.
## This guide provides step-by-step instructions on how to manage phone numbers in the Omnia Admin Portal. It includes accessing, adding, editing, deleting, and searching for phone numbers, as well as enabling features like call recording and setting caller ID names.
This document applies to the following user roles within Omnia:
Account Administrator
Partner Administrator
### Accessing Phone Numbers
1. **Navigate to Phone Numbers:**
Go to the [Admin Portal](https://app.voxo.co/dashboard) and sign in.
Click the **Phone System** tab to expand it, then select **Phone Numbers.**

### Adding a New Phone Number
2. **Add a New Phone Number:**
* Click **Add New**.
* Select **Phone Number** or **Toll Free** from the dropdown menu.

### Ordering Numbers
3. **Order Numbers:**
* **Search Inventory:** Choose this option to select from available numbers.
* **Select State:** Choose the state for the number(s).
* **Select Rate Center:** Choose the rate center — the local telephone exchange area (state and town) a number is tied to. Local-number inventory is organized by state and rate center, so picking the right town determines which numbers are available to order. If no numbers are available in the rate center you pick, try another town in the same state.
* **Select NPA-NXX:** Choose the NPA-NXX. This is optional — leave it blank to see all available prefixes in the selected rate center.
* **Branch:** Select the [branch](https://scribehow.com/shared/Omnia_Admin_Branches___UJ4yv5wT1qKlkNTqkRvUA) to assign the number(s) if applicable. This helps with filtering and sorting.
* **Choose Numbers:** Enter keywords to filter available numbers and assign them as needed.
**Note**: If a desired number is unavailable, please reach out to support.

4. **Search Exact Number:**
* **Enter Number**: Choose this option to search for a specific number.
* Enter the exact number.
* Use **wildcard digits** by entering an "X" to specify a wildcard digit.
* **Branch**: Select the branch if applicable to assign the number, which helps with filtering and sorting.

### Creating Toll-Free Numbers
5. **Create Toll-Free Number:**
* **Search Inventory:** Choose this option to select from available toll-free numbers.
* **Number Format:** Choose the format for the toll-free number.
* **Number:** Select a number from the available options in the dropdown list.
* **Branch:** Select the branch if applicable to assign the number, which helps with filtering and sorting.
**Note**: If a desired number is unavailable, please reach out to support.

6. **Search Exact Toll-Free Number:**
* **Enter Number:** Input the exact toll-free number you want.
* **Use Wildcards:** Enter an "X" to specify a wildcard for any of the last 7 digits.
* **Select Branch:** Choose the branch if applicable to assign the number, which helps with filtering and sorting.

### Saving the Number
7. **Save Number:**
* Click **Create** to add the number(s) to your inventory.
* Click **Yes** to confirm.

### Updating General Settings
8. **Update General Settings**:
* **Description:** Enter or update the description.
* **Caller ID Name:** Enter the name that will show up on caller ID when dialing externally. The account name when setting up the account determines default the caller ID.
* **Branch:** Select the branch associated with this number.
* **Enter Prefix Name:** Enter a prefix name if needed. This will show up on your caller ID in addition to the caller's name.
* **Enable Recording:** Choose **Yes**, **No**, or **No, but allow start/stop** to manage inbound call recording for this number. Recording is **off by default**, so inbound calls aren't captured until you set this to **Yes**, and only answered calls are recorded. Note that [outbound](https://scribehow.com/shared/Omnia_Admin_Extensions__-L9BuyfORwK9dnYrMhXwQg#63efea07) call recording is managed from the extension.
* **Email Recording:** Enter the email address(es) where recordings should be sent

### Updating Routing Settings
9. **Update Routing Settings:**
**Select Type:** Choose between Voice and Fax.
* **Voice:** Select the type of routing and destination.
* **Inbound Fax:** Configure inbound fax settings, including delivery options and email addresses.
**Unconditional Forwarding:** Enable if you want to forward all calls or faxes unconditionally.
**SMS Settings:** Enable text messaging if needed (contact support if text messaging features are not configured).

### Selecting Routing Type for Voice
10. **Select Routing Type for Voice**:
* **Destination Type**: Choose from options such as **Ring an [Extension](https://scribehow.com/shared/Omnia_Admin_Extensions__-L9BuyfORwK9dnYrMhXwQg), Automation, [Custom](https://scribehow.com/shared/Omnia_Admin_Custom_Destinations__UhdCAL0gSv2KBHRBil5DnQ?referrer=documents), Follow a [Call Flow](https://scribehow.com/shared/Omnia_Admin_Call_Flows__Pzxem7coSC26XlSCs_AB-g?referrer=documents), Go to a [Virtual Receptionist](https://scribehow.com/shared/Omnia_Admin_Virtual_Receptionists__0zu-MuY_TbSnbNKkwRzptw?referrer=documents), Go to a [Voicemail](https://scribehow.com/shared/Omnia_Admin_Voicemails__avd1aEdzQJapD-KxgaffoA?referrer=documents), Play an [Audio File](https://scribehow.com/shared/Omnia_Admin_Media_Files__LxLyMgU7SBqju9ex6tTRBg?referrer=documents), Ring a [Call Group](https://scribehow.com/shared/Omnia_Admin_Call_Groups__new4XpZBTwKeEYeYxm88ng?referrer=documents).**
* **Select Destination**: Choose the specific action or endpoint based on the selected type.
* Click **Add a destination** to configure configure multiple destinations. Note that this button will only appear based on the selected destination type.
* **Reorder**: Click to reorder destinations by clicking and dragging.
* **Delete**: Click to remove a destination.
To give a department or staff a direct line that skips your phone menu, point a dedicated number straight at its destination — for example **Ring a Call Group** or a queue — instead of **Go to a Virtual Receptionist**. Calls to that number reach the group or queue directly, without playing the IVR greeting or asking for a key press, while your main number keeps its menu.

### Enable Unconditional Forwarding
11. **Enable Unconditional Forwarding:**
* **Unconditional Forwarding**: Enable this option if you want to forward all calls or faxes unconditionally.
* **Example**: If an office is closing due to bad weather and you need to forward their main number to a cellphone:
* Create a custom destination for the cellphone.
* Enable unconditional forwarding.
* Select **Custom** as the destination type.
* Choose the custom destination you just created for the cellphone.

### SMS settings
Incoming texts sent to this phone number are delivered to the destination you configure here. If text messaging isn't enabled on the number, incoming texts to it aren't delivered.
12. **SMS Settings:**
* **Enable for Text Messaging**: Check this box to enable text messaging. Note that this process may take a while.
* **Destination Type**: Select the type of destination from the dropdown menu.
* **Select Destination**: Choose the specific destination based on the selected destination type.
* **Add a Destination**: Click the **Add a destination** button to add another destination.
* **Reorder**: Click to reorder destinations by clicking and dragging.
* **Delete**: Click to remove a destination.
* **Note**: If text messaging features are not configured for your account, contact support for assistance.

13. **Save Changes**:
* Click **Save** to save changes.
* Click **Update** to confirm.

### Fax Settings
14. **Inbound Fax Settings**:
* **Enable Fax Storage After Delivery**: Check this box to store the fax after it is delivered.
* **Delivery Options**:
* **Deliver to Email**: Select this option to have the fax delivered to an email address.
* **Deliver to Email and Forward to Extension**: Select this option to deliver the fax to an email address and forward it to an extension.
* **Enter Emails**: Enter the email addresses where the faxes should be delivered. You may enter multiple emails separated by a comma.
* **Note**: Outbound faxing is enabled from the extension.

### Wiretap Feature
15. **Initiate Wiretap**:
* The wiretap feature enables you to view a live packet capture of the respective phone number's activity. Here’s how to use it:
* **Click Wiretap** next to the desired extension.
* **Click Start** to begin the wiretap.

### Editing a Phone Number
16. **Edit a Phone Number:**
* Click on the phone number you want to edit or click the **Edit** button next to it.
* Make your edits.
* Click **Save**.
* Click **Update** to confirm.

### Deleting a Phone Number
17. **Delete a Phone Number:**
* **Select Phone Number**: Click the **Delete** button next to the Phone Number.
* **Warning Message**: If the number is routed, a warning message will alert you that this number is not retrievable. Once deleted, the number is removed from your account and there is no undo on this screen. To add it back, use **Add New** from the Phone Numbers screen — it can only be re-added if it's still available in inventory (try **Search Exact Number** first, then **Search Inventory** by state and rate center). If neither finds the number, contact support.
* **Confirm Deletion**: Click **Yes** to confirm the deletion.

### Viewing, Searching, and Exporting Phone Numbers
18. **Phone Numbers**:
* **Viewing Phone Numbers**: The main screen displays a list of phone numbers with details such as **Number, Description, Prefix, Branch, Status,** and **Use**.
* **Search Bar**: Quickly find specific items by typing the name or a keyword in the search field. The system will filter the list based on your search input, displaying the relevant results.
* **Export Button**: Click the **Export** button next to the search field.The system will download a list of the items in CSV format.
* **Sort**: Click the sort icons next to the column headers to arrange items in ascending or descending order.

# Provisioning
Source: https://docs.voxo.co/omnia/admin/provisioning
This guide explains how to access and view provisioning reports in Omnia.
## This guide explains how to access and view provisioning reports in Omnia. It covers filtering logs, selecting date ranges, applying filters, and exporting data. It also provides an overview of the provision logs table, detailing device provisioning activities. These logs help monitor provisioning status, track device configurations, and troubleshoot issues efficiently.
Access Report Roles:
Partner Administrator
Account Administrator with the Reporting Feature Enabled
### Accessing Provisioning
1. **Access Provisioning:**
* Go to the [Admin Portal](https://app.voxo.co/dashboard) and sign in.
* Click the **Reports** tab to expand it, then select **Provisioning**.

### Viewing Provisioning
2. **ViewProvisioning Logs:**
* The provision logs display a table with columns such as **Time, Type, MAC, Status, IP Address, User Agent,** and **Fail Reason.** The initial results shown will be for today's date.
* **Sort:** Click the sort icons next to column headers to arrange items in ascending or descending order.
* The initial results shown will be for today's date.

### Filtering the Provision Logs
3. **Preset Filters:**
* **Yesterday**: Click this button to quickly filter the log entries from the previous day.
* **Last 10 Days**: Click this button to quickly filter the log entries from the last 10 days.
* **Last 30 Days**: Click this button to quickly filter the log entries from the last 30 days.

4. **Filter Settings**:
* Click **Filter** to open the filter settings.

5. **Select Date Range**:
* Choose the start and end dates to define the period for which you want to view logs.
* You can use preset options like **Last Week, Last Month, Last 3 Months, Last 6 Months,** and **Last Year**.
* In addition to the date range, you can also filter by a specific time range within the selected dates.

6. **Clear Filters:**
* Click **Clear** to remove the filters if needed. This allows you to start over while picking from your date ranges.

7. **Filter By**:
* Choose additional filters such as **MAC Address** or **IP Address** to narrow down the results further.
* Enter the specific criteria based on the selected filter.

8. **Apply Filter**:
* Click **Update** to apply the filter settings.
* The details will be displayed on the screen based on your filters.

9. **Reset Filters**:
* Click **Reset** to remove your filters and start over if needed.

### Exporting the Provision Logs
10. **Export Button**:
* Click **Export** to download the filtered provision log data in CSV format.
* Click **OK** to confirm the export.

### Understanding the Provision Logs Table
11. **Understanding the Provision Logs Table**:
* **Time**: Shows the timestamp of the provisioning action.
* **Type**: Indicates the type of provisioning action (e.g., directory, boot, global).
* **MAC**: Displays the MAC address of the device being provisioned.
* **Status**: Shows the result of the provisioning action (e.g., SUCCESS, FAILURE).
* **IP Address**: Displays the IP address of the device being provisioned.
* **User Agent**: Shows the user agent string of the device being provisioned.
* **Fail Reason**: Provides additional details if the provisioning action failed.

# Queue Activity
Source: https://docs.voxo.co/omnia/admin/queue-activity
This document provides comprehensive instructions for accessing and interpreting the Queue Activity Report within the Omnia Admin Portal.
This document provides comprehensive instructions for accessing and interpreting the Queue Activity Report within the Omnia Admin Portal. It includes detailed steps for navigating to the report, filtering data by various criteria, understanding the key metrics and visual representations, and utilizing additional features like the Inbound Heatmap. This guide is essential for administrators to monitor and analyze queue performance effectively, ensuring optimal management and operational efficiency
Alert: **Access to this Report:**
* Access to this report is based on your user role. You may not be able to access and view a specific report and all of its features if your role does not permit it.
### Accessing Queue Activity
1. **Navigate to the Reports Section**:
* Go to the [Admin Portal](https://app.voxo.co/dashboard) and sign in.
* Click the **Reports** tab to expand it.
* Select **Queues**, then **Queue Activity**.

### Viewing Queue Activity Records
2. **Understanding the Queue Activity Graph:**
* The Queue Activity graph provides a visual representation of the queue performance over a selected period. The graph includes data points for:
* **Complete:** The number of completed calls.
* **Abandoned:** The number of abandoned calls.
* **Refused:** The number of refused calls.

### Filtering Queue Activity Records
3. **Selecting Queues:**
* Use the dropdown menu to select the queue you want to view.

4. **Quick Filters:**
* You can quickly filter records by date using the buttons at the top of the page:
* **Last 10 Days**
* **Last 30 Days**

5. **Accessing Filter Settings:**
* Click the **Filter** button to open the filter settings.

6. **Selecting Date and Time Range:**
Use the calendar to pick start and end dates and times.
Alternatively, choose from quick filters like: **Last week, Last month. Last 3 months, Last 6 months, Last year**.
After setting your desired filters, click **OK** to apply them and update the graph.

7. **Selecting Queues:**
* Use the dropdown menu to select the queue you want to filter.

8. **Selecting Distribution:**
* Choose how to distribute the data:
* Daily
* Monthly
* Hourly

9. **Filtering by Additional Criteria:**
* You can further filter the records by additional criteria:
* **User:** Select specific users.
* **Tag:** Enter a specific tag to filter by.

10. **Selecting Secondary Metrics:**
* Choose a secondary metric to compare:
* Abandon Rate
* Another Queue (select the secondary queue from the dropdown menu.)
* Answered Under 30
* Outbound Complete
* Queue Exits
* Talk Time / Wait Time
* After setting your desired filters, click **Update** to apply them and update the graph.

11. **Reset Filters:**
* Click the **Reset** button to remove all applied filters.

### Understanding the Queue Activity Graph
12. **Queue Activity Graph**:
* The Queue Activity graph provides a visual summary of queue performance over time.
#### Key Components:
1. **Y-Axis (Calls):** Number of calls.
2. **X-Axis (Date):** Timeline of call activity.
#### Legend:
* **Complete (Blue):** Successful calls.
* **Abandoned (Green):** Calls not completed by the caller.
* **Refused (Red):** Calls not accepted by the system.

13. **Hovering Over Data Points:**
* When you hover over a data point, a tooltip appears showing detailed information about that specific point, including the date and the number of completed, abandoned, and refused calls.

14. **Use the Legend to Filter Metrics:**
* Click on any metric in the legend to remove it from the view.
* This feature allows you to focus on specific metrics by filtering out the others.

### Viewing Additional Metrics
15. **Viewing Additional Metrics:**
* Below the graph, additional metrics are available for detailed analysis:
* **Completed:** Total number of completed calls. Click **Total**, **Avg**, or **%** to switch views.
* **Abandoned:** Total number of abandoned calls. Click **Total**, **Avg**, or **%** to switch views.
* **Refused:** Total number of refused calls. Click **Total**, **Avg**, or **%** to switch views.
* **Talk Time:** Total and average talk time for calls.
* **Wait Time:** Total and average wait time for calls, including shortest and longest wait times.
* **Transfers:** Total number of attended and blind transfers. Click **Total**, **Avg**, or **%** to switch views.
* **Total Inbound:** Total and percentage of inbound calls, including unique inbound calls.
* **Exits:** Total number of call exits by timeout or key press. Click **Total**, **Avg**, or **%** to switch views.
* **Callbacks:** Total, successful, and failed callback attempts. Click **Total**, **Avg**, or **%** to switch views.

### Viewing the Inbound Heatmap
16. **Accessing the Inbound Heatmap:**
* Scroll below the additional metrics to find the **Inbound Heatmap**.

17. **Selecting a Date Range:**
* Use the buttons at the top to select a date range, such as **Last 6 Months** or **Last 1 Year**.

18. **Understanding the Heatmap:**
* The heatmap displays the total number of inbound calls over the selected period.
* The color gradient indicates call volume:
* Light yellow: 0 - 5 calls
* Light orange: 5 - 9 calls
* Orange: 9 - 14 calls
* Dark orange: 14 - 18 calls
* Red: 18 - 22 calls

19. **Interactive Heatmap:**
* Hover over a specific date to view the total inbound calls for that day

20. **Filtering Heatmap Data:**
* Click on the numbers in the heatmap legend to remove those data points from the view.

# Queue Log
Source: https://docs.voxo.co/omnia/admin/queue-log
This document provides a detailed guide for accessing and managing the Queue Log report in the Omnia Admin Portal.
This document provides a detailed guide for accessing and managing the Queue Log report in the Omnia Admin Portal. It includes steps for navigating to the reports section, understanding and filtering the records table, exporting data, and scheduling reports. The guide ensures that users can efficiently track and analyze queue activities within the Omnia platform, with options to filter by date, time, specific queues, users, and events.
Access to this Report:
Access to this report is based on your user role. You may not be able to access and view a specific report and all of its features if your role does not permit it.
### Accessing Queue Logs
1. **Navigate to the Reports Section**:
* Go to the [Admin Portal](https://app.voxo.co/dashboard) and sign in.
* Click the **Reports** tab to expand it.
* Select **Queues**, then **Queue Log**.

### Viewing Queue Records
2. **Understanding the Records Table**:
* The records table provides detailed information about each event handled by the Queue system. The columns include:
* **Time:** The date and time when the event was logged.
* **Queue:** The name of the queue involved in the event.
* **Event:** The type of event (e.g., Exit Timeout, Blind Transfer, Unpause).
* **User:** The user involved in the event.
* **Caller Number:** The phone number of the caller.
* **Caller Name:** The name of the caller (if available).
* **Reason:** The reason for the event (if applicable).
* **Hold Time (s):** The hold time in seconds.
* **Talk Time (s):** The talk time in seconds.
* **Exit Key:** The exit key used during the event.
* **Tag:** Additional tags associated with the event.
* The initial results shown will be for today's date.

### Filtering Queue Records
3. **Using Quick Filters:**
* You can quickly filter records by date using the buttons at the top of the page:
* **Yesterday**
* **Last 10 Days**
* **Last 30 Days**

4. **Accessing Filter Settings:**
* Click on the **Filter** button to open the filter settings.
Filters like **Events** (Abandon, Complete Caller, Refused, and so on), **Queues**, **Users**, **Call Tag**, and **Call ID** live inside the Filter window — they aren't shown as separate fields on the main page. Open **Filter** first, then choose the criteria you want and click **Update**.

5. **Selecting Date and Time Range:**
In the filter settings, you can select a specific date and time range:
* Use the calendar to pick start and end dates.
* Adjust the time settings as needed.
Alternatively, you can choose from predefined date ranges such as: **Last week,Last month, Last 3 months, Last 6 months,** or **Last year**.
After setting your desired filters, click **OK.**

6. **Filtering by Additional Criteria:**
* You can further filter the records by additional criteria:
* **Queues:** Select specific queues.
* **Users:** Select specific users.
* **Call Tag:** Enter a specific call tag.
* **Call ID:** Enter a specific Call ID.
* **Events:** Select specific events to filter by (e.g., Complete Caller, Complete Agent, Abandon, Refused, Pause, Unpause, Login, Logout, Exit Key, Exit Timeout, Attended Transfer, Blind Transfer, Callback Attempt, Callback Timeout, Withdraw).
* After setting your desired filters, click **Update** to apply them and update the records table.

7. **Reset Filters**:
* Click **Reset** to remove your filters and start over if needed.

### Exporting the Queue Log
8. **Export Data**:
* Click the **Export** button to download the data in CSV format.

### Scheduling Reports
9. **Schedule a Report:**
* Click the **Export** button.
* Select **Schedule Report** from the dropdown.

10. **Configure Report Settings:**
* Enter a name for the report.
* Add recipient email addresses.
* Select the report frequency: Daily, Weekly, or Monthly.
* Review the current filter settings.
* Click **Schedule** to save the report schedule.
* For more information, see the [Scheduled Reports](https://scribehow.com/shared/Omnia_Admin_Reports_Scheduled_Reports__W6AXJX2qQMK2RNHO1Mu0DA?referrer=documents) section.

####
# Queue Summary
Source: https://docs.voxo.co/omnia/admin/queue-summary
The "Omnia Admin Reports: Queue Summary" guide provides administrators with comprehensive instructions on accessing and utilizing the Queue Summary report wi...
The "Omnia Admin Reports: Queue Summary" guide provides administrators with comprehensive instructions on accessing and utilizing the Queue Summary report within the Omnia Admin Portal. This document details how to navigate to the reports section, understand the records table, and use sorting and filtering options to customize the data view. Additionally, it explains how to export records and schedule reports for regular updates.
Access to this Report:
Access to this report is based on your user role. You may not be able to access and view a specific report and all of its features if your role does not permit it.
### Accessing Queue Summary
1. **Navigate to the Reports Section**:
* Go to the [Admin Portal](https://app.voxo.co/dashboard) and sign in.
* Click the **Reports** tab to expand it.
* Select **Queues,** then **Queue Summary**.

### Viewing Queue Summary Records
2. **Understanding the Records Table:**
* The records table provides detailed information about the queue performance metrics. The columns include:
* **Name:** The name of the queue.
* **Inbound Complete:** The number of completed inbound calls.
* **Abandoned:** The number of abandoned calls.
* **Refused:** The number of refused calls.
* **Blind Transfers:** The number of blind transfers.
* **Attended Transfers:** The number of attended transfers.
* **Total Transfers:** The total number of transfers.
* **Total Wait Time:** The total wait time for all calls.
* **Average Wait Time Per Call:** The average wait time per call.
* **Shortest Wait:** The shortest wait time.
* **Longest Wait:** The longest wait time.
* **Percent Answered Under 30 Seconds:** The percentage of calls answered within 30 seconds.
* **Total Talk Time:** The total talk time for all calls.
* **Average Talk Time Per Call:** The average talk time per call.
* **Exits with Key Press:** The number of exits triggered by key press.
* **Exits By Timeout:** The number of exits due to timeout.
* **Total Inbound:** The total number of inbound calls.
* **Unique Inbound:** The number of unique inbound calls.
* **Answer Rate Minus Abandons:** The answer rate excluding abandoned calls.
* **Average Abandon Time Per Call:** The average abandon time per call.
* **Complete Callbacks:** The number of completed callbacks.
* **Successful Callbacks:** The number of successful callbacks.
* **Failed Callbacks:** The number of failed callbacks.
* **Hold Time Under 0.5 Minutes:** The hold time under 0.5 minutes.
* **Hold Time Over 0.5 Minutes:** The hold time over 0.5 minutes.
* **Total Outbound:** The total number of outbound calls.
* The initial results shown will be for today's date.

3. **Sorting Columns:**
* All column headers can be sorted. Click on a column header to sort the records based on that column.

### Filtering Queue Summary Records
4. **Using Quick Filters:**
* You can quickly filter records by date using the buttons at the top of the page:
* **Yesterday**
* **Last 10 Days**
* **Last 30 Days**

5. **Accessing Filter Settings:**
* Click on the **Filter** button to open the filter settings.

6. **Selecting Date and Time Range:**
* In the filter settings, you can select a specific date and time range:
* Use the calendar to pick start and end dates.
* Adjust the time settings as needed.
* You can also choose from predefined date ranges such as: **Last week, Last month, Last 3 months, Last 6 months, Last year.**

7. **Selecting Distribution**:
* You can filter the records by distribution: **Hourly, Daily, Monthly, Agents, or None.**

8. **Filtering by Hold Time:**
* Enter a specific hold time in minutes to filter the records.

9. **Filtering by Additional Criteria:**
* You can further filter the records by additional criteria:
* **Queues:** Select specific queues.
* **Tag:** Enter a specific tag to filter by.
* After setting your desired filters, click **Update** to apply them and update the records table.

10. **Reset Filters**:
* Click **Reset** to remove your filters and start over if needed.

### Exporting Records
11. **Export Records:**
* To export the displayed records, click on the **Export** button located at the top right of the records table.

### Scheduling Queue Summary Reports
12. **Schedule a Report:**
* Click the **Export** button.
* Select **Schedule Report** from the dropdown.

13. **Configure Report Settings:**
* Enter a name for the report.
* Add recipient email addresses. Use commas to separate multiple emails.
* Select the report frequency: Daily, Weekly, or Monthly.
* Review the current filter settings.
* Click **Schedule** to save the report schedule.
* For more information, see the [Scheduled Reports](https://scribehow.com/shared/Omnia_Admin_Reports_Scheduled_Reports__W6AXJX2qQMK2RNHO1Mu0DA?referrer=documents) section.

####
# Registering SMS Brand
Source: https://docs.voxo.co/omnia/admin/registering-sms-brand
Learn how to register your SMS brand for 10DLC compliance.
1. SMS registration will begin by needing to create a brand and getting veried.
2. Start by going to "Account"

3. Click "Settings"

4. Scroll down and click "Register SMS Brand"

5. Fill out the information as it is shown on tax documents for business, Once complete click save and wait for the brand to be verified.

# Scheduled Reports
Source: https://docs.voxo.co/omnia/admin/scheduled-reports
This guide provides step-by-step instructions on how to manage scheduled reports within the Omnia Admin Portal.
This guide provides step-by-step instructions on how to manage scheduled reports within the Omnia Admin Portal.
Access to this Report:
Access to this report is based on your user role. You may not be able to access and view a specific report and all of its features if your role does not permit it.
### Accessing Scheduled Reports
1. **Navigate to Scheduled Reports**:
* Go to the [Admin Portal](https://app.voxo.co/dashboard) and sign in.
* Click the **Reports** tab to expand it, then select **Scheduled Reports**.

### View Scheduled Reports
2. **View Scheduled Reports:**
* The table displays the following columns:
* **Name**: The name of the scheduled report.
* **Module**: The report module (e.g., [Call Records](https://scribehow.com/shared/Omnia_Admin_Reports_Call_Records__imIZZvN2TKWGf4aynAImog?referrer=documents), [Queue Summary](https://scribehow.com/shared/Omnia_Admin_Reports_Queue_Summary__1Jg1uGdhSyCE8P9pF7S88g?referrer=documents), [Agent Activity](https://scribehow.com/shared/Omnia_Admin_Reports_Agent_Activity__4Tj2RynhQA-N-MSQwvvSLA?referrer=documents), [Queue Log](https://scribehow.com/shared/Omnia_Admin_Reports_Queue_Log__znAmyxjCSQW3JPiHRO71Ag?referrer=documents)).
* **Frequency**: How often the report is sent (e.g., Daily, Weekly, Monthly).
* **Creator**: The email address of the report creator.
* **Recipients**: The email addresses of the report recipients.
* Click on the column headers to sort the reports by that column.

### Editing a Scheduled Report
3. **Edit a Scheduled Report:**
* Click the **Edit** button next to the scheduled report you want to edit or click directly on the report.

4. **Update Report Settings:**
When you select a scheduled report, you can modify the report name, frequency, recipients, and enable/disable the report as needed.
The current settings are displayed for:
* **Name**: The name of the scheduled report.
* **Frequency**: How often the report is sent.
* **Recipients**: The email addresses of the report recipients.
* **Module**: The report module.
* **Creator Email**: The email address of the report creator.
* **Filters**: The filters applied to the report.
Click **Save** to apply any changes.

### Exporting Scheduled Reports
5. * Click **Export** to download a list of Scheduled Reports in CSV format.

### Deleting a Scheduled Report
6. **Delete a Scheduled Report:**
* Click the delete icon (trash can) next to the scheduled report you want to remove.
* Confirm the deletion in the prompt that appears.

# Short Numbers
Source: https://docs.voxo.co/omnia/admin/short-numbers
A "Short Number" is a 2-5 digit code that allows users to reach specific destinations without dialing the full 10-digit number.
## A "Short Number" is a 2-5 digit code that allows users to reach specific destinations without dialing the full 10-digit number. For example, office staff can transfer calls to a field technician's cell phone using a short number like "02" instead of the full number. This guide provides step-by-step instructions for managing short numbers in the Omnia Admin Portal.
This document applies to the following user roles within Omnia:
Account Administrator
Partner Administrator
### Accessing Short Numbers
1. **Navigate to Short Numbers:**
Go to the [Admin Portal](https://app.voxo.co/dashboard) and sign in.
Click the **Phone System** tab to expand it, then select **Short Numbers**.

### Adding New Short Numbers
2. **Add a New Short Number:**
Click **Add New** to create a new short number.

3. **Add Numbers:**
* **Number**: Enter a number in the **Number** field. The number length must be at least two characters long.
* **Destination Number**: Enter the destination number in the **Enter destination number** field.
* **Description**: Enter a description in the **Enter description** field.

4. **Add Entries:**
* Click **Add (**+**)** to add an entry.
* Click the **Clear** to remove an entry before adding it to the list.
* You can continue to add multiple numbers by following this process. Added entries will appear in the list below.

5. **Remove an Entry:**
* If you need to remove a number from the list after selecting add, clicking **Remove** (-) will remove an entry before saving.

6. **Save Entries:**
* Once you have completed adding entries, click **Create**.
* Click **Yes** to confirm and save.

### Bulk Adding Short Numbers
7. **Import from CSV:**
* Hover over **Import from csv** and click **Download example csv** to get a template to add your numbers in bulk.
* Complete the template, save it, and click **Import from csv** to upload the spreadsheet.

8. **Map CSV Fields**:
* Select **number**, **destination**, and **description** from the dropdown menus for each corresponding column.
* All listed fields must be selected to continue.
* Click **Reset** to remove the CSV and reupload if needed.
* Click **Add**.
* Added entries will appear in the list below.

9. **Remove an Entry:**
* If you need to remove a number from the list after selecting add, clicking **Remove** (-) will remove an entry before saving.

10. **Save the Short Numbers:**
* Once you have completed adding entries, click **Create**.
* Click **Yes** to confirm and save.

### Editing Short Numbers
11. **Edit Short Numbers:**
* Click on the short number you want to edit or click the **Edit** button next to it.
* Make your edits.
* Click **Save**.
* Click **Yes** to confirm and save your changes.

### Deleting Short Numbers
12. **Delete a Short Number:**
* Click the **Delete** button next to the Short Number.
* Click **Yes** to confirm the deletion.

### Search and Sort
13. **Search Short Numbers:**
* **Search Bar**: Quickly find specific items by typing the name or a keyword in the search field. The system will filter the list based on your search input, displaying the relevant results.
* **Sort**: Click the sort icons next to column headers to arrange items in ascending or descending order.

### Exporting Short Numbers
14. **Export Short Numbers:**
* Click the **Export** button next to the search field.
* The system will download a list of the items in CSV format.

# SMS Logs
Source: https://docs.voxo.co/omnia/admin/sms-logs
The SMS Logs Report allows you to view and manage SMS messages sent and received.
The SMS Logs Report allows you to view and manage SMS messages sent and received.
Access to this Report:
Access to this report is based on your user role. You may not be able to access and view a specific report and all of its features if your role does not permit it.
### Accessing the SMS Logs
1. **Access the SMS Logs**:
* Go to the [Admin Portal](https://app.voxo.co/dashboard) and sign in.
* Click the **Reports** tab to expand it, then select **SMS Logs**.

### Viewing the SMS Logs
2. **View the SMS Logs:**
* The SMS logs display a table with columns such as **Date, From, To,** and **Body**. The initial results shown will be for today's date.
* **Sort Icons**: Click the sort icons next to the column headers (**Date, From, To, Body**) to arrange items in ascending or descending order.
* The initial results shown will be for today's date.

### Filtering SMS Logs
3. **Preset Filters:**
* **Yesterday**: Click this button to quickly filter the log entries from the previous day.
* **Last 10 Days**: Click this button to quickly filter the log entries from the last 10 days.
* **Last 30 Days**: Click this button to quickly filter the log entries from the last 30 days.

4. **Filter Settings**:
* Click **Filter** to open the filter settings.

5. **Select Date Range**:
* Choose the start and end dates to define the period for which you want to view logs.
* You can also use the preset options like **Last Week, Last Month, Last 3 Months, Last 6 Months,** and **Last Year**.
* In addition to the date range, you can also filter by a specific time range within the selected dates.

6. **Clear Filters:**
* Click **Clear** to remove the filters if needed. This allows you to start over while picking from your date ranges.

7. **Filter By Extension**:
* Select the extension from the dropdown menu to narrow down the results to messages sent or received by a specific extension.

8. **Apply Filter**:
* Click **Update** to apply the filter settings.
* The details will be displayed on the screen based on your filters.

9. **Reset Filters**:
* Click **Reset** to remove your filters and start over if needed.

### Exporting the SMS Log
10. **Exporting the SMS Logs**:
* Click **Export** to download the filtered SMS log data in CSV format.
* Click **OK** to confirm the export.

### Understanding the SMS Logs Table
11. **Understanding the SMS Logs Table**:
* **Date**: Shows the timestamp of the SMS.
* **From**: Displays the extension number of the sender.
* **To**: Displays the extension number of the receiver.
* **Body**: Shows the content of the SMS.

# Accounts
Source: https://docs.voxo.co/omnia/admin/system-admin-accounts
This document provides instructions for managing accounts in the Omnia Admin: System Admin - Accounts section.
## This document provides instructions for managing accounts in the Omnia Admin: System Admin - Accounts section. It includes how to view, search, sort, edit, delete, and add accounts, as well as the roles and permissions of Partner Admins and Account Administrators.
This document applies to the following user roles within Omnia:
Account Administrator
Partner Administrator
### Accessing System Admin - Accounts
1. **Navigate toSystem Admin - Accounts:**
Go to the [Admin Portal](https://app.voxo.co/dashboard) and sign in.
Click the **System Admin** tab to expand it, then select **Accounts**.

### Viewing Accounts
2. **Viewing Accounts:**
* In the **Accounts** section, you can view a list of all accounts associated with your user account. Each account displays the name, code, partner, and time zone.
**Note**: Partner Admins will see all accounts that fall under their administration. Account Admins will only see the specific accounts assigned to them.

3. **Search and Sort**:
* Use the search option to find specific accounts.
* Click the **sort icons** next to the column headers to arrange items in ascending or descending order.

### Creating a New Account
4. **Add New**:
* To add a new account, click the **Add New** button.
* Only Partner Admins can create new accounts. See the [Accounts (Add New)](https://scribehow.com/shared/Omnia_Admin_System_Admin__Accounts_Add_New__vbPAJ9Y1RcSPbxPGUfnc6w) document for detailed instructions.

### Editing an Account
5. **Edit Account**:
* To edit an account, click the **edit** button next to the account or click directly on the account.
* **Partner Admins** have full rights to edit all account details.
* **Account Administrators** have limited editing privileges.
For detailed instructions on editing account settings, please refer to the [Account Settings](https://scribehow.com/shared/Omnia_Admin_Account_Settings__gaYuDNCBQbCCA_1-ZWU0GQ) document.

### Deleting an Account
6. **Delete Account**:
* To delete an account, click the **delete** button next to the account. Only Partner Admins can delete accounts.
* A warning message will appear: "Permanently delete this account? No Going Back!" Click **Yes** to confirm or **Cancel** to abort.

# Accounts (Add New)
Source: https://docs.voxo.co/omnia/admin/system-admin-accounts-add-new
This guide provides step-by-step instructions on how to add new accounts within the Omnia Admin Portal.
This guide provides step-by-step instructions on how to add new accounts within the Omnia Admin Portal.
This document applies to the following user roles within Omnia:
Partner Administrator
### Accessing System Admin - Accounts
1. **Navigate toSystem Admin - Accounts:**
* Go to the [Admin Portal](https://app.voxo.co/dashboard) and sign in.
* Click the **System Admin** tab to expand it, then select **Accounts**.

### Creating a New Account
2. **Add New**:
* To add a new account, click the **Add New** button.
* Only Partner Admins can create new accounts.

### General
3. **General Settings**:
* After clicking the **Add New** button, you will be taken to the **General Settings** tab.
* Fill in the required fields:
* **Enforce Two-Factor Authentication for organization**: Check this box if you want to enforce two-factor authentication.
* **Residential Account**: Check this box if the account is residential.
* **Enter name**: Type the account name. This name will be used as the default caller ID.
* **Enter billing id**: Type the billing ID.
* **Select time zone**: Choose the appropriate time zone from the dropdown menu.
* **Bill Start Date**: Click on the calendar icon to select the bill start date.
* **Billing Information (May not be required)**: Enter the billing details, which may include:
* **First Name**
* **Last Name**
* **Email**
* **Phone Number**
* **Address**: Use the search bar to find and enter the address.
* **Register SMS Brand**: Check this box if you need to register an SMS brand.

4. **SMS Brand Registration**:
If you checked the **Register SMS Brand** box, fill in the additional fields required for SMS brand registration:
* **Organization Type**: Select the organization type from the dropdown menu (e.g., Government, Non-Profit, Private Profit, Public Profit).
* **Brand Vertical**: Select the brand vertical from the dropdown menu (e.g., Agriculture, Communication, Construction).
* **Company Name**
* **EIN**
* **Street**
* **City**
* **State**
* **Postal Code**
* **Country**
* **Email**
* **Phone**
* **Website**

### Pricing
5. **Pricing Settings:**
Navigate to the **Pricing** tab.
Fill in the pricing details for the voice products:
* **Unlimited Extension**
* **Toll Free Minutes**
* **SIP Trunk**
* **Fax Service**
* **International Minutes**
* **Live Transcription Service**
For custom products, select the product from the dropdown menu, and enter the price and quantity:
* **Product**: Select from options such as Managed Services or Internet.
* **Price**: Enter the price.
* **Quantity**: Enter the quantity.
* **Description**: Enter a description for the custom product.
* Click **Add a product** to include additional custom products.
Check the **Verify product pricing** box to ensure all product pricing is accurate before saving.

### Conduits
6. **Adding Conduits**:
* Navigate to the **Conduits** tab.
* Enter the **Conduit Prefix**. Note that conduits only work when dialing 6 digits or less.
* Select the conduits to assign:
* Use the **Available** list to search and select conduits. Only accounts with conduit prefixes are listed.
* Move selected conduits to the **Assigned** list using the arrow buttons.
**Conduits** allow extensions to dial extensions in other accounts by using a prefix and the extension number. This feature enables users from multiple accounts to communicate via extension-to-extension dialing as if they were all part of the same account, facilitating easy internal communication across different departments or locations.

### Create Account
7. **Create Account**:
* After filling in the necessary details, click the **Create** button.
* A warning message will appear: "Confirm Basic Account Creation?" Click **Yes** to confirm or **No** to cancel.

# Devices
Source: https://docs.voxo.co/omnia/admin/system-admin-devices
This guide provides step-by-step instructions on how to manage devices within the Omnia Admin Portal.
## This guide provides step-by-step instructions on how to manage devices within the Omnia Admin Portal. It covers accessing, viewing, and deleting devices.
This document applies to the following user roles within Omnia:
Account Administrator
Partner Administrator
1. **Navigate toSystem Admin - Devices**
Go to the [Admin Portal](https://app.voxo.co/dashboard) and sign in.
Click the **System Admin** tab to expand it, then select **Devices**.

### Viewing Devices
2. **View the List of Devices:**
* The **Devices** page will display a list of devices along with their names, accounts, models, and MAC addresses.
**Note**: Partner Admins will see all devices for the accounts under their administration. Account Admins will only see the devices for the accounts assigned to them.

3. **Search for a Specific Device:**
* Use the **Search** bar at the top of the page to find a specific device.
* Click the **sort icons** next to the column headers to arrange items in ascending or descending order.

### Deleting Devices
4. **Delete the Device:**
* Click the **Delete** button next to the device.
* A confirmation dialog will appear. Click **Yes** to confirm the deletion.
* For detailed instructions on managing devices, please refer to the [Devices](https://scribehow.com/shared/Omnia_Admin_Devices__he9fosrYR8qcWUiGTyv6lw?referrer=documents) document.

### Using your own SIP phone
VOXO auto-provisions **Yealink** and **Polycom** phones — plug one in and it pulls its configuration automatically. Other SIP-capable phones can still register, but they won't auto-provision and must be configured manually with SIP credentials.
Point the phone at the SIP server hostname **`sip.voxo.co`** rather than an IP address. VOXO doesn't publish a fixed IP for the gateway, so using the hostname ensures the phone always resolves to the current one.
Contact support to get the SIP credentials for manual provisioning, or to confirm whether a specific phone model has been tested with VOXO before you buy it.
# Omnia Themes
Source: https://docs.voxo.co/omnia/admin/system-admin-omnia-themes
This guide provides step-by-step instructions on how to view and edit themes within the Omnia Admin Portal.
This guide provides step-by-step instructions on how to view and edit themes within the Omnia Admin Portal. Omnia Themes is a feature within the Omnia Admin Portal that allows administrators to customize the appearance and branding of the Omnia user interface. This includes setting the visual elements such as logos, icons, and other branding components that define the look and feel of the platform for users.
This document applies to the following user roles within Omnia:
Partner Administrator
### Accessing System Admin - Omnia Themes
1. **Navigate toSystem Admin - Omnia Themes:**
Go to the [Admin Portal](https://app.voxo.co/dashboard) and sign in.
Click the **System Admin** tab to expand it, then select **Omnia Themes**.

### Viewing Omnia Themes
2. **View the List of Themes:**
* The **Omnia Themes** page will display a list of available themes along with their names.
* You can use the **Search** bar to find a specific theme.
* The **Export** button allows you to export the list of themes.

### Editing/Viewing an Omnia Theme
3. **Edit a Theme:**
* To edit a theme, click the **Edit** button next to the theme name, or click directly on the theme name.

### General Tab
4. **General Tab:**
* In the **General** tab, you can view and update the following information:
* **Name**: The name of the theme (view only, not editable).
* **Omnia theme folder**: The folder associated with the theme (view only, not editable).
* **Omnia application URLs**:
* **App URL**
* **Meet domain**
* **Quick dial extension URL**
* **Mobile application**:
* **Mobile app identifier**
* **iOS app URL**
* **Android app URL**
* **Support details**:
* **Support website URL**
* **Support email**
* **Change log URL**
* **Company website URL**
* **Emails and social**:
* **Info email**
* **Sender email**
* **Twitter handle**

### Images
5. **Images Tab**:
In the **Images** tab, you can upload and update the following images:
* **App logo URL (light mode)**
* **App logo URL (dark mode)**
* **Logo icon**
* **Favicon**
* **Preview image**

6. **Save Changes:**
* After making the necessary updates, click the **Edit** button at the top right corner of the screen.
* Once the changes are made, click **Save** to apply the changes.

# Phone Numbers
Source: https://docs.voxo.co/omnia/admin/system-admin-phone-numbers
This guide provides step-by-step instructions on how to manage phone numbers within the Omnia Admin Portal.
## This guide provides step-by-step instructions on how to manage phone numbers within the Omnia Admin Portal. It covers accessing, viewing, and editing phone numbers.
This document applies to the following user roles within Omnia:
Account Administrator
Partner Administrator
### Accessing System Admin - Phone Numbers
1. **Navigate toSystem Admin - Phone Numbers:**
Go to the [Admin Portal](https://app.voxo.co/dashboard) and sign in.
Click the **System Admin** tab to expand it, then select **Phone Numbers**.

### Viewing Phone Numbers
2. **View the List of Phone Numbers:**
* The **Phone Numbers** page will display a list of phone numbers along with their associated accounts, prefixes, and statuses.
**Note**: Partner Admins will see all phone numbers for the accounts under their administration. Account Admins will only see the phone numbers for the accounts assigned to them.

3. **Search for a Specific Phone Number:**
* Use the **Search** bar at the top of the page to find a specific phone number by typing in the number or part of it.
* Click the **sort icons** next to the column headers to arrange items in ascending or descending order.

### Editing Phone Numbers
4. **Edit Phone Number Details:**
* Click the **Edit** button next to the phone number, or click directly on the phone number.
* For detailed instructions on managing phone numbers, please refer to the [Phone Numbers](https://scribehow.com/shared/Omnia_Admin_Phone_Numbers__LWFIyZMrQtOdnAQBiVLT9w?referrer=documents) document.

5. **Update the Necessary Fields:**
* In the **Edit Number** screen, you can update the following fields:
* **Caller ID name**
* **Prefix name**
* **Allow recording**
* **Tenant**: This allows you to reassign the number to another tenant (account).
**Note**: Partner Admins will see all phone numbers and accounts under their administration. Account Admins will only see the phone numbers and accounts assigned to them.

6. **Save Changes**:
* Click **Save** then **Update** to apply the changes.
* If you do not want to save the changes, click **Cancel**.

### Deleting Phone Numbers
7. **Delete a Phone Number:**
* Click the **Delete** button next to the phone number.
* A confirmation dialog will appear. Click **Yes** to confirm the deletion.
* A success message will appear, indicating that the phone number has been successfully removed.

# Port Out Requests
Source: https://docs.voxo.co/omnia/admin/system-admin-port-out-requests
This guide provides step-by-step instructions on how to manage and view port out requests.
This guide provides step-by-step instructions on how to manage and view port out requests.
This document applies to the following user roles within Omnia:
Partner Administrator
1. **Navigate toSystem Admin - Port Out Requests:**
Go to the [Admin Portal](https://app.voxo.co/dashboard) and sign in.
Click the **System Admin** tab to expand it, then select **Port Out Requests**.

### Viewing Port Out Requests
2. **View the List of Port Out Requests:**
* The **Port Out Requests** page will display a list of port out requests along with their order IDs, tenant names, and dates.

3. **Search for a Specific Port Out Request:**
* Use the **Search** bar at the top of the page to find a specific port out request.
* Click the **sort icons** next to the column headers to arrange items in ascending or descending order.

4. **Export Port Out Requests:**
* Click the **Export** button to download the list of port out requests.

### Port Out Request Notification
5. **Port Out Request Email Notification:**
* When a port out request is submitted for review, you will receive an email notification.
* The email will provide details about the port out order, including the order ID and instructions to view and approve or reject the request through the portal.

### Viewing Order Details
6. **View Order Details:**
* Click the **View Order Details** button next to the port out request.

7. **Review the Order Details:**
* The **View Order Details** screen will display comprehensive information about the port out request, including:
* Customer Order Reference
* Order Status
* Desired Due Date
* Account Name
* Customer Details (Auth Name, Address, Account Number, Account Pin)
* Port Out Numbers (Telephone Number and Status)

### Approving or Rejecting a Port Out Request
8. **Approve or Reject the Request:**
* On the **View Order Details** screen, click the **Approve** button to approve the port out request or the **Reject** button to reject it.
* After clicking **Yes**, you will see a success message indicating that your order approval or rejection has been submitted.

####
# Port Requests
Source: https://docs.voxo.co/omnia/admin/system-admin-port-requests
This guide provides step-by-step instructions on how to manage port requests within the Omnia Admin Portal.
## This guide provides step-by-step instructions on how to manage port requests within the Omnia Admin Portal.
This document applies to the following user roles within Omnia:
Account Administrator
Partner Administrator
### Accessing System Admin - Port Requests
1. **Navigate toSystem Admin - Port Requests:**
Go to the [Admin Portal](https://app.voxo.co/dashboard) and sign in.
Click the **System Admin** tab to expand it, then select **Port Requests.**

### Viewing Port Requests
2. **View the List of Port Requests:**
* The **Port Requests** page will display a list of port requests along with their order IDs, PONs, order dates, statuses, request dates, types, next port, on-demand, and TN statuses.
**Note**: Partner Administrators will see all the port requests for accounts that fall under the Partner Admin Account. Account Administrators will only see port requests for the specific accounts assigned to them.

3. **Search for a Specific Port Request**:
* Use the **Search** bar at the top of the page to find a specific port request by typing in the order ID or part of it.
* Click the **sort icons** next to the column headers to arrange items in ascending or descending order.

4. **Filter Port Requests**:
* You can filter port requests by date range, status, and type (all, normal, toll-free).
* Click the **Filter** button to open the filter settings.
* Select the date range for filtering the port requests.
* In the **Filter Settings**, select the desired status from the dropdown menu. Options include Canceled, Closed, Incomplete, Pending, and Pending Cancel.
* After selecting the desired status and date range, click **Update** to apply the filter.

### Editing Port Requests
5. **Edit Port Request Details**:
* Click the **Edit** button next to the port request or click directly on the port request.
* This will take you to the **View/Edit Port Request** Screen.
* For detailed instructions on managing port requests, please refer to the [Number Porting](https://scribehow.com/shared/Omnia_Admin_Number_Porting__m0jgfN1qQeSPXHrDAEaqOg?referrer=documents) document.

### Deleting a Port Request
6. **Delete the Port Request:**
* Click the **Delete** button next to the port request.
* Click **Yes** to confirm the deletion.

# Time of Days
Source: https://docs.voxo.co/omnia/admin/time-of-days
The Time of Day (TOD) feature routes calls based on time conditions.
## The Time of Day (TOD) feature routes calls based on time conditions. It's commonly used to direct calls to after-hours service or voicemail outside business hours. This guide will show you how to set up and implement Time of Days in your call routing.
This document applies to the following user roles within Omnia:
Account Administrator
Partner Administrator
### Accessing Time of Days
1. **Navigate to Time of Days:**
Go to the [Admin Portal](https://app.voxo.co/dashboard) and sign in.
Click the **Phone System** tab to expand it, then select **Time of days.**

### Creating Time of Day Rules
2. **Create Time of Day:**
* Click **Add New.**
* **Name:** Enter the name for the TOD rule.
* **Time Zone:** Select the time zone (use account default or specify).
* **Select Type:** Choose the condition type (e.g., Calendar, Weektime).

### TOD Types
3. **TOD Types**:
* **All listed conditions satisfied**: All specified conditions must be met to engage the TOD routing rules.
* **Any listed conditions satisfied**: Any of the listed conditions can be met to engage the TOD routing rules.
* **Calendar**: Specify a date range to engage specific TOD routing rules.
* **Use global**: Select from a preset list of specific TOD routing rules.
* **Weektime**: Set specific day/time settings to establish TOD routing rules.

For a 24-hour day on a Weektime condition (for example, a location that's open around the clock), set the end time to **11:59 PM** rather than 12:00 AM. The end time can't match the start time, so 12:00 AM is greyed out as an end value.
### Setting Call Routing
4. **Setting Call Routing:**
* Click **Routing**.
* **During TOD Rules**: Use the **Type** and **Destination** options to set call routing for during your TOD rules (e.g., during business hours).
* **Outside TOD Rules**: Use the **Type** and **Destination** options to set call routing for outside your TOD rules (e.g., after business hours).
* **Add a Destination**: Click to configure multiple destinations. Note that this button will only appear based on the selected destination type.
* **Reorder**: Use to reorder destinations by clicking and dragging.
* **Delete**: Click to remove a destination.
* Click **Create**, then **Yes** to create the TOD rules.
**Example**: Route calls to a call group during business hours and to an employee's cell phone after hours.

**Holidays and one-day closures.** Holidays aren't preset — handle each holiday, unexpected closure, or one-off change in hours yourself. For a date-bound closure, use a **Calendar** condition with the closure date so normal hours resume automatically once the date passes, and point its routing at the destination you want for that day (for example, an IVR with a closure greeting or a voicemail box). Add a separate entry for each date you want covered. If you route a closure to a voicemail box, open it in [Voicemails](/omnia/admin/voicemails) and confirm an email address is set so you're notified of any messages left during the closure.
### Enable Time of Day Override
5. **Enable Time of Day Override:**
* Check **Enable time of day override** to enable the time of day override. This feature allows you to temporarily override your current routing settings.

### Manual Override
6. **Override Settings:** Temporarily override your current routing.
* **Start Date:** Select the start date for the override. Click on the **Select start date** field to choose the desired date and time.
* **End Date:** Select the end date for the override. Click on the **Select end date** field to choose the desired date and time.
* **Destination:**
* **Select Type:** Choose the destination type from the dropdown menu (e.g., Ring an [Extension](https://scribehow.com/shared/Omnia_Admin_Extensions__-L9BuyfORwK9dnYrMhXwQg?referrer=documents), Call Group, Automation, [Custom](https://scribehow.com/shared/Omnia_Admin_Custom_Destinations__UhdCAL0gSv2KBHRBil5DnQ?referrer=documents)).
* **Select Destination:** Choose the specific destination based on the type.
* **Add a Destination:** Click to configure multiple destinations (appears based on the selected destination type).
* **Reorder:** Click and drag to reorder destinations.
* **Delete:** Click to remove a destination.
* Click **Save**, then **Yes** to confirm the override settings.
**Manual Override Activation:**
* When a manual override on a Time of Day rule is enabled, an **Override active** icon will appear next to the Time of Day entry.

**A "closed" or holiday message still playing after the date has passed** is usually a **Manual Override** that was left enabled — unlike a Calendar condition, a manual override doesn't expire on its own. Open the rule's **Manual Override** tab, uncheck **Enable time of day override**, and save (see [Removing Time of Day Override](#removing-time-of-day-override) below). Pharmacy customers should also check that the message isn't coming from a scheduled [announcement](/pharmacy/announcements) left without an end date.
### Removing Time of Day Override
7. **Remove Time of Day Override:**
* Find the desired Time of Day (TOD) rule.
* Navigate to the **Manual Override** tab.
* Uncheck **Enable time of day override**.
* Click **Save**, then **Yes** to confirm the changes.

### Editing Time Of Days
8. **Edit Time of Day:**
* Click on the TOD you want to edit or click the **Edit** button next to it.
* Make your edits.
* Click **Save**, then **Yes** to confirm the changes.

### Deleting Time of Days
9. **Delete a Time of Day:**
* Click the **Delete** button next to the Time of Day.
* Confirm the deletion by clicking **Yes**.

### Search, Sort, and Export Time of Days
10. **Search, Sort, and Export TOD:**
* **Search Bar**: Quickly find specific items by typing the name or a keyword in the search field. The system will filter the list based on your search input, displaying the relevant results.
* **Sort**: Click the sort icons next to the column headers to arrange items in ascending or descending order.
* **Export Button**: Click the **Export** button next to the search field. The system will download a list of the items in CSV format.

# User Logs
Source: https://docs.voxo.co/omnia/admin/user-logs
This guide provides step-by-step instructions for accessing and viewing user logs in Omnia.
This guide provides step-by-step instructions for accessing and viewing user logs in Omnia. It explains how to filter logs by date range, specific users, and events. It also covers exporting log data and understanding the columns in the user logs table. User Logs offer a detailed record of activities helping monitor actions, ensure security, and track system usage.
Access to this Report:
Access to this report is based on your user role. You may not be able to access and view a specific report and all of its features if your role does not permit it.
### Accessing the User Logs
1. **Access the User Log Report**:
* Go to the [Admin Portal](https://app.voxo.co/dashboard) and sign in.
* Click the **Reports** tab to expand it, then select **User Logs**.

### Viewing the User Logs
2. **View the User Logs**:
* The user logs display a table with columns such as **Event Time, Email, Extension Name, Extension, Event,** and **Event Description**. The initial results shown will be for today's date.
* **Sort:** Click the sort icons next to column headers to arrange items in ascending or descending order.
* The initial results shown will be for today's date.

### Filtering the User Logs
3. **Preset Filters:**
* **Yesterday**: Click this button to quickly filter the log entries from the previous day.
* **Last 10 Days**: Click this button to quickly filter the log entries from the last 10 days.
* **Last 30 Days**: Click this button to quickly filter the log entries from the last 30 days.

4. **Filter Settings**:
* Click **Filter** to open the filter settings.

5. **Select Date Range**:
* Choose the start and end dates to define the period for which you want to view logs.
* You can use preset options like **Last Week, Last Month, Last 3 Months, Last 6 Months,** and **Last Year.**
* In addition to the date range, you can also filter by a specific time range within the selected dates.

6. **Clear Filters:**
* Click **Clear** to remove the filters if needed. This allows you to start over while picking from your date ranges.

7. **Select User:**
* Pick a user from the dropdown menu in the **Select User** field to filter by.

8. **Select Events**:
* Select the specific events you want to filter by.

9. **Apply Filter**:
* Click **Update** to apply the filter settings.
* The details will be displayed on the screen based on your filters.

10. **Reset Filters**:
* Click **Reset** to remove your filters and start over if needed.

### Exporting the User Log
11. **Export Button**:
* Click **Export** to download the filtered user log data in CSV format.
* Click **OK** to confirm the export.

### Understanding the User Logs Table
12. **Understanding the User Logs Table**:
* **Event Time**: Shows the timestamp of the user action.
* **Email**: Displays the email address of the user who performed the action.
* **Extension Name**: Shows the name associated with the user's extension.
* **Extension**: Displays the extension number.
* **Event**: Describes the type of event (e.g., Login, Logout, Enable DND).
* **Event Description**: Provides additional details about the event, such as "Login from auth" for a login event.

# Users
Source: https://docs.voxo.co/omnia/admin/users
This guide provides step-by-step instructions for managing user accounts in the Omnia Admin Portal.
## This guide provides step-by-step instructions for managing user accounts in the Omnia Admin Portal.
This document applies to the following user roles within Omnia:
Account Administrator
Partner Administrator
### Accessing User Management
1. **Navigate to Port Requests:**
Go to the [Admin Portal](https://app.voxo.co/dashboard) and sign in.
Click the **Account** tab to expand it, then select **Users**.

### Viewing Users
2. **View Users:**
The table displays the following columns:
* **Email**: The email address of the user.
* **Role**: The role assigned to the user (e.g., Account Admin, Partner Admin, User).
* **Extension**: The phone [extension](https://scribehow.com/shared/Omnia_Admin_Extensions__-L9BuyfORwK9dnYrMhXwQg?referrer=documents) assigned to the user.
* **Direct Dials**: The direct dial numbers assigned to the user.
Click the **sort icons** next to the column headers to arrange items in ascending or descending order.
Additionally, you can use the search bar to find specific users and the export button to download a list of users as a CSV file.

### User Account Roles Description
3. #### Partner Admin:
* **Role:** Full administrative access across all accounts under the Partner Admin Account and settings within the platform.
* **Permissions:** Can create, edit, and delete other users, including other partner admins. Has the highest level of control over the system.
#### Account Administrator:
* **Role:** Manages specific accounts assigned to them.
* **Permissions:** Can create, edit, and delete users within their assigned accounts. Cannot edit or delete partner admins.
#### Reports Administrator:
* **Role:** Focuses on generating and managing reports.
* **Permissions:** Can access reporting features and generate reports for analysis. Cannot manage users or account settings.
#### Queue Manager:
* **Role:** Manages call queues and queue-related settings.
* **Permissions:** Can assign agents to queues, manage queue settings, and monitor queue performance. Has limited access to account-wide settings.
#### User:
* **Role:** General user with access to basic features needed for their role.
* **Permissions:** Limited to using assigned features such as managing their calls and accessing relevant data. Cannot manage other users or account settings.

### Creating a New User
4. **Create New User:**
* Click the **Add New** button to open the new user form.

5. **Enter User Details:**
* **Enable Operator Panel Access:** Check this box if the user should have access.
* **Email:** Enter the user’s email address.
* **Time Zone:** Select the appropriate time zone for the user.
* **User Role:** Select the role for the user from the dropdown menu.
**Note**: You cannot edit your own user account.

6. **Assign Accounts and Extensions:**
* **Assign Accounts:** Select the accounts the user will have access to.
* **Home Account:** Set the home account for the user. This applies only to the Account Administrator role.
* **Assign Extension:** Assign an extension to the user.

7. **Enable Reporting Features (Optional):**
* Toggle on/off the reporting features if needed.
* Enable receiving queue manager reports.
* Enable receiving queue agent reports.

8. **Assign Queues:**
* **Assign as Manager to Queues:** Select the queues where the user will be a manager.
* **Assign as Agent to Queues:** Select the queues where the user will be an agent.

9. **Complete the Creation Process:**
* Click the **Create** button to finalize the new user.
* If you need to cancel the creation, click the **Cancel** button.
* A confirmation message will pop up asking, "Confirm User Creation? Please tell the new user to check their email for the invite that will contain their login information."
* Click **Yes** to proceed with creating the user.
* The new user will receive an email with their login information.

### Editing a User Account
10. **Select the User:**
* Navigate to the user list.
* Click on the user you wish to edit or click the **edit** button next to their name.

11. **Reset Password and Send Invite:**
* A checkbox will be available to **Reset password and send invite?**
* Check this box if you need to reset the user's password and send them a new invite.

12. **Edit User Details:**
* Make any necessary changes to the user's details.

13. **Save Changes:**
* After making the necessary edits, click **Save**, then **Update** to confirm.

### Deleting a User
14. **Deleting a User:**
* Select the user from the list and click the **Delete** button.
* Click **Yes** to confirm.

# Virtual Receptionists
Source: https://docs.voxo.co/omnia/admin/virtual-receptionists
IVRs route calls based on caller input, offering a flexible and automated way to handle incoming calls.
## IVRs route calls based on caller input, offering a flexible and automated way to handle incoming calls. This guide provides step-by-step instructions for creating and managing virtual receptionists (IVRs).
This document applies to the following user roles within Omnia:
Account Administrator
Partner Administrator
### Accessing Virtual Receptionists
1. **Navigate to Virtual Receptionists:**
Go to the [Admin Portal](https://app.voxo.co/dashboard) and sign in.
Click the **Phone System** tab to expand it, then select **Virtual Receptionists.**

### Creating an IVR
2. **Create an IVR**:
* Click **Add New**.

### General Settings
3. **General Settings**:
* **Enable speech detection**: Allows callers to speak key options instead of pressing keys.
* **Enter name**: Provide a name for the IVR.
* **Enable extension dialing**: Allows callers to dial extensions directly.
* **Branch**: Select the [branch](https://scribehow.com/shared/Omnia_Admin_Branches___UJ4yv5wT1qKlkNTqkRvUA) if applicable to assign to the IVR, which helps identify and assist with filtering and sorting.

### Timeout Settings
4. **Timeout Settings**:
* **On timeout**: Select the destination type and the specific destination for calls that timeout.
* **Add a Destination**: Click to configure multiple destinations. Note that this button will only appear based on the selected destination type.
* **Reorder**: Use to reorder destinations by clicking and dragging.
* **Delete**: Click to remove a destination.
* **Select timeout**: Set the timeout duration in seconds.

### Wrong Key Press Settings
5. **Wrong Key Press Settings**:
* **If Wrong Key Pressed**: Select the destination type and specific destination for calls that press an incorrect key.
* **Add a Destination**: Click to configure multiple destinations. Note that this button will only appear based on the selected destination type.
* **Reorder**: Use to reorder destinations by clicking and dragging.
* **Delete**: Click to remove a destination.

### Loop Settings
6. **Loop Settings**:
* **Enable loop on timeout**: Enable if you want the system to loop back to the menu on timeout.
* **Enable loop on wrong key**: Enable if you want the system to loop back to the menu on a wrong key press.
* **Max loops**: Set the maximum number of times the system will loop back to the menu.

### Media Settings
7. **Select Media Files**:
* Navigate to the **Media** tab.
* Select the appropriate [media files](https://scribehow.com/shared/Omnia_Admin_Media_Files__LxLyMgU7SBqju9ex6tTRBg?referrer=documents) from the dropdown list to be used for the Greeting messages. This will be an already saved file in the media files section of the portal.
* You can add more than one media file to the greeting. Files play back-to-back in the order they are listed, which is useful when you want an announcement to play after the main greeting without creating a combined recording.

8. **Add a New Media File:**
* Click **Add a Mediafile** to record or upload a new media file if needed.
* Use the controls to record or upload the media file. This will open additional options.

9. **Additional Options**:
* **Playback**: Click to play the media file
* **Press and Hold To Record:** Click and hold to record a message.
* **Upload File**: Click to add an existing audio file.
* **Cancel Changes**: Click to revert to previous settings.
* **Enter a name:** Type the name in the **Mediafile name** field before saving.
* **Save Changes**: Click to save the recorded or uploaded file. This media file will now be available to choose from and select in the dropdown.

### Key Press Options
10. **Configure Key Press Destinations**:
* Navigate to the **Key Press Options** tab.
* For each key (0-9, \*, #), select the destination type and specific destination.
* Use the **Add a destination** button to configure multiple destinations.
* **Reorder**: Use to reorder destinations by clicking and dragging.
* **Delete**: Click to remove a destination.

### Saving an IVR
11. **Save IVR**:
* Click **Save**.
* Click **Yes** to confirm.

### Editing an IVR
12. **Edit an IVR:**
* Click on the IVR you want to edit or click the **Edit** button next to it.
* Make your edits.
* Click **Save**.
* Click **Yes** to confirm and save your changes.

### Deleting an IVR
13. **Delete an IVR:**
* Click the **Delete** button next to the IVR.
* Confirm the deletion by clicking **Yes**.

### Search, Sort, and Export Virtual Receptionists
14. **Search, Sort, and Export Virtual Receptionists:**
* **Search Bar**: Quickly find specific items by typing the name or a keyword in the search field. The system will filter the list based on your search input, displaying the relevant results.
* **Sort:** Click the sort icons next to column headers to arrange items in ascending or descending order.
* **Export Button**: Click the **Export** button next to the search field. The system will download a list of the items in CSV format.

# Voicemails
Source: https://docs.voxo.co/omnia/admin/voicemails
This guide provides detailed steps for handling voicemails in the Omnia Admin Portal.
## This guide provides detailed steps for handling voicemails in the Omnia Admin Portal. It includes accessing voicemail lists, creating new voicemails, enabling email delivery and storage, editing, configuring greetings, managing messages, and deleting voicemails. Voicemail allows callers to leave recorded messages when recipients are unavailable, ensuring efficient communication through accessible and personalized message management.
This document applies to the following user roles within Omnia:
Account Administrator
Partner Administrator
### Accessing Voicemails
1. **Navigate to Voicemails**:
* Go to the [Admin Portal](https://app.voxo.co/dashboard) and sign in.
* Click the **Phone System** tab to expand it, then select **Voicemails**.

### Voicemail Overview
2. **Voicemail List:**
* You can view details for each mailbox, such as:
* **Mailbox:** The number assigned to each voicemail box.
* **Name:** The name of the user associated with the mailbox.
* **PIN:** The Personal Identification Number for accessing voicemail.
* **Email:** The email address where voicemail notifications are sent.
* **Search and Export:** Use the **Search** and **Export** functions to find specific mailboxes or to export the list.
* **Sort:** Click the sort icons next to column headers to arrange items in ascending or descending order.

### Creating a Voicemail
3. **Create a Voicemail**:
* Click **Add New**.

When you add a new extension, a voicemail is automatically created unless you modify the Never Miss a Call - Additional Destinations settings to route to a specific destination such as a call group if busy, offline, or unanswered. If a voicemail is not automatically created due to these changes, go to Voicemails to create one manually.
4. **Enable email delivery and storing voicemails**:
* **Enable Email Delivery**: Check this option to have voicemails delivered to an email address. Uncheck it if you do not want this feature.
* **Enable Storing Voicemails**: Check this box to store voicemails after successful email delivery, allowing admins and users to manage them in Omnia. If left unchecked, voicemails will not be stored for management.

5. **Enter Details**:
* **Full Name**: Enter the full name associated with the voicemail.
* **Mailbox Number**: Assign a unique mailbox number.
* **Email**: Provide an email address for email delivery (if enabled). To send each voicemail email to more than one recipient, enter multiple addresses separated by commas.
* **Notify Numbers**: Optional. Enter one or more phone numbers (comma-separated) to receive an automated voice-call notification each time a new voicemail lands in this mailbox. This is a phone call, not a text message.
* **PIN**: Set a PIN for accessing the voicemail.

To share one voicemail box across two extensions, turn on the **Group mailbox** toggle on the box. The group flag lets both phones light their message indicator when a new message arrives. Point the second extension's busy, offline, and no-answer destinations at the shared box under **Never Miss a Call**.
6. **Virtual Receptionist Settings**:
* **Allow IVR Options**: Check this box to enable IVR options.
* **Select IVR**: Choose the [IVR](https://scribehow.com/shared/Omnia_Admin_Virtual_Receptionists__0zu-MuY_TbSnbNKkwRzptw?referrer=documents) to be used.
**If the Operator is Dialed**:
* **Destination Type**: Select the type of destination.
* **Select Destination**: Choose the specific destination. The operator can be dialed by pressing the 0 key.

If a caller presses 0 during the greeting and the greeting just repeats instead of transferring, the **Operator** destination on this voicemail box is blank — with no destination set, there is nowhere to route the caller, so the greeting replays. Set the Operator destination and save. Each voicemail box has its own Operator setting, so repeat this for every box that needs the press-0 option.
7. **Save the Voicemail**:
* Click **Create**, then **Yes** to confirm and save.

To send a live call straight to a voicemail box, press the physical **Transfer** button on your phone, dial `*` followed by the voicemail box number (for box 3000, dial `*3000`), and complete the transfer. The caller is dropped into that box and hears its greeting. Press **Transfer** first — dialing the star code without it does nothing.
### Viewing and Editing Voicemails
8. **Edit Voicemails**:
* Click on the **Voicemail** you want to edit or click the **Edit** button next to it.
* Modify items such as the PIN and timezone.
* Record, upload, or assign existing greeting messages.
* Manage, listen to, download, and delete voicemails.

### Configuring Voicemail Greetings
9. **Configure Voicemail Greetings**:
* Click **Greetings**.
* **Greeting Types**:
* **Name Greeting**: Identifies your extension.
* **Unavailable Greeting**: Plays when you do not answer.
* **Busy Greeting**: Plays when you are on the phone.
* **Out of Office Greeting**: Overrides your unavailable and busy greetings.
* Choose from existing media files, record, or upload new files for each greeting type.

10. **Select Greeting from Media File**:
* Click **From media file**.
* Click the **Select a greeting** dropdown and pick from an existing [media file](https://scribehow.com/shared/Omnia_Admin_Media_Files__LxLyMgU7SBqju9ex6tTRBg?referrer=documents).
* **Playback**: Click to play the media file.
* **Download Greeting**: Click to download.
* **Save as current**: Click to save the selected media file as your new greeting.
* **Remove greeting**: Once saved, click to delete the media file. Click **Yes** to confirm.

11. **Select Greeting - Record or Upload**:
* Click **Record or Upload.**

12. **Record or Upload**:
* **Press and Hold To Record:** Click and hold to record a message.
* **Upload File**: Click to add an existing audio file.
* **Playback**: Click to play the media file.
* **Cancel Changes**: Click to revert to previous settings.
* **Save as current:** Click to save the recorded or uploaded file.
* **Remove greeting:** Once saved, click to delete the media file. Click **Yes** to confirm.

13. **Save Changes**:
* Once you have finished making your edits, click **Save.**
* Click **Yes** to confirm.

### Managing Voicemail Messages
14. **Viewing Messages**:
* Go to the **Messages** tab to see a list of all voicemail messages.
* You can view details such as the **date, time, caller's name, number,and theduration** of each message.

The Messages tab lists the voicemails currently stored in the mailbox. Voicemails age out of the system over time, so older messages may no longer appear here — and once a message has aged out, it can't be retrieved. To keep a permanent copy of every voicemail, turn on **Enable Email Delivery** for the mailbox (step 4 above) so each new message is sent to your inbox with the audio file attached, which you can save and replay any time.
Each mailbox can store only a limited number of messages. Once a box hits that cap, it **silently stops accepting new messages** — callers can't leave a voicemail and IVR or staff transfers into the box fail, even though the rest of your phone system is working normally. This most often happens on shared or group mailboxes that a team reads by email while nobody logs in to clear the stored copies.
To recover, delete the stored messages from the **Messages** tab. If the mailbox emails each voicemail with the audio attached, deleting the stored copies loses nothing — you still have the emails. To keep an email-only box from filling up again, turn on **Enable Email Delivery** and leave **Enable Storing Voicemails** unchecked (step 4 above) so new messages are emailed out and never retained on the server.
15. **Playing and Saving Messages**:
* Click the **music note** next to a message to play it.
* In the **Voicemail Message** window, you can listen to the message and save the recording if needed.

16. **Deleting Messages**:
* Select a message and click **Delete** to remove it.
* Confirm the deletion by clicking **Yes**.

### Deleting Voicemails
17. **Delete a Voicemail**:
* Click the **Delete** button next to the **Voicemail.**
* Confirm the deletion by clicking **Yes**.

# Cordless DECT phones
Source: https://docs.voxo.co/omnia/devices/cordless-dect
Set up the Yealink W70B DECT base station, pair compatible cordless handsets, and fix a handset stuck on "Searching for Base".
The Yealink W70B is the cordless base station for VOXO DECT phones. It connects to your network, registers to VOXO as a phone, and serves as the wireless hub for your cordless handsets.
## Compatible handsets
* **W70H** — the standard handset that pairs with the W70B.
* **W56H** — an older handset that also works with the W70B.
The base supports up to 5 paired handsets at once. Third-party DECT handsets are not guaranteed to work and need testing.
A base firmware update can occasionally cause pairing loss, so check your handsets after an update.
## Pair a handset to the base
On the base, press and hold the registration button on top for 3 to 5 seconds until the LED flashes green. This opens a pairing window of about 60 seconds. The button is small and is sometimes marked with a handset icon.
On the handset, go to **Menu** > **Settings** > **Registration** > **Register Handset**.
Select the base (it may show as "Base 1") and press **OK**.
When prompted, enter the base PIN: `0000` (four zeros).
The handset registers within a few seconds and shows a dial tone and its extension. Place a test call in and out to confirm it works.
## Fix a handset stuck on "Searching for Base"
A handset that shows **"Searching for Base"** and never connects has lost its pairing with the base. This is common after a handset is factory reset, replaced, or newly delivered. Re-run the [pairing steps](#pair-a-handset-to-the-base) above to register it again.
If it still will not register:
* Do not factory reset the handset again. A reset erases the pairing and is the most common cause of the "searching" loop.
* Confirm the base is not at its 5-handset limit. If five are already registered, remove one before adding another.
* Note the exact message on the handset screen so support can see where registration stops.
A factory reset on a handset erases its pairing and triggers the "Searching for Base" state. A base reset does not always erase handset pairings, but it can prompt all handsets to re-register.
For the DECT handset reset gesture itself — and how it differs from a desk-phone reset — see [Troubleshooting](/omnia/troubleshooting#a-desk-phone-wont-register).
**Contact support** if a handset still shows "Searching for Base" after the base enters pairing mode, you have entered PIN `0000`, and you have confirmed the base is online.
# Desk phone tasks
Source: https://docs.voxo.co/omnia/devices/desk-phones
Common tasks on a VOXO desk phone: transfer a call, set up voicemail from the handset, and add a speed dial or Busy Lamp Field key.
This page covers everyday tasks you can do from a VOXO desk phone. For call-quality or registration problems, see [Troubleshooting](/omnia/troubleshooting).
## Transfer a call
You can transfer a call two ways. A **blind transfer** sends the call without telling the recipient first; a **consultative (attended) transfer** lets you speak with the recipient before completing the transfer. Your VOXO phone is set up to blind transfer by default.
### Blind transfer
While on a call, press the **Transfer** button.
Dial the recipient's extension, or press their Busy Lamp Field / speed dial button.
If the recipient is a programmed speed dial, the call transfers automatically. Otherwise, press **B Transfer** to complete the transfer.
### Consultative (attended) transfer
Put the caller on hold.
Dial the recipient's extension and press **Send**. You connect with the recipient so you can check whether they want the call.
If they want it, press **Transfer** to connect the two parties.
## Set up voicemail from the phone
Press the **Messages** button on your handset. You can also dial `*97` to reach the same options.
Press `0` to reach the greetings menu.
Record a full greeting, or record just your name to use a generic greeting.
To change your greeting later, press **Messages** again and follow the audio prompts.
## Add a speed dial or Busy Lamp Field key
Your VOXO phone comes with 10 Busy Lamp Field (BLF) / speed dial slots on the main screen, with three more pages of buttons available if you need them.
A **Busy Lamp Field** contact is an extension inside your organization. A **Speed Dial** contact is any outside number, such as a cell phone — set it up the same way, but enter a phone number instead of an extension.
Hold down the BLF or speed dial slot where you want the contact to appear.
Use the arrows to scroll right until the **Type** field shows **BLF** (or **Speed Dial** for an outside number).
Scroll down to **Label** and use the numeric keys to enter the contact's name.
Scroll down to **Value** and enter the contact's extension (for BLF) or phone number (for Speed Dial).
Press **Save**.
To add more than the 10 main-screen fields, go to **Menu** > **Features** > **DSS Keys**, select the line key you want (for example, Line 12), and add the contact there.
If you plan to add more pages, leave the 10th Busy Lamp Field blank — that field is used to scroll through the pages on the handset's main screen.
# Factory reset a desk phone
Source: https://docs.voxo.co/omnia/devices/factory-reset
Factory reset a VOXO desk phone. The gesture differs by brand — Yealink uses a hold-OK reset, while Polycom 400-series phones use keypad sequences.
The factory reset gesture depends on the brand of phone. Use the section for your phone — the gestures are not interchangeable.
The Yealink hold-**OK** gesture does **not** reset a Polycom phone, and the Polycom keypad sequences do **not** reset a Yealink. Make sure you are following the steps for your brand.
## Yealink
Hold down the **OK** button for several seconds.
A confirmation screen asks for permission to factory reset. Press the **OK** soft key to reset.
The phone reboots and resets.
## Polycom 400 series
These steps cover the Polycom VVX 400, 410, and 415. Use them when you do not know the admin password.
Power cycle the phone, then simultaneously press and hold the **0**, **1**, and **3** dial-pad keys until you hear a confirmation tone (or for about three seconds).
Press the **Cancel** soft key during the boot process.
During the countdown, simultaneously press and hold the **1**, **3**, and **5** dial-pad keys until the password prompt appears.
Enter the **MAC ID** of the phone, then press **OK**. The MAC ID is on a label on the underside of the phone.
The phone power cycles and comes back factory reset.
Your MAC ID is available on request, or in your VOXO Portal if you have access.
A factory reset clears the phone's registration. If the phone won't reconnect afterward, see [Troubleshooting](/omnia/troubleshooting#a-desk-phone-wont-register).
# Grandstream ATA
Source: https://docs.voxo.co/omnia/devices/grandstream-ata
Connect analog devices like fax machines to VOXO with a Grandstream HT8xx analog telephone adapter, and troubleshoot one that won't come online.
A Grandstream HT8xx analog telephone adapter (ATA) connects analog devices, such as a fax machine or an analog handset, to your VOXO phone service. The adapter sits between your network and the analog device and registers to VOXO as a phone line.
## Which model do I have
The HT8xx family differs by how many analog (FXS) ports each model has. Each port maps to one analog device.
| Model | Analog ports |
| ----- | -------------------------------------------- |
| HT801 | 1 — for a single fax machine or analog phone |
| HT812 | 2 |
| HT814 | 4 |
| HT818 | 8 — for larger deployments |
Some sites use one HT801 per fax machine so a single adapter failure only affects one machine.
## Connect the adapter
Plug an Ethernet cable from your network into the ATA's network port.
Plug your fax machine or analog phone into one of the phone (FXS) ports.
Connect power. The adapter pulls its configuration from VOXO automatically once it is online.
Confirm the link light on the network port lights up when the cable is connected. A lit link light means the adapter has a working network connection.
## If the adapter does not come online
An ATA that never registers is almost always a network problem rather than a faulty unit. Before assuming the hardware is bad:
Plug a laptop into the same Ethernet port. If the laptop cannot get online, the port is the problem.
Move the cable to a different switch or router port.
Swap in a known-good Ethernet cable.
Confirm the link light on the ATA illuminates.
**Contact support** if the network port passes a laptop test and you have tried a different port and cable, but the adapter still has no dial tone or fax on any connected device.
# Paging adapters
Source: https://docs.voxo.co/omnia/devices/paging-adapters
Which paging adapters VOXO supports, and how to check an adapter when paging returns "service unavailable".
A paging adapter connects an overhead paging or intercom system to your VOXO phone service, so a call or page from a phone plays through speakers.
## Recommended adapter
* **Algo 8301** — the supported and recommended paging adapter. VOXO can order one for you, and it integrates with your VOXO service.
If you need a paging adapter or a replacement, the Algo 8301 is the supported choice. You can buy one and have it configured for your account.
## Adapters VOXO does not supply
VOXO does not stock or supply every paging adapter on the market. The **Snom PA1**, for example, is not provided by VOXO. If you already own a third-party adapter, it may still work, but support for it is limited and VOXO cannot order replacements for it.
To check whether an adapter is one VOXO supplied, see whether it appears in your account's device list. An adapter that is not listed there is likely customer-owned third-party hardware.
## When paging shows "service unavailable"
A **"service unavailable"** message when you press the intercom or paging button often comes from the paging adapter rather than the phone. Check whether the adapter is online before troubleshooting the phone itself.
To set up or review where pages are sent, see [Paging Groups](/omnia/admin/paging-groups).
**Contact support** if a VOXO-supplied Algo 8301 shows offline or returns "service unavailable" after you confirm it has power and a network connection.
## Provision an overhead horn (Algo paging endpoint)
An overhead horn — such as an Algo paging speaker — is added to VOXO like any other device: create an extension, add the horn as a device, point it at VOXO's provisioning URL, then add it to a paging group. Because a horn has no screen, the provisioning step happens on the device itself, which is where most setups get stuck.
Create a new extension for the horn and add the horn as a device on it (model and MAC address), the same way you would any phone. See [Extensions](/omnia/admin/extensions) for the create-extension and add-a-device steps. A **Paging** extension type works well for a horn.
The horn pulls its configuration from VOXO's provisioning URL:
```text Provisioning URL theme={null}
https://api.voxo.co/p
```
Set this in the horn's own **Advanced → Auto Provisioning** menu, on the device itself. It is not in the horn's web interface, and it cannot be set from another phone.
Because the horn has no display, you reach its setup through its physical reset procedure. If the horn won't come online and you can't reach its menu:
* Power-cycle the horn and watch its status LED.
* On Algo units, briefly bridging the two reset terminals while the LED is double-flashing triggers a reset, returning the device to its default credentials (default password `algo`).
* Confirm the horn has power and a working network connection — the correct VLAN or subnet, not a static IP on the wrong subnet — before provisioning.
Once the horn is online, add it to the relevant [paging group](/omnia/admin/paging-groups) so it broadcasts when that group is paged.
If you can't physically reach the horn, or it isn't appearing on your network at all, that's a wiring or network step — contact support and we'll work through it with you.
# Update Yealink firmware
Source: https://docs.voxo.co/omnia/devices/yealink-firmware
Upgrade the firmware on a Yealink SIP desk phone from its web interface using the phone's IP address.
Yealink releases firmware updates to add features and fix bugs. You can apply an update from the phone's built-in web interface, which you reach through the phone's IP address on your network.
## Before you begin
* Download the latest firmware for your model from the [Yealink support site](https://support.yealink.com/) and unzip it to a local folder.
* Make sure your computer is on the same network as the phone.
## Apply the update
Press the **OK** button on the phone's keypad to display its IPv4 address.
In a web browser, enter the phone's IP address in the address bar and press Enter.
Enter the username and password. Both are `admin` by default.
Go to **Settings** > **Upgrade**, click **Browse**, and select the firmware file you downloaded.
Click **Upgrade**, then confirm to continue. The update takes about 5 minutes.
Do not unplug or power cycle the phone while the firmware is upgrading. Interrupting the update can leave the phone unusable.
# Yealink phone lights
Source: https://docs.voxo.co/omnia/devices/yealink-lights
Understand what the indicator lights on a Yealink desk phone mean, including the blinking red corner light and group-call issues after a restart.
The indicators on a Yealink desk phone tell you what the phone is doing. Here is what the common ones mean.
## Blinking red light in the top corner
A blinking red light in the top corner of the screen means the phone is rebooting or finishing a software update. This is normal after a power cycle, after an update, or during initial setup.
* It stops on its own once the phone finishes restarting.
* If it keeps blinking for more than a few minutes, unplug the phone, wait about 10 seconds, then plug it back in.
The corner light is not the same as the side keys. The buttons along the side of the phone are programmable keys (such as Busy Lamp Field or Park) and light up for their own reasons.
## Phone restarted but no longer rings for group calls
After a restart, a phone can make calls and ring on its direct extension but stop ringing for a shared group or queue. The phone is fine — its place in the group went stale. Refresh its connection:
Place an outbound call. If it connects, the phone is connected to the network.
Call the phone's extension directly. If it rings, the phone is registered.
Unplug the phone, wait about 10 seconds, and plug it back in to refresh its connection.
**Contact support** if the phone still misses group or queue calls after one full power cycle.
# Yealink Wi-Fi setup
Source: https://docs.voxo.co/omnia/devices/yealink-wifi
Connect a Yealink desk phone to your wireless network, including which models need a WF40 or WF50 Wi-Fi adapter.
You can connect most Yealink desk phones to a wireless network instead of running an Ethernet cable. Some models have Wi-Fi built in, while others need a USB Wi-Fi adapter.
## Check adapter compatibility
Confirm which adapter your phone needs before you start:
| Model | Wi-Fi support |
| ---------- | --------------------------------------------------------- |
| T42S, T46S | WF40 adapter (2.4 GHz) |
| T48S | WF50 adapter (2.4 GHz or 5 GHz) or WF40 adapter (2.4 GHz) |
| T4xU | WF50 adapter (2.4 GHz or 5 GHz) or WF40 adapter (2.4 GHz) |
| T5xW | Built-in Wi-Fi — no adapter needed |
The T5xW series has Wi-Fi built in, so you can skip the adapter step below.
## Connect to Wi-Fi
If your model needs an adapter, insert it into the USB port on the back of the phone.
You may be prompted to scan for available networks automatically. To do it manually, go to **Menu** > **Settings** > **Basic Settings** > **Wi-Fi**.
Select **Available Networks** and press **OK**.
Select the Wi-Fi network you want and press **Connect**.
Enter the network password and press **OK**.
Wireless networks can introduce call-quality issues that a wired connection avoids. If you hear dropped audio after switching to Wi-Fi, see [Troubleshooting](/omnia/troubleshooting).
# Firewall IP Whitelist
Source: https://docs.voxo.co/omnia/faqs/firewall-ip-whitelist
VOXO IP range, ports, and servers to allow on your firewall for real-time traffic.
Add the following VOXO IP range, ports, and servers to your firewall allowlist for real-time traffic.
### IP addresses
* `140.235.248.0/24`
* `35.196.54.85`
* `35.222.110.103`
* `34.174.6.120`
* `34.94.212.85`
A missing `140.235.248.0/24` is the most common cause of one-way or no audio on managed networks, so make sure this subnet is whitelisted.
### DNS
* `connect.voxo.co`
* `portal.voxo.co`
* `app.voxo.co`
* `api.voxo.co`
* `rps.yealink.com`
### Ports
* `443 (TCP)`
* `5060 (TCP)`
* `8060 (TCP)`
* `5060 (UDP)`
* `8060 (UDP)`
* `10,000 - 60,000 (UDP)`
### STUN servers
* `stun.l.google.com:19302`
* `stun1.l.google.com:19302`
* `stun2.l.google.com:19302`
* `stun3.l.google.com:19302`
* `stun4.l.google.com:19302`
# VOXO Omnia
Source: https://docs.voxo.co/omnia/index
This quick setup guide provides essential instructions for setting up and accessing Omnia.
This quick setup guide provides essential instructions for setting up and accessing Omnia. It covers how to log in, change your password, download Omnia, and install the VOXO Quick Dial extension.
### Email Invitation
1. **Email Invitation Details:**
You will receive an email invitation with the following details:
* **Extension Number:** Your unique extension identifier.
* **Login Information:** Includes your Username and Password.
* **Omnia Desktop URL:** The link to access the Omnia Desktop Experience.
* **Mobile Apps:** App Store and Google Play buttons for downloading VOXO Connect.
* **Quick Dial Chrome Plugin:** A link to install this plugin for easy dialing from websites through the Omnia portal.
* **Support:** A direct link to email support for any questions or issues.

### Logging In
2. **Standard Login:**
* Go to the [User Portal](https://app.voxo.co/) and sign in.
* Enter the username and password from your email invitation.
* Click on **Login** to access your account.

3. **Login with Microsoft Account:**
* Go to the [User Portal](https://app.voxo.co/) and sign in.
* Click on **Continue with Microsoft** to log in using your Microsoft account.

4. **Login with Google Account:**
* Go to the [User Portal](https://app.voxo.co/) and sign in.
* Click on **Continue with Google** to log in using your Google account.
## 
*
We recommend changing your password after your initial login for enhanced security. Follow these steps:
Visit the User Portal.
Log in using the username and password provided in your email invitation.
Navigate to your Profile, then Settings, and click on My Profile.
Select Reset Password to create a new password.
### Logging Out
5. **Logging Out of Omnia:**
* Click your **Profile** located at the top right corner of the screen.
* Select **Logout** from the dropdown menu.

### Enabling Notifications and Microphone Access
6. **Location Access**:
* After logging in, you may see a message stating, "app.voxo.co wants to 'Know your location'."
* Choose one of the following options:
* **Allow this time**
* **Allow on every visit**
* **Don't AllowNote**: Sharing your location allows us to properly locate you when contacting emergency services.

7. **Notifications:**
* After logging in you will see a message stating, "app.voxo.co wants to 'Show notifications'".
* Click **Allow** to enable notifications.

8. **Microphone Access:**
* After logging in you will see a message stating, "app.voxo.co wants to 'Use your microphone'".
* Click **Allow** to enable microphone access.

### Enabling/Disabling Softphone
9. **Enabling or Disabling Your Softphone:**
* Click the **green headset button** at the top left of the screen to enable or disable your softphone.
* Ensure the softphone is enabled to make and receive calls.

### Choosing Audio Device
10. **Selecting Audio Devices:**
* Click the dropdown next to the green headset button to view and select from your available audio devices.

### Navigation Menu
11. **Toggle Left Navigation Menu:**
* **Hide the Menu**: Click the button next to the VOXO logo.
* **Restore the Menu**: Click the button again to restore the menu.

### Downloading Omnia to Desktop
12. **Downloading Omnia to Your Desktop:**
* Although Omnia runs in your browser, you can download it directly to your desktop:
* Navigate to [https://app.voxo.co/](https://app.voxo.co/) in Google Chrome.
* Select the download icon in the browser's URL bar.
* Click **Install VOXO** when prompted.

### Installing the VOXO Quick Dial Extension
13. **Installing the VOXO Quick Dial Extension:**
The VOXO Quick Dial extension lets you easily dial phone numbers from websites using Omnia:
* **Email Invitation**: Click the link in the email invitation to install the extension.
* **Chrome Web Store**: Search for **VOXO Quick Dial** in the Chrome Web Store and click **Add to Chrome**.

### Forgot Password
14. **Resetting Your Password:**
If you've forgotten your password, follow these simple steps to reset it:
* Open the login page of the Omnia Portal.
* Click on **Forgot Password?**.
* Enter the email address associated with your account.
* Click **Reset Password**.
* Check your email for a password reset link and follow the instructions provided.

15. For more details about VOXO products and support, visit the [VOXO Website](https://voxo.co/).

# Call History
Source: https://docs.voxo.co/omnia/mobile/call-history
This guide provides instructions for reviewing and managing your call history in the VOXO Mobile app.
This guide provides instructions for reviewing and managing your call history in the VOXO Mobile app.
These guides cover the legacy **VOXO Mobile** app. If you're installing the mobile app for the first time, use the **VOXO Connect** app instead — see [Connect mobile app](/connect/mobile/index). Menus differ between the two apps.
### Access Call History
1. #### **Steps to Access Call History:**
* Open the **VOXO Mobile App:** Launch the app on your mobile device.
* Navigate to **Call History**: Tap the call history (clock) at the top of the screen.

### Reviewing Your Call Logs
2. **Call History Overview:**
* **All Calls:** View all incoming and outgoing calls, or filter by missed or recorded calls.
* **Contact/Number:** See the contact name or phone number associated with each call.
* **Call Status**: Indicates if the call was inbound, outbound, answered, missed, or canceled. It also shows the total number of calls and the day and time.
* **Call Details**: Tap the "i" button to view more details about the calls and to delete call records. This includes the date and time of each call, the duration, and the status such as answered or missed.

### Filtering Call History
3. **Managing Your Call Logs:**
* This section of the VOXO Mobile app allows you to filter and view your call history by different categories:
* **All Calls**: View all incoming, outgoing, and missed calls.
* **Missed Calls**: Filter to see only the calls you missed.
* **Recorded Calls**: Filter to view calls that have been recorded.

### Search Call Records
4. **Search Call Records:**
* **Search**: Locate and tap search.
* **Enter Details:** Type in the specific details of the call you are looking for (e.g., date, time, or contact name).

### Options Menu
5. **Options Menu:**
This section of the VOXO Mobile app allows you to manage your call history through the options menu:
* **Clear Call History**: Remove all entries from your call history.
* **Edit Mode**: Select multiple calls to delete or manage them simultaneously.
* **Settings**: Access additional settings related to app preferences.

### Understanding Call Icons
6. **Inbound and Outbound Call Indicators:**
* The telephone icons on the left indicate whether a call was inbound or outbound:
* **Upward Arrow**: Indicates an outbound call.
* **Downward Arrow**: Indicates an inbound call.

### Contact/Number
7. **Contact/Number:**
* **View Call Record**: Look at the contact name or phone number displayed with each call record.
* **Tap to Call**: Tap on the call record to start a call.

### Additional Call Options
8. **Additional Call Options:**
* Pressing and holding down on a call record will provide you with the following options:
* **Auto Call:** Initiates an automatic call using the preferred calling method.
* **Call:** Starts a standard voice call.
* **Video Call:** Initiates a video call with the selected contact.
* **GSM Call:** Makes a call using the GSM network.
* **Message:** Sends a text message to the contact.
* **Copy Number:** Copies the contact's phone number to the clipboard.

### Call Status
9. **Call Status:**
* **Call Type**: Indicates if the call was inbound, outbound, answered, missed, or canceled.
* **Call Details**: Displays the total number of calls and the day and time of each call.

### Call Details
10. **Call Details:**
* **Tap the "i" button**: Locate and tap the "**i**" button next to the call record.
* **View Call Details**: See the date, time, duration, and status (answered, missed, etc.) of each call.
* **Delete Call Records**: From this screen, you can also delete call records if needed.

# Contacts and Call Management
Source: https://docs.voxo.co/omnia/mobile/contacts-and-call-management
This guide provides step-by-step instructions on how to navigate contacts and manage calls using the VOXO Mobile app.
This guide provides step-by-step instructions on how to navigate contacts and manage calls using the VOXO Mobile app. It covers topics such as viewing and searching for contacts, adding new contacts, sending messages, and managing calls.
These guides cover the legacy **VOXO Mobile** app. If you're installing the mobile app for the first time, use the **VOXO Connect** app instead — see [Connect mobile app](/connect/mobile/index). Menus differ between the two apps.
### Navigating Contacts
1. **Open Contacts:**
* Launch the VOXO Mobile app and navigate to the **Contacts** section by tapping **Contacts**.

2. **Viewing Contacts**:
* Contacts are listed alphabetically by their first name. Scroll through the list to find a specific contact.
* To change the sort order of your contacts:
* Go to the **menu** (three dots) at the top right of the screen.
* Select **Settings**.
* Tap on **Contact Sort Order** to choose your preferred sorting method.

3. **Switching Contact:**
* Tap **VOXO Contacts** to view contacts saved within the VOXO system, or **Address Book** to view contacts from your device's address book.

4. **Searching for Contacts:**
* Use **Search** at the top right of the screen to quickly find a contact by typing their name.

5. **Adding New Contacts:**
* Tap **Add** (+) button to add a new contact to your device's address book . Fill in the necessary details and save the contact.

### Contact Options
6. **Contact Options:**
* Contact entries displays buttons for various actions:
* **Phone:** Tap to initiate a voice call.
* **Video:** Tap to initiate a video call.
* **Message:** Tap to send a text message.

7. #### **Viewing Contact Details:**
Tap on a contact to view details such as:
* Ringtone
* Extension Number
* Direct Number
* Organization
Use the buttons next to the contact for quick actions:
* **Phone**: Start a voice call.
* **Video**: Start a video call.
* **Message**: Send a message.

### Messaging
8. **Sending a Message**:
Tap the **Message** Button next to a contact to send a message.

### Managing a Call in VOXO Mobile
9. **Active Call Screen:**
* Once a call is established, you will see the active call screen.
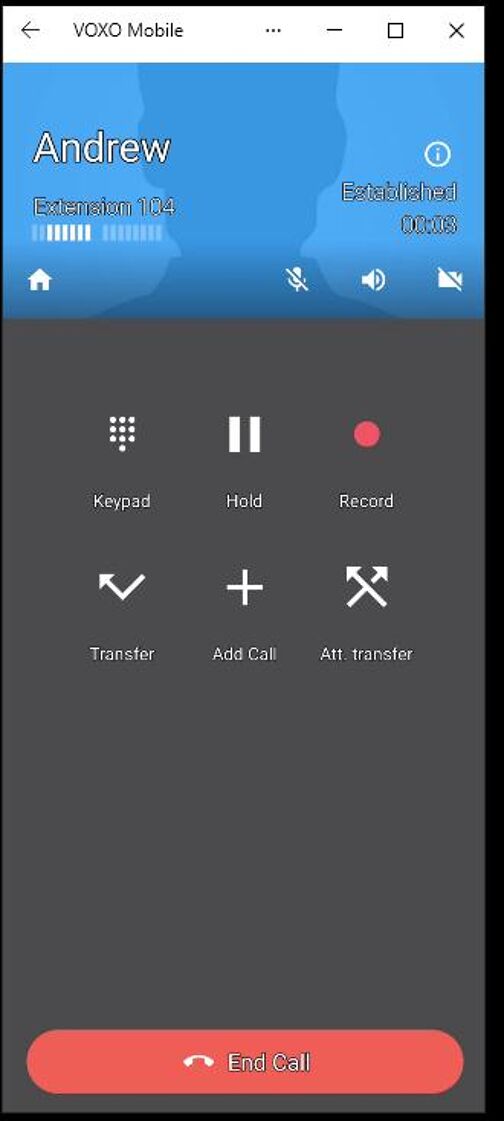
10. **Caller Information:**
* **Name**: Displays the caller's name.
* **Extension**: Shows the caller's extension number or phone number.
* **Call Status**: Indicates the call status (e.g., Established).
* **Call Duration**: Displays the duration of the call.

11. **Call Management Options:**
* **Keypad:** Tap to bring up the keypad for entering numbers during the call.
* **Hold:** Tap to place the call on hold.
* **Record:** Tap to start recording the call.

12. **Call Transfer Options:**
* **Transfer:** Tap to transfer the call to another contact.
* **Add Call:** Tap to add another call, creating a conference call.
* **Attended Transfer (Att. transfer):** Tap to perform an attended transfer, allowing you to speak to the new contact before transferring the call.

13. **Ending the Call:**
* **End Call:** Tap the red **End Call** button at the bottom of the screen to terminate the call.

14. **Additional Call Controls:**
* **Home**: Tap the **Home** button to return to the main app screen while keeping the call active.
* **Mute**: Tap the **Mute** button to mute or unmute your microphone.
* **Speaker**: Tap the **Speaker** button to turn the speakerphone on or off.
* **Camera On/Off**: Tap the **Camera** button to toggle the camera during a video call. Choose between the front or rear camera as needed.

15. **Viewing Call Details:**
* While on a call, pressing the information **(i)** button at the top of the screen will present you with details about the call in progress.

# Dialer
Source: https://docs.voxo.co/omnia/mobile/dialer
This guide provides step-by-step instructions on how to make a call using the dialer in the VOXO Mobile app.
This guide provides step-by-step instructions on how to make a call using the dialer in the VOXO Mobile app.
These guides cover the legacy **VOXO Mobile** app. If you're installing the mobile app for the first time, use the **VOXO Connect** app instead — see [Connect mobile app](/connect/mobile/index). Menus differ between the two apps.
### Using the Dialer
1. **Making a Call**:
* **Open the Dialer**:
* Tap the **dialer button** on the main screen.
* **Enter Number**:
* Use the on-screen keypad to enter the phone number you wish to call.
* **Initiate Call**:
* Tap the blue **phone button** at the bottom of the screen to start the call.

# Enabling or Disabling Do Not Disturb (DND)
Source: https://docs.voxo.co/omnia/mobile/enabling-or-disabling-do-not-disturb-dnd
VOXO Mobile: Enabling or Disabling Do Not Disturb (DND) This guide provides step-by-step instructions on how to enable or disable Do Not Disturb (DND) on the...
### VOXO Mobile: Enabling or Disabling Do Not Disturb (DND)
This guide provides step-by-step instructions on how to enable or disable Do Not Disturb (DND) on the app. By following these steps, you can easily toggle DND on or off, allowing you to manage your incoming calls and message notifications more efficiently.
These guides cover the legacy **VOXO Mobile** app. If you're installing the mobile app for the first time, use the **VOXO Connect** app instead — see [Connect mobile app](/connect/mobile/index). Menus differ between the two apps.
### Do Not Disturb (DND) Feature
1. **Enable/Disable DND:**
* **Toggle DND**:
* Tap the **VOXO button** located at the top left corner of the screen to toggle Do Not Disturb (DND) on or off.

2. **DND Enabled**:
* When DND is enabled:
* All incoming calls will appear as missed in your call history.
* Sound notifications for incoming messages will be suppressed.
* **Note:** DND automatically declines incoming calls and immediately routes them to the next step in the call flow. In group calls, your extension is treated as Busy and skipped.
3. **Return to Main Screen**:
* To exit the DND menu, tap the **VOXO button** again to return to the main screen.
# Managing Queues, Faxing, and Voicemail
Source: https://docs.voxo.co/omnia/mobile/managing-queues-faxing-and-voicemail
This guide provides step-by-step instructions on managing queues, faxing, and voicemail on the VOXO Mobile platform.
This guide provides step-by-step instructions on managing queues, faxing, and voicemail on the VOXO Mobile platform. It explains how to log in and out of queues, pause and unpause your status, send a fax, and access and manage voicemail.
These guides cover the legacy **VOXO Mobile** app. If you're installing the mobile app for the first time, use the **VOXO Connect** app instead — see [Connect mobile app](/connect/mobile/index). Menus differ between the two apps.
### Managing Queues
1. **Your Extension and Queue Status:**
* **Your Extension:** Displays your extension number for quick reference.
* **Your Queues:**
* **Queue Selection:** Use the dropdown menu to select the desired queue.
* **Logged In:** Toggle this switch to log in or out of the selected queue.
* **Unpaused:** Toggle this switch to pause or unpause your status in the queue.
* **Note**: You must be a queue agent added to a call queue or queues to use these features.

### Send a Fax
2. **Send a Fax:**
* Tap **Send a fax** to access the faxing feature.
* Enter the number you want to fax to.
* Find and select the file to attach.
* Click **Send** to transmit the fax.
* **Note:** To use this feature, outbound faxing must be enabled for your extension.

### Voicemail
3. **Access Voicemail**:
* Tap **Voicemail** to access your voicemail.
* The number of new voicemails will be indicated.
* You can listen, download, and delete messages. Ensure you have a voicemail box setup to use this feature.
* **Note:** You can also check messages from any phone by dialing your voicemail extension (for example, `*2003`) and entering your mailbox password when prompted.

### App Settings
4. **App Settings:**
* Select **Settings:** Tap settings, then refresh, or go to settings to adjust the app settings.

# Messaging
Source: https://docs.voxo.co/omnia/mobile/messaging
This guide provides a step-by-step explanation of how to manage messages in the VOXO Mobile app.
This guide provides a step-by-step explanation of how to manage messages in the VOXO Mobile app.
These guides cover the legacy **VOXO Mobile** app. If you're installing the mobile app for the first time, use the **VOXO Connect** app instead — see [Connect mobile app](/connect/mobile/index). Menus differ between the two apps.
### Managing Messages
1. #### **Viewing and Sending Messages:**
* **View Messages:** Tap the message button on the main screen to display a list of recent messages.
* **Read Messages:** Tap on a message to open and read the full content.
* **Send a New Message:** Tap **Add** "**+**" at the bottom right to compose and send a new message.

### Messaging Options Menu
2. #### **Managing Your Messages:**
* **New Message:** Start composing a new message.
* **Mark All as Read:** Mark all messages as read.
* **Clear Message History:** Delete the message history.
* **Edit Mode:** Select multiple messages to delete or manage them simultaneously.
* **Settings:** Access additional settings for the app.

### Steps to Send a Message
3. **Sending a Message**:
* **Open Messaging:** Tap the message button on the main screen.
* **New Message:** Tap **Add** "+" to compose a new message.
* **Select Contact Source:** Choose **VOXO Contacts** or **Address Book**.
* **Choose Contacts:** Scroll through or search for the contact(s) you wish to message, and select them.
* **Compose and Send:** Type your message in the text box at the bottom and tap **send** to send it.

### Adding Options for Messaging
4. #### Additional Messaging Options:
* **Message Interface:** Open a message thread.
* **Options Menu:** Tap the three-dot menu in the top right corner to access more options.
* **People & Options:** Select **People & Options** to view and manage settings for the message.
* **Delete:** Select **Delete** to remove the message thread.
* **Call:** Select **Call** to initiate a phone call with the contact directly from the message thread.

### Customizing Message Settings
5. **People & Options Menu**:
* In the VOXO Mobile app, the **People & Options** menu lets you customize conversation settings:
* **General Settings:**
* **Notification Settings:** Adjust notifications for this conversation.
* **Notifications:** Use global notification settings or customize them for this conversation.
* **People in This Conversation:**
* View all participants. For group messages, this section lists all members involved.

# Settings
Source: https://docs.voxo.co/omnia/mobile/settings
This guide provides step-by-step instructions on how to navigate the settings menu in the VOXO Mobile app.
This guide provides step-by-step instructions on how to navigate the settings menu in the VOXO Mobile app.
These guides cover the legacy **VOXO Mobile** app. If you're installing the mobile app for the first time, use the **VOXO Connect** app instead — see [Connect mobile app](/connect/mobile/index). Menus differ between the two apps.
### Open Settings
1. **Accessing Settings:**
* Go to **Settings** in the app to open the settings menu.

### Account Settings
2. **Incoming Calls/Push Notifications:**
* Manage push notifications for incoming calls.
* From the settings menu, tap on **Incoming Calls**.
On the mobile app, **Incoming Calls** is a top-level item in **Settings** — it is not inside the **Preferences** submenu described below. On the OMNIA desktop and web softphone, the same toggle lives under **Settings → Preferences**.

### Program Settings/Preferences
3. **Open Preferences:**
* From the settings menu, tap on **Preferences**.

### Sound Preferences
4. **Ringtone:**
* From the Preferences menu, tap on **Ringtone**.
* Select your preferred ringtone.

5. **Call Recording**:
Manage your call recording settings.
**Open Call Recording Settings**: From the **Preferences** menu, tap on **Call Recording**.
**Call Recording Options**:
**Record All Calls**: Enable to automatically record all SIP phone calls.
**Split Participant Channels**: Check to have separate tracks for each participant in the recording.
**Recording Format**: Select the recording format (default is WAV µ-law 8 kHz).
**Automatically Delete Recordings**: Set duration after which recordings are automatically deleted (default is "Never").
**Warning Beep**: Beeps every 15 seconds to notify the remote party that the conversation is being recorded.
**E-mail Address**: Pre-fill the e-mail address for sharing call recordings via email.
**Upload URL**: Configure the app to upload call recordings to a specified URL.
**Recording Storage**:
* **Internal**: Saves recording on the app's internal storage.
* **External**: Saves recording on the phone's memory.

6. **Sound**:
* Adjust sound settings.
* From the **Preferences** menu, tap on **Sound.**
* **Audio Processing Configuration**:
* **System Audio Processing**: Toggle between device-built and in-app audio processing.
* **Additional Sound Settings**:
* Incoming Noise Suppression, Playback Boost, Microphone Level, Keypad Volume, Speaker on Display Down, Automatic Enabling Speaker in Video Call, Advanced Sound Settings.

### Preferences/Number Rewriting
7. **Number Rewriting**:
* Configure how numbers are displayed and managed.
* From the **Preferences** menu, tap on **Number Rewriting.**
* **Number Rewriting Categories**:
* Plus Replacement, Local to International Number Mapping, Dial-Out Account Override.

### Preferences/Network
8. **Network**:
* Adjust your network settings.
* From the **Preferences** menu, tap on **Network.**
* **SSIDs**: Manage allowed and disallowed SSIDs.
* **Network Priorities for RTP**: Prefer Wi-Fi or mobile data for voice RTP traffic.
* **Network Change Strategy**: Choose how to handle network changes during a call.
* Additional Network Settings: Keep Cellular Network Active, Prevent Wi-Fi from Sleeping.

### Preferences/Other
9. **Call Forwarding**:
* Set up call forwarding rules.
* From the **Preferences** menu, tap on **Call Forwarding**.

10. **Contact Sort Order:**
* Choose how contacts are sorted (e.g., First name, last name).
* From the **Preferences** menu, tap on **Contact Sort Order**.

11. **Other:**
* From the **Preferences** menu, tap on **Other**.
* **Proximity Senso**r: Use the built-in proximity sensor to lock and unlock the screen during calls.

12. **Controls:**
From the **Preferences** menu, tap on **Controls**.
**GSM Call Settings**:
* Music on Hold, Notifications, GSM Button, Contacts, Call Integration.

13. **Do Not Disturb (DND)**:
* From the **Preferences** menu, tap on **Do Not Disturb.**
* **Create a New Rule**: Tap the plus (+) button to create a new DND rule.
* **Enable the Rule**: Toggle the Enabled switch to activate the rule.
* **Set the Time Interval**: Under Time, set the interval for the DND rule.
* **Select Weekdays**: Choose the weekdays the DND rule will apply to.
* **Manage Unknown Contacts**: Apply the DND rule to calls from unknown contacts.
* **Add Specific Contacts**: Specify contacts that the DND rule should apply to.
* **Add a Comment**: Optionally, add a comment for this rule.
* **Save the Rule**: Tap Add at the top right to save your new DND rule.

### Additional Preferences
14. **Troubleshooting Log**:
* Enable or disable logging of network traffic and other information for troubleshooting.
* **Language**: Set the language for the app (default is "Auto: English (United States)").
* **Start Video Automatically**: Toggle to enable or disable starting video automatically.
* **DNS Lookup**: Toggle to force a new DNS resolution every time the network changes.

### Information
15. **Information:**
* **About:** View information about the app.
* **Usage:** Check your usage statistics.
* **Logs:** Access log details.
* **Share with Friends:** Share the app with your friends.

### Provisioning
16. **Reset Application:**
* Reset the application to its default settings.
* From the **Settings** menu, tap on **Reset Application**.
If the mobile app shows connection errors such as **Web socket closed** or **error loading queue** — for example, the call log or directory won't load — tap **Reset Application** to return the app to its default settings, which clears these errors. Also confirm the app is updated to the latest version in your device's app store.

# Troubleshooting
Source: https://docs.voxo.co/omnia/troubleshooting
Fix the most common call-quality, phone-registration, and stuck-extension problems before contacting support.
Most call problems come from a network or device issue you can correct yourself. Work through the steps for your symptom below — if the issue persists afterward, contact support with the affected extension numbers so we can dig in quickly.
## Dropped calls or one-way audio
Dropped calls and one-way audio (you can hear them but they can't hear you, or vice versa) are usually caused by a local network or device issue.
Unplug the phone from power for 15 seconds, then plug it back in and let it fully restart.
On your router, enable **Multicast** and disable **SIP ALG**. These two settings cause most VoIP call-quality problems.
If only one side can hear audio, reseat the headset cable or switch to speakerphone to confirm it isn't a headset problem.
If the problem is limited to a single extension, swap that phone with a known-good one to confirm whether the device is at fault.
If the affected phones are cordless (DECT), reboot the base station they connect to — not just the handset. Unplug the base's power (and network cable, if separate) for 15 seconds, then plug it back into the same port.
If you're working from home or over Wi-Fi, place a test call over a cellular hotspot instead of your usual network. If the call works on the hotspot but not on your Wi-Fi, your router is interfering with the call — ask your internet provider to disable **SIP ALG** (on some provider-managed routers this is done by switching the router to bridge mode).
On a managed corporate or healthcare network, the most common cause of one-way audio is a firewall blocking VOXO's return audio traffic. Ask your IT team to whitelist VOXO's media subnet **`140.235.248.0/24`** — see [Firewall IP Whitelist](/omnia/faqs/firewall-ip-whitelist) for the full list of ranges and ports to allow.
**Contact support** if issues persist after a restart and router-setting check, or if multiple extensions are affected at the same time.
## A desk phone won't register
If a phone shows **"Account Unregistered"**, displays **"No Service"**, or says the phone is disabled, it has lost its connection to the system — usually a network issue.
Unplug the phone's power cable (and network cable, if separate) for 15 seconds, then plug it back in.
Confirm the network cable is fully seated at both ends and that your switch or router has power.
Go to **Menu → Status → IPv4**. If the phone has an IP address, your network is fine and it's a registration issue — continue below. If there's no IP, it's a cabling or network issue — reseat the cable and check your switch or router.
Plug the phone into the same port or location as a phone that registers normally, then place a test call. If it works there, the original port or upstream network is blocking communication — contact your IT team.
If the phone still won't register, factory reset it by holding the **OK** button (center of the directional pad) for 5–7 seconds and confirming.
The hold-**OK** reset above is for desk phones. A cordless (DECT) handset such as the Yealink W73H ignores that gesture — reset it from the handset menu instead: press **OK**, open **Settings**, go to **System Settings** (or **Advanced Settings**), choose **Handset Reset**, and enter the PIN when prompted (the default is **0000**).
You can see whether the extension is online in [Extensions](/omnia/admin/extensions).
**Contact support** if the phone still won't connect after a factory reset, or if it connects but immediately goes offline again.
## An extension shows stuck on a call
If a phone screen says you're stuck in a call, or an extension shows busy in the [Operator Panel](/omnia/user-guide/operator-panel) when no call is actually in progress, the extension's call status has gotten out of sync with the system.
Unplug the phone from power for 15 seconds, then plug it back in and wait for it to fully restart.
If a call is sitting in a park slot, pick it up to clear it. Connect users can see parked calls in [Your department → Parked Calls](/connect/your-department#parked-calls-tab).
Open the [Operator Panel](/omnia/user-guide/operator-panel) to check whether the extension still shows on an active call after the restart. The Active Calls list is read-only — there's no end-call control to clear a stuck entry yourself.
**Contact support** if the extension still shows on a call after a power cycle and no parked call is waiting — only support can clear a stuck extension status from the backend. Include the affected extension numbers so we can clear them quickly.
# Callers get a "cannot be completed" message
Source: https://docs.voxo.co/omnia/troubleshooting/caller-cannot-complete
When certain callers can't reach your number, the most common fix is on their side — dialing the full 1 + area code + number.
When certain callers — often businesses on older landline or office phone systems — can't reach your number and hear "the call cannot be completed as dialed," the most common fix is on the caller's side: have them dial the full number.
## Ask the caller to dial 1 plus the area code
Many older office systems still dial 7 digits. Most U.S. areas now require the full 10-digit number, and some require `1` first. Ask the caller to dial **1 + area code + the 7-digit number**. This resolves it more often than you'd expect.
If 11-digit dialing works where 7-digit dialing failed, the caller's phone system needs a dialing-plan update. Only their phone vendor can make that change.
**Contact support** if cell phones reach your number fine but multiple landline callers still can't get through after dialing the full number, so we can check for a carrier-level block on the calling side.
# No audio on a headset
Source: https://docs.voxo.co/omnia/troubleshooting/no-audio-headsets
Fix no-audio and microphone problems on OMNIA softphone calls by checking your output device, audio selection, and browser permissions.
If you can't hear callers or they can't hear you on OMNIA softphone calls, the cause is almost always an audio-device or permission setting on your computer or in your browser — not a fault with the headset itself. Work through the steps below for your symptom.
For desk-phone audio problems, see [Troubleshooting](/omnia/troubleshooting) instead.
## Set the right output device in Windows
When you can't hear audio through a connected headset, confirm Windows is sending sound to the headset rather than another device.
Left-click the **sound icon** in the Windows taskbar.
Select the connected headset from the drop-down menu. The entry may show **USB** or the brand and model in brackets, depending on how the headset connects.
## Select the right audio device in OMNIA
OMNIA has its own audio-device selector that's separate from your Windows settings.
Click the **small arrow** on the headset icon in OMNIA.
Select the correct microphone or headset from the list of audio devices.
## Others can't hear you
If callers can't hear you, work through the microphone checks below.
If your headset has a Mute button, make sure it isn't active, and confirm the headset is connected correctly.
Go to **Start → Settings → System → Sound**. Under **Input**, select your microphone in **Choose your input device**, then speak into it and watch **Test your microphone** to confirm Windows is hearing you.
Go to **Start → Settings → Privacy → Microphone**, select **Change**, and turn on **Allow apps to access your microphone**. Make sure **Allow desktop apps to access your microphone** is also set to **On**.
In Chrome, go to **Settings → Privacy and security → Site settings → Microphone**. Review your blocked and allowed sites, and change the OMNIA site's microphone permission to **Allow**.
If the problem continues, run the Windows Sound Troubleshooter. Go to **Settings → System → Sound** — the troubleshooter is listed below the **Input** and **Output** settings.
## Browser remedies
If you use OMNIA in a browser and the steps above don't help, refresh the site's permissions and cached data.
In the browser address bar on `connect.voxo.co`, click the lock (site information) icon and set **Microphone** to **Allow**.
Click the site information icon to the left of the URL, open **Cookies and site data → Manage on-device site data**, delete the entry for `connect.voxo.co`, and reload the page.
In your operating system's privacy settings, confirm your browser is allowed to access the microphone.
Log out of OMNIA and log back in to confirm the warning has cleared.
**Contact support** if you still have no audio after selecting the correct device and allowing microphone access in both your operating system and browser.
# Phones randomly rebooting
Source: https://docs.voxo.co/omnia/troubleshooting/phones-rebooting
Track down spontaneous desk-phone reboots by checking the cable, port, power source, and switch PoE load.
A desk phone that restarts on its own, sometimes mid-call, almost always has a power or cabling problem at its network port. Work through the checks below before assuming the phone is faulty.
## Note the scope first
Knowing how many phones are affected makes the fix easier to find:
* Is it one phone, a few phones, or every phone?
* Are the affected phones in the same room or plugged into the same network switch?
A few phones in the same area point to a power or switch problem. Every phone at once points to a network or service issue — see [Troubleshooting](/omnia/troubleshooting).
## Checks you can run
A cable with an intermittent break causes reboots without any visible damage. Try a known-good cable.
Plug the phone into another port on the switch, or a different switch. If the reboots stop, the original port was the problem.
If the phone draws power over the network cable (PoE), move it to a different PoE port. If it uses a separate power adapter, swap the adapter.
If several phones on one switch reboot together, especially during busy periods, the switch may be drawing more power than it can supply. Spread the phones across more ports or a second switch.
If reboots continue, watch the phones for a day or two and note which extensions reboot and at what times. That pattern helps support narrow down the cause.
**Contact support** if a phone keeps rebooting after you've tried a new cable, a different port, and a different power source, especially if the reboots happen during calls.
# Check VOXO service status
Source: https://docs.voxo.co/omnia/troubleshooting/service-status
Check status.voxo.co during a widespread issue, subscribe to incident updates, and learn why VOXO phones don't need a static IP.
If calls are failing or audio is broken across most or all of your phones at once, check the VOXO status page at `status.voxo.co`. A problem that hits everyone at the same time is usually a service-wide event rather than something on your own network.
## Check the status page
Go to `status.voxo.co` to see current service status.
Subscribe to email or SMS updates so you're notified of future incidents.
During a service-wide event, there's nothing to change on your side — the fix comes from VOXO. Once it's resolved, place a test call to confirm your service is back.
**Contact support** if the status page shows all systems normal but you still have calls failing across every phone, since that points to something specific to your account or network.
## Do VOXO phones need a static IP?
No. VOXO desk phones and softphones work on a standard dynamic (DHCP) internet connection — you don't need a static IP for normal use. When your IP address changes, the phone re-registers on its own.
If your provider changes your IP often, calls can drop briefly until the phone re-registers, though this is uncommon in practice. If your firewall only allows traffic from a fixed IP, your IT team still needs to allow VOXO's network ranges, since the phone's own IP can change — see [Firewall IP Whitelist](/omnia/faqs/firewall-ip-whitelist).
**Contact support** if a phone repeatedly goes offline and back online while your internet connection itself is stable, so we can check whether the IP is changing more than expected.
# No audio on a home router (SIP ALG)
Source: https://docs.voxo.co/omnia/troubleshooting/sip-alg-home-router
Confirm SIP ALG on a home router is breaking your softphone audio, then turn it off — with step-by-step instructions for AT&T gateways.
If you connect on the OMNIA desktop app from home but hear no audio in either direction — the call timer runs, but neither side can hear the other — your home router most likely has a feature called **SIP ALG** interfering with the call. Turning SIP ALG off fixes most of these cases.
## Confirm it's the router
A quick test points to the router as the cause:
If the mobile app works but the desktop app doesn't, the router's SIP ALG is the likely cause. The mobile app takes a different path that the router doesn't interfere with.
Connect the desktop app to a phone hotspot. If audio works there but not on your home Wi-Fi, the home router is the difference.
## Turn off SIP ALG on AT\&T gateways
These steps apply to AT\&T gateways (Hub Air, BGW210, BGW320).
On a device connected to the Wi-Fi, go to `http://192.168.1.254`.
Open the **Firewall** tab, then **Firewall Advanced**.
Enter the **Device Access Code** — the 10-digit code printed on the sticker on the gateway. This is not the Wi-Fi password.
Set **SIP ALG**, **Authentication Header Forwarding**, and **ESP Header Forwarding** to **Off**.
Click **Save**, then power-cycle the gateway so the change takes effect.
Other routers have this setting in a similar firewall or advanced section. If you can't find it, your router's support can point you to it.
## If SIP ALG is already off
* Power-cycle the modem and router after any change — audio sometimes doesn't clear until a full restart.
* If a managed firewall controls the network, ask IT to allow VOXO's voice traffic. See [Firewall IP Whitelist](/omnia/faqs/firewall-ip-whitelist).
* If the modem and router are separate devices, set the router to bridge mode to remove double-NAT, which also causes audio problems.
**Contact support** if you still have no audio after SIP ALG is off and the router has been restarted, so we can confirm the firewall whitelist is complete.
# Call Queues (Agent)
Source: https://docs.voxo.co/omnia/user-guide/call-queues-agent
This guide provides detailed instructions on how to navigate and use the Call Queues feature as an agent in the Omnia Portal.
This guide provides detailed instructions on how to navigate and use the Call Queues feature as an agent in the Omnia Portal. It covers topics such as accessing the Agent Dashboard, switching between queues, logging in/out, pausing/unpausing, filtering agent views, and viewing agent status and statistics. It also includes information on queue stats, active calls, and calls waiting.
This document applies to the following user roles within Omnia:
Any role that is assigned as an agent to a queue.
### Accessing the Agent Dashboard
1. **Access the Agent Dashboard:**
* Click **Call Queues,** then click **Agent Dashboard** to open the Agent Dashboard.

### Switching Between Queues
2. **Switch Between Queues:**
* If you are assigned to multiple queues, click the dropdown and select the appropriate queue to see the details and complete actions pertaining to the selected queue.
* An icon of an agent next to the queue indicates that you are a queue agent in that queue.

### Logging In/Out of a Queue
3. **Log In/Out of a Queue:**
If you are a member of multiple queues, click the dropdown and select the appropriate queue.
Toggle the **Logged In** switch on or off to change your status.
* When logged out, your status will show a red indicator and the name of the queue you are logged out of.
* When logged in, your status will show a green indicator and the name of the queue you are logged into.

### Pausing/Unpausing
4. **Pause/Unpause:**
If you are a member of multiple queues, click the dropdown and select the appropriate queue.
Click the dropdown next to your profile and select one of the available options to pause your agent out of the queue.
When paused, your status will display an orange indicator with the queue name and the reason for the pause.
To unpause, select **Available** from the list.

### Filtering Agent View
5. **Filter Agent View:**
* Select the appropriate queue from the dropdown menu.
* To see agents, filter the agent view by selecting **All**, **Logged In**, or **Logged Out** from the dropdown.
**Agent Status Descriptions:**
* **All:** Displays all agents regardless of their status.
* **Logged In:** Shows only agents who are currently logged into the queue.
* **Logged Out:** Displays agents who are currently logged out of the queue.

### Viewing Agent Status
6. **View Agent Status**:
* Hover over an agent's name to see their current status.
* **Idle**: The agent is not on a call.
* **Green**: The agent's phone is ringing.
* **Blue**: The agent is on a call.

### Viewing Agent Statistics
7. **View Agent Statistics:**
* Under **Queue Agents**, you can see statistical data for the current day based on the selected queue and your filters, including:
* **In**: Inbound call count.
* **Out**: Outbound call count.
* **Refused**: Refused or abandoned call count.
* **Time In/Out**: Total talk time for inbound and outbound calls.
* **Pause Time**: Total pause time.
* All stats are in real-time for the current day.

### Viewing Queue Stats
8. **Queue Stats Grid:**
* The Queue Stats grid will provide several meaningful data points regarding queue stats including:
* **Agents:Callers**: Ratio of available agents to callers.
* **Agents:Ready:** Number of agents ready to take calls
* **Active Calls:** Number of active calls.
* **Calls Waiting:** Number of calls waiting in the queue.

### Viewing Active Calls
9. **View Active Calls:**
* See active, in-progress calls from the queue, with details such as **Agent, Name, Number,** and **Duration.**

### Viewing Calls Waiting
10. **Viewing Calls Waiting:**
* Lists waiting calls with details such as **# (position), Name, Number, Ringing,** and **Time.**

### Agent Dashboard Overview
11. **Agent Dashboard Overview**:
* **Completed Calls**: Number of completed calls, categorized into inbound and outbound.
* **Agents**: Ratio of available agents to callers.
* **Total Talk Time**: Total duration of talk time for calls, separated into inbound and outbound.
* **Total Wait Time**: Total wait time for calls, highlighting the shortest and longest wait times.
* **Hourly Call Volume**: A bar graph showing the volume of calls per hour, with different colors representing inbound calls, inbound duration, abandoned calls, outbound calls, outbound duration, exit key, and exit timeout.
* **Completed SLA (30s)**: Number of calls completed within the Service Level Agreement (SLA) of 30 seconds and the service level achieved.
* **Abandoned Calls**: Number of abandoned calls and the abandon rate.

# Call Queues (Queue Manager)
Source: https://docs.voxo.co/omnia/user-guide/call-queues-queue-manager
This guide provides Queue Managers with detailed instructions for managing call queues within the Omnia Portal.
This guide provides Queue Managers with detailed instructions for managing call queues within the Omnia Portal. It includes steps for logging agents in and out, listening to and coaching during active calls, picking up waiting calls, and accessing live stats. The document covers creating and managing custom live stat dashboards and using various widgets to monitor and optimize queue performance.
1. **The Queue Manager Role:**
The Queue Manager role includes strategic queue management actions but is otherwise the same as a queue agent. For more details, see the relevant document: [Call Queues (Agent)](https://scribehow.com/shared/Omnia_Call_Queues_Agent__mMkPgFnpTRWkAgI-2aClMg)**.**
### Agent Activity - Queue Agents
2. **Logging Agents In and Out:**
**Select the Queue:** Navigate to the dropdown menu at the top of the screen and select the desired queue (e.g., "Ops Queue").
**Filter Agents by Status:** Use the status filter dropdown on the right to filter agents by **All**, **Logged In**, or **Logged Out**.
**Toggle Agent Status:** In the **Queue Agents** section, find the agent and
toggle the status switch next to the agent’s name to **Logged In** or **Logged Out**.

3. **Pause/Unpause an Agent:**
You can pause an agent by selecting a status such as **Account Review**, **Break**, **Lunch**, **Meeting**, **Personal**, or **Other**.
**Unpause an Agent:** Select **Unpause**.

4. **Make a Call:**
* To make a call, click on the agent and select **Call**.

5. **Disable Do Not Disturb (DND):**
* To disable DND, click on the agent and select **Disable DND**.

### Active Calls - Listen & Coach
6. **Listening to an Active Call:**
* Click **Listen** to monitor an active call without either party knowing.

7. **Coaching During an Active Call:**
* Click **Coach** to interact with the agent while the caller cannot hear the queue manager. This allows the manager to provide guidance to the agent discreetly.

### Calls Waiting
8. **Pick up a Waiting Call:**
* **Go to the Calls Waiting section:** Navigate to the **Calls Waiting** section in the interface.
* **Pick up the call:** Click on **Pickup** next to the call you want to answer.

### Live Stats
9. **Accessing Live Stats:**
* Go to **Call Queues** then select **Live Stats**.
* This feature enables you to create custom live stat dashboards for queues in your accounts using drag-and-drop functionality.

10. **Create Layout**:
* Click on the gear icon next to the layout dropdown at the top of the dashboard and select **Create layout**.
* Enter the name and select the queues you wish to be included.
* Click **Submit** then **OK**.
* After submitting, your layout will be created, and you can start adding widgets.

### Widgets Types and Glossary
11. **Table Widgets**:
* **Queues**:
* Displays a searchable table view of all queues selected in the current layout, showing statistics for each queue.
* Includes sort functionality and column filtering to customize the table to display only the desired statistics.
* **Agents By Queue**:
* Provides a searchable table view of all agents across all queues in the current layout, showing user statistics, and information about their logged in/out and pause/unpause status.
* Allows logging agents in/out and pausing/unpausing.
* Includes sort functionality and column filtering to customize the table statistics to your needs.
* Allows exporting the agent data by clicking the **Export** button.
* **Agent Totals**:
* Displays a searchable table view for all agents similar to the Agents By Queue Table, but without breaking down data by queue for agents who are members of multiple queues.
* Allows logging agents in/out and pausing/unpausing in all queues they are members of.
* Includes sort functionality and column filtering to customize the table statistics to your needs.
* Allows exporting the agent data by clicking the **Export** button.
* **Waiting Calls List**:
* Shows a table view with caller information and wait time for all calls currently waiting in the queue.
* **Active Calls List**:
* Displays a searchable table view with caller information and duration for all calls currently connected to agents.
* **Table Widget Column Filtering**:
* Click the filter button to select and deselect the columns of your choice.

12. **Stat Widgets**:
* **Abandoned Calls**:
* Shows the total count of abandoned calls, the overall abandon rate, and the average wait time before an abandon occurs. An abandoned call is one where the caller hangs up before connecting with an agent.
* **Active Calls**:
* Displays the total count of active calls in a queue, representing calls currently connected in the queue. This does not include calls an agent might be participating in outside of the queue.
* **Agent Outbound:**
* Shows the total outbound call counts for agents servicing the queue, with a breakdown of answer and no-answer counts.
* **Average Answer Time**:
* Displays the average answer time across all selected queues, representing the average amount of time a caller waits before an agent connects with them.
* **Complete Callbacks**:
* Shows the total number of callbacks completed for the selected queues, broken down into successful callbacks and those that timed out.
* **Exits**:
* Displays the total number of times callers exit the queue by pressing a key or reaching the queue timeout setting, broken down by timeout and key counts.
* **Inbound Answered**:
* Shows the inbound complete counts for the selected queues, representing queue calls that successfully connected to an agent, including calls transferred out of the queue.
* **Queued Callbacks**:
* Provides a count of calls waiting for callbacks in the selected queues.
* **Total Inbound**:
* Provides a count of the total inbound traffic to a queue, including Inbound Answered, Exits, and Abandoned counts.
* **Transfers**:
* Displays the total number of calls completed as a result of blind and attended transfers out of the queue.
* **Waiting Calls:**
* Shows the number of calls currently waiting in the queue to connect to an agent, including the longest wait times for calls currently in the queue.
* Each stat widget displays the total counts for all queues by default. You can filter which queue totals you would like to see by using the checkboxes in the table.

13. **Add Widgets:**
* Click **Add Widget** located at the top right corner of the dashboard.
* Select from the list of available widgets to add. Once selected, these widgets will be displayed on the screen. You can add as many widgets as you like.
* Drag a widget anywhere on the screen to arrange your desired layout.
* Release the widget to place it in the chosen position.
* Resize the widget by clicking and dragging the corner of the widget.
* Click the delete button next to the widget to remove it.

### Managing Layouts
14. **Access Layout Options:**
* Click on the gear icon next to the layout dropdown at the top of the dashboard.

15. **Edit Layout:**
Use the dropdown menu to select the desired layout.
Click on the gear icon next to the layout dropdown at the top of the dashboard.
Select **Edit Layout** to rename the layout or modify the selected queues.
Make your changes.
Click **Submit**, then **OK** to confirm.

16. **Remove Layout:**
* Use the dropdown menu to select the desired layout.
* Click on the gear icon next to the layout dropdown at the top of the dashboard.
* Select **Remove Layout** to delete the current layout.
* Confirm the removal when prompted.

17. **Create Layout:**
* Click on the gear icon next to the layout dropdown at the top of the dashboard.
* Select **Create Layout** to start a new layout.

18. **Duplicate Layout:**
* Use the dropdown menu to select the desired layout.
* Click on the gear icon next to the layout dropdown at the top of the dashboard.
* Select **Duplicate Layout** to make a copy of the current layout.

### Accessing Queue Management Functions
19. **Navigate to the Admin Portal:**
* Click the **Go to admin** button at the bottom of the user panel menu.

20. **Locate the Call Queues Tab:**
* Click on the **Phone System** tab to expand it.
* Select the **Call Queues** tab to view a list of call queues that you have access to view and manage as a Queue Manager.

### Call Queues List
21. **Call Queues:**
* Use the **Search** bar to find specific call queues.
* Click the **Export** button to download the list of call queues in CSV format.
* The table displays the following column headers, which can be sorted:
* **Name:** The name of the call queue.
* **Number:** The number assigned to the call queue.
* **Ring Strategy:** The strategy used for ringing, such as "Ring all" or "Round robin."
* **Recording:** Indicates whether call recording is enabled or not.

### View/Edit Call Queue
22. **Edit a Queue:**
* Click the edit button next to the queue, or click on the queue you want to edit.
* In the **Agent Settings** section, you can:
* Add agents by clicking **Add Agent**, typing the agent's name, and then selecting the agent from the list.
* Remove agents by clicking the **Remove Agent** button next to the agent's name.
* Reorder agents by using the **Reorder button** next to the agent's name.
* Save Changes: Click **Save**.

Newly added agents are not logged in automatically. After adding agents to a queue, set the status filter to **All** in the queue window and click the button next to each agent to log them in. Until you do this, the agents will not receive calls routed to the queue.
23. **Update Agent Extensions**:
* After selecting **Save**, you will receive the following message:
* For any selected agents, update the following:
* Update extension branch to match the branch assigned to this queue.
* Update busy, no answer, and offline destinations to point to the selected destination.
* Select **Skip** to save without completing this, then click **Yes** to confirm.
* Select agents from the dropdown. Choose the **Destination type** and **Select destination** for busy, no answer, and offline settings.
* Click **Submit**, then click **Yes** to confirm.

### Accessing Reports
24. **Navigate to Reports**:
* Click on the **Reports** tab to expand it.
* Here you will see a list of available reports. For specific details on reports, see the [Omnia Admin Reports User Guide](https://scribehow.com/page/Omnia_Admin_Reports_User_Guide__SBv2WAWDROSz4ohbF5e4KA?referrer=documents).
**Note**: Access to reports is based on your user role. You may not be able to access and view a specific report and all of its features if your role does not permit it.

####
# Call Recordings
Source: https://docs.voxo.co/omnia/user-guide/call-recordings
This guide provides step-by-step instructions for accessing, saving, and listening to call recordings in Omnia.
This guide provides step-by-step instructions for accessing, saving, and listening to call recordings in Omnia. It includes instructions for filtering recordings by date range, call direction, and dispositions.
Call Recordings Availability:
Call Recording is available for all users with call recording enabled.
### Accessing Call Recordings
1. **Access Call Recordings:**
* Click **Call Recordings** to access, save, and listen to your call recordings.

### Filtering Recordings
2. **Filter by Date Range**:
* To find a specific call, filter your call recordings by date range. Choose from **Last 10 Days** or **Last 30 Days**. The recordings will be from the selected date range.

3. **Filter by Call Direction and Dispositions**:
* Further refine your search by selecting call direction (**Inbound, Outbound, Internal,** or **All**) or dispositions (**Answered, No Answer, Busy,** or **Failed**). The recordings will be filtered based on the selected date/time range and filters.

4. **Reset Filters**:
* Click **Reset** to remove all filters and start your search over.

### Listening and Saving Recordings
5. **Listening to or Saving Recorded Calls:**
* Click the **Recording** button to access call recording details.
* Click the **Play** button to listen to the recording.
* Click the **Save recording** button to save the recording.

# Call Summary
Source: https://docs.voxo.co/omnia/user-guide/call-summary
This guide provides step-by-step instructions on how to use the "Call Summary" feature in Omnia.
This guide provides step-by-step instructions on how to use the "Call Summary" feature in Omnia. The Call Summary feature allows you to view detailed call records, filter call records by various criteria, and display or reset filters.
### Accessing Call Summaries
1. **Access Call Summary**:
* Select **Call Summary** to view detailed call records.

### Filtering Call Records
2. **Quick Filters**:
* Use the quick filters to view call records by selecting options like **Last 30 Days** or **Last 10 Days**.

3. **Custom Date Range**:
* After selecting the **Filter** option, click **Select Date Range** to choose a specific date range and time from the calendar.
* Refine your search by call direction (**Inbound, Outbound, Internal,** or **All**) or by dispositions (**Answered, No Answer, Busy,** or **Failed**).
* The call records that appear will be from the selected date range and filters.

### Displaying and Resetting Filters
4. **Displaying Records**:
* Once you have selected your filters, the call records will be displayed. These records include:
* **Date and time of the call**
* **Caller number**
* **Caller name**
* **Dialed number**
* **Call direction**
* **Disposition**
* **Duration**
* **Packet loss**
* **Jitter**
* **MOS score**

5. **Reset Filters**:
* Click the **Reset** button to remove all filters and start your search over.

# Contacts
Source: https://docs.voxo.co/omnia/user-guide/contacts
This guide provides step-by-step instructions for viewing and managing business and personal contacts.
This guide provides step-by-step instructions for viewing and managing business and personal contacts. It covers searching for contacts, initiating calls, creating personal contacts, bulk uploading, editing, and deleting contacts.
### Viewing Contacts
1. **Access Contacts**:
* Select **Contacts** from the left-side navigation window.
**Extension Status Indicators:**
* **Green:** The user is logged into Omnia or has a connected and online phone.
* **Red:** The user is not logged in or their device is offline.

### Business Contacts
2. **View Business Contacts**:
* Click **Business Contacts** to see all users' direct numbers and extensions from the company directory.

3. **Search Business Contacts**:
* Enter a name or phone number in the search bar labeled **Search Name / Number**.

4. **Quick Dial:**
* Click the **green telephone button** next to the contact to initiate a call.

### Personal Contacts
5. **View Personal Contacts**:
* Click **Personal Contacts** to see contacts associated with your personal extension, including manually added or uploaded contacts from a spreadsheet.

6. **Search Personal Contacts**:
* Enter a name or phone number in the search bar labeled **Search Name / Number**.

7. **Quick Dial:**
* Click the **green telephone button** next to the contact to initiate a call.

### Creating Personal Contacts
8. **Add New Contact**:
* Select **Personal Contacts**.
* Click **Add Contacts** "+" to add a new contact.
* Enter the contact's details.
* Click **Add** (+), then **Create**.
* Click **Yes** to save the contact.

### Bulk Uploading Personal Contacts
9. **Import from CSV**:
* Hover over **Import from csv** and click **Download example csv** to get a template. Complete the template, save it, and click **Import from csv** to upload the spreadsheet.

10. **Map CSV Fields**:
* Select **First name, Last Name, Phone, Email, and Company** from the dropdown menus for each corresponding column.
* All listed fields must be selected to continue.
* Click **Reset** to remove the CSV and reupload if needed.
* Click **Add**.
* Added entries will appear in the list below.

11. **Remove an Entry:**
* If you need to remove a phone number entry from the list after selecting add, clicking **Remove number** (-) will remove an entry before saving.

12. **Save the Personal Contacts:**
* Once you have completed adding entries, click **Create**.
* Click **Yes** to confirm and save.

### Editing and Deleting Personal Contacts
13. **Edit Contact**:
* Search for and select the contact.
* Make the necessary changes.
* Click **Edit**.
* Confirm by clicking **Yes**.

14. **Delete Contact**:
* Search for and select the contact.
* Click the **Delete** button.
* Confirm by clicking **Yes**.

# Internal and external dialing
Source: https://docs.voxo.co/omnia/user-guide/dialing
Dial a short extension to reach a coworker, or a full number to call outside your organization.
How you dial depends on who you're calling. Reach a coworker by their extension, and call anyone outside your organization by their full phone number.
## Call a coworker (internal)
To reach someone on your account, dial their **extension** — the short 3–4 digit number assigned to their line. You can also open **Contacts**, find the person, and start the call from there. A colored dot shows their current state:
* **Green** — their phone is ringing.
* **Blue** — they are on a call.
* **Idle** — they are free.
## Call an outside number (external)
To call someone outside your organization, dial the **full phone number**. If your account has **7-digit dialing** turned on, you can dial local numbers without the area code; otherwise, enter the complete number.
## Send digits into a menu
If you reach an auto attendant or phone menu, open the dial pad mid-call (the blue arrow icon pointing right) to enter your selection. See [Softphone](/omnia/user-guide/softphone) for the full set of in-call controls.
Contact support if a coworker's extension or an outside number won't connect after you've confirmed the digits are correct.
# Do Not Disturb (DND)
Source: https://docs.voxo.co/omnia/user-guide/do-not-disturb-dnd
This guide provides simple steps to enable or disable the Do Not Disturb (DND) feature.
This guide provides simple steps to enable or disable the Do Not Disturb (DND) feature. Follow these instructions to manage notifications and ensure uninterrupted focus and privacy.
### Accessing DND
1. **Open DND Settings:**
* Go to your profile at the top right of the screen.
* Select **DND** from the drop-down menu.

### Toggling DND
2. **Enable/Disable DND:**
* Click the **DND (Do Not Disturb)** option to toggle it on or off.

### DND Status Indicator
3. **DND Status Indicator:**
* Other operators and managers can see that you have DND enabled from the Operator panel and the Call Queue Agent Dashboard.

### How DND routes calls
When DND is on, incoming calls to your extension are automatically declined and immediately routed to the next step in the call flow, without waiting or timing out on your extension. In group or queue scenarios, the system treats your extension as busy and sends the call to the next available agent or step.
# Get Help
Source: https://docs.voxo.co/omnia/user-guide/get-help
This guide explains how to use the "Get Help" feature in Omnia.
This guide explains how to use the "Get Help" feature in Omnia. It provides steps for accessing support, including sending messages to the VOXO team and finding help articles.
### Accessing Help
1. **Get Help Feature**:
* Click on your profile icon in the top right corner.
* Select **Get Help** from the drop-down menu.

2. **Support Options:**
* **Messaging**: Send a message to the VOXO team if you have questions about using Omnia.
* **Help Articles**: Access help articles to learn more about using Omnia.

# Hot Keys
Source: https://docs.voxo.co/omnia/user-guide/hot-keys
This guide explains how to access and use keyboard shortcuts (hot keys) for the Omnia softphone.
This guide explains how to access and use keyboard shortcuts (hot keys) for the Omnia softphone. It includes instructions for viewing the available shortcuts and performing basic functions using your keyboard.
### Accessing Hot Keys
1. **Viewing Hot Keys**:
* Click **Hot Keys** under your profile to view the available keyboard shortcuts for the softphone.

### Using Keyboard Shortcuts
2. **Keyboard Shortcuts**:
* Perform basic functions with your keyboard.
* Find these shortcuts in Omnia by pressing **ALT + K** (Windows) or **Option + K** (Mac).

# Install the desktop app
Source: https://docs.voxo.co/omnia/user-guide/install-desktop-app
Install OMNIA as a desktop app from Google Chrome so you can launch it like any other program.
OMNIA runs in your browser, but you can install it as a desktop app so it opens in its own window and launches like any other program on your computer.
## Install OMNIA from Chrome
Go to [app.voxo.co](https://app.voxo.co) in Google Chrome.
Select the install icon in the browser's address bar.
When prompted, choose **Install VOXO** to add OMNIA to your desktop.
Installing the app requires Google Chrome.
# My Activity
Source: https://docs.voxo.co/omnia/user-guide/my-activity
This guide provides step-by-step instructions for navigating and using the "My Activity" section.
This guide provides step-by-step instructions for navigating and using the "My Activity" section. It covers filtering call history, searching for specific calls, managing voicemails, sending faxes, and accessing fax history.
### Call History
1. **View Call History**:
* Under **My Activity**, click **Inbound** or **Outbound** to view your inbound or outbound call history.

2. **Filter Call History**:
* Place a checkmark next to **Missed** or **Answered** under **My Activity** to filter calls by type.

3. **Search Call History**:
* Enter a name or phone number in the **Search Number / Name** field to search your call history.

4. **Initiate a Call**:
* Click the **green telephone button** to initiate a call.

### Voicemail
5. **Manage Voicemails:**
* Click **Voicemails** to listen to, save, and delete your voicemails.
**Note**: This option is available only if a voicemail box has been set up for your extension.

### Faxes
6. **Manage Faxes**:
* Click **Faxes** to manage your inbound and outbound faxes through Omnia.

7. **View Fax History**:
* The fax history section displays your inbound and outbound fax records.
* Use the **Search Faxes** field to find specific faxes.
* You can download fax files for further review.

8. **Send a Fax**:
* Enter the 10-digit number in the **Enter Number** field.
* Attach your file.
* Click **SEND** to send the fax.
**Note**: Outbound faxing must be enabled on your extension for this feature to work.

### Sending a Fax via Email
9. **Email a Fax**:
* Start a new email.
* In the **To** field, enter: [send@voxofax.com](mailto:send@voxofax.com).
* In the subject line, enter the 10-digit telephone number you want to fax to (no spaces or dashes). To send to multiple numbers, separate them with commas.
* Attach a PDF to the email body and send. Only PDF format is supported for sending faxes.
* Cover pages are created and added automatically.
**Note:** Outbound faxing must be enabled on your extension for this feature to work.
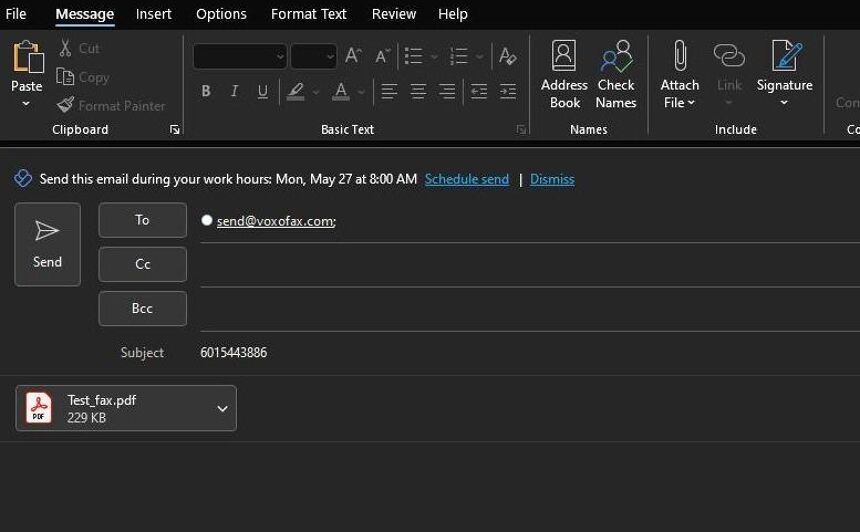
# Operator Panel
Source: https://docs.voxo.co/omnia/user-guide/operator-panel
This guide provides an overview of the Omnia Operator Panel and its features.
This guide provides an overview of the Omnia Operator Panel and its features. It explains how to access the Operator Panel, manage branches, view user status, initiate calls, and provides a real-time overview of active calls and extensions. It is useful for individuals who want to efficiently manage their organization's phone system and monitor call activity in real-time.
Operator Panel Availability:
The Operator Panel is available to all users with Operator Panel access enabled on their account.
### Accessing the Operator Panel
1. **Accessing the Operator Panel:**
* Click **Operator Panel** to display a list of account users, their status, and extension numbers.
* From this screen, you can also make calls.

### Managing Branches
2. **Managing Branches:**
* **Account Administrator:**
* Can view all branches and extensions assigned to an account from the Operator Panel.
* Can filter between these extensions based on branch assignment, which aids in managing large organizations with multiple teams.
* Use the branch dropdown to filter and display users from specific branches.
* **Non-Account Admins:**
* Will only see extensions in the same branch as theirs.
* **To Filter Users by Branch:**
* Select the desired branch from the dropdown menu to view users in that branch.

### Viewing User Status
3. Hover over a user's name to see their current status:
* **Green**: The user’s phone is ringing.
* **Blue**: The user is on a call.
* **Idle**: The user is not on a call.
* **DND**: Do Not Disturb - the user is not available

### Initiating a Call
4. **Initiating a Call:**
* Click the **green telephone button** next to the contact to initiate a call.

### Active Calls and Extensions Overview
5. #### **Real-Time Status and Call Management:**
This section of the Omnia portal offers a real-time overview of active calls, extension statuses, and user-to-call ratios.
**Active Calls:** Displays the total number of ongoing calls.
**Extensions:** Shows the number of online and offline extensions.
**Users:Calls:** Indicates the ratio of users to active calls.
**Detailed List:** Below the summary, you can view a comprehensive list of all active calls in progress. Use the search function to find specific calls.
Click the **sort icons** next to the column headers to arrange items in ascending or descending order.
The Active Calls list is read-only — there's no end-call control on entries. If you see an extension showing on an active call when no call is actually in progress, power cycle the phone first; if it still shows on a call, contact support to clear the extension status.

# Set up a remote or international worker
Source: https://docs.voxo.co/omnia/user-guide/remote-worker
Network, router, and power requirements for giving remote and overseas staff a VOXO line, plus the 911 caveat.
You can give staff outside your office a VOXO line that answers, holds, and transfers calls like an in-office extension — either through a browser-based softphone or a physical desk phone. This page covers what the worker's location needs and the caveats to know before you set them up.
## What the worker's location needs
* **Internet** — at least 5 Mbps up and down dedicated to phone traffic.
* **Router** — if the modem and router are separate devices, set the router to **bridge mode** to avoid double-NAT registration problems. If your provider can't enable bridge mode, ask them to disable **SIP ALG** instead.
* **Firewall** — if a managed firewall controls the network, ask their IT to allow VOXO's voice traffic. See [Firewall IP Whitelist](/omnia/faqs/firewall-ip-whitelist) for the ranges and ports to allow.
* **Power** — VOXO desk phone power supplies handle 100 to 240V, so they work on overseas mains without a converter.
## Things to know
**911 does not work internationally.** Remote staff outside the U.S. can't dial 911 from a VOXO phone and must use a local phone for emergencies.
Call quality follows the local internet — it depends on the remote location's connection.
If a remote phone or softphone won't register after you've confirmed the internet is up and the router is in bridge mode, see [Troubleshooting](/omnia/troubleshooting) or contact support.
# Settings
Source: https://docs.voxo.co/omnia/user-guide/settings
This guide provides step-by-step instructions on how to navigate and customize settings on the Omnia platform.
This guide provides step-by-step instructions on how to navigate and customize settings on the Omnia platform. It covers changing profile pictures, call forwarding, two-factor authentication, preferences, voicemail settings, and integrations.
### Profile Picture
1. **Change Profile Picture**:
* Click **Settings** in the upper right corner of the Omnia page.
* Click **Edit** on your profile picture.
* Find and upload the picture you want to use.
* Click **Save**.

### My Profile
2. **Profile Settings**:
* Go to your profile in the top right corner, then select **Settings** and **My Profile**.

3. **My Profile:**
Under **My Profile**, you can see the following:
* **Profile Type:** This is your role in Omnia.
* **Email:** Your registered email address.
* **Extension:** Your extension number.
* **DID:** Your Direct Inward Dialing number.

### Call Forwarding
4. **Enable Call Forwarding:**
* Check the box next to **Enable forwarding**.
* Enter the number you want to forward calls to.
* Click **Save**.
* To stop forwarding, uncheck **Enable forwarding**.

### Mobile App
5. **Download Mobile App**:
* Scan the QR code to download the Omnia Mobile Application, available for iOS and Android.

### Reset Password
6. **Reset Password**:
* Check **Reset Password**.
* Enter your new password.
* Click **Submit**.

### Two-Factor Authentication
7. **Set Up 2FA**:
* Select a method from the **Select 2FA Method** dropdown list.
* Click **Email** to use email as the method.

8. **Authenticator App**:
* Select an authentication app or browser extension. Click **Add** and enter the generated code.

9. **SMS/Text Message:**
* To set up two-factor authentication using SMS, click **Add**, enter your phone number, and get a one-time code sent to your phone.

### My Devices
10. **View Devices**:
* Click **My Devices** to see a list of all your devices currently online.
* Click **Load online devices**.

### Preferences
11. **Time zone:**
* Click the **Time zone** field and select your desired time zone from the drop-down list.

12. **Dark mode:**
* Toggle the switch on or off to enable or disable dark mode.

13. **Incoming Calls:**
* Toggle the switch on or off to enable or disable push notifications for incoming calls.

14. **Incoming ring tone:**
* Click the **Incoming ring tone** field and select a ring tone from the drop-down list.

15. **Volume:**
* Adjust the volume for **incoming calls, outbound calls**, and **call waiting notifications** using the toggle switch next to each option.

### Voicemail
16. **Voicemail Settings**:
* Manage voicemail greetings that inform callers of your status by clicking **Voicemail**.

17. **Voicemail PIN**:
* Enter the new PIN in the **Enter PIN** field and click **Save**.

18. **Voicemail to Email:**
* Enter your email address and click **Save** to receive voicemails via email. This feature must be enabled on your extension.

19. **Voicemail Greetings**:
* Follow these steps to upload, download, record, or play a voicemail greeting:
* **Name Greeting**: Identifies your extension.
* **Unavailable Greeting**: Plays when you do not pick up the phone.
* **Busy Greeting**: Plays when you are on the phone.
* **Out of Office Greeting**: Overrides your unavailable and busy greetings.

20. **Record/Upload new Greeting:**
**Press and Hold To Record:** Click and hold to record a message.
**Upload File:** Click to upload a new greeting file from your device.
**Playback**: Click to play the media file.
**Cancel Changes**: Click to revert to previous settings.
**Save Changes:** Click to save the recorded or uploaded file.
**Current Greeting:** Displays the name of the current greeting file.
* **Download:** Click the **Download Current** button to download the current greeting file.
* **Playback**: Click to play the media file.
* **Delete:** Click the red **Delete** button to remove the current greeting

### Integrations
21. **Accessing Integrations:**
* Click **Integrations**.

22. **Call Outcome Integration:**
* This results in a call outcome popup for your VOXO calls, allowing you to specify a call outcome to be reported to your selected CRM. Disabled options are unavailable.

# Softphone
Source: https://docs.voxo.co/omnia/user-guide/softphone
This guide provides step-by-step instructions for using the Omnia Softphone, including making calls, holding, muting, and parking, and accessing the expanded...
This guide provides step-by-step instructions for using the Omnia Softphone, including making calls, holding, muting, and parking, and accessing the expanded dialer.
### Handling Incoming Calls
1. **Incoming Calls**:
* You will receive a notification of an incoming call. Choose **Accept** to answer or **Decline** to reject the call.

### Make a Call
2. **Open Dialer:**
* Click **Make a call** to open the dialer and start making an outbound call.

3. **Making a Call**:
* **Enter a Phone Number**: Type the number you wish to call.
* **Start Call**: Click **Call From Softphone** to initiate the call.

4. ### **Call Saved Contact:**
* **Search and Select**: Look up a saved contact and select it from the results. Click **Call From Softphone** to initiate the call.
* **Transfer Status**: When transferring a call, you can see the contact's status:
* **Green**: The user’s phone is ringing.
* **Blue**: The user is on a call.
* **Idle**: The user is not on a call.

5. **Switch Devices:**
* Use the **Move to another device** button to transfer the call to another device on your account.

### Mute Feature
6. **Mute/Unmute:**
* Click the **Mute** button to mute or unmute your microphone during a call.

### Hold Feature
7. **Hold/Resume Call:**
* Click the **Hold** button to put a call on hold.
* Click the **Resume** button to resume the call.

### Softphone Dial Pad
8. **Access Softphone Dial Pad:**
* **Open Dial Pad**: Click the blue arrow icon pointing to the right to access the softphone dial pad.
* **Navigate Options**: Use the dial pad to navigate options on an auto attendant.

9. **Pause/Resume Recording**:
* If call recording is enabled, click the **Pause Recording** button to pause or resume recording.

### Transfer/Conference
10. **Access Transfer/Conference Options:**
* Click the **Transfer / Conference** button (Blue Arrow) to open options for transferring a call or starting a conference call.

11. **Performing a Blind Transfer:**
* While on an active call, select **Transfer / Conference**.
* Enter the phone number or contact, and select **Blind Transfer** to redirect the call without waiting for an answer.

12. **Performing an Attended Transfer:**
* **Transfer/Conference**: Click the button while on an active call.
* **Attended Transfer**: Enter the number or contact, then select to speak with the party before transferring.
* **Swap**: Switch between calls, placing the other on hold.
* **Merge**: Combine calls into a conference call.
* **Hang Up/Complete Transfer**: Complete the transfer, connecting both parties.
* **Cancel Transfer**: Cancel the attended transfer and return to the original caller.

13. **Performing a Conference Call**:
* **Transfer/Conference**: While on an active call, click the button.
* **Enter Number/Contact**: Input the number or contact, then select **Conference**.
* **Swap**: Switch between calls, placing the other party on hold.
* **Merge**: Combine calls into a conference call.
* **Add Multiple Parties**: Repeat the process to add more participants.
* **Hangup**: Select this to leave the conference; other parties will stay connected.

### Park Feature
14. **Park a Call:**
* Click the **Park for User** button.
* Enter the extension or name of the recipient.
* This action transfers the call to the specified extension and puts it on hold.

# VOXO Meet
Source: https://docs.voxo.co/omnia/user-guide/voxo-meet
This guide provides a step-by-step overview of using Omnia: VOXO Meet for meetings.
This guide provides a step-by-step overview of using Omnia: VOXO Meet for meetings. VOXO Meet is a cloud-based video conferencing service that lets you meet with anyone, anywhere, on any device.
VOXO Meet Availability:
VOXO Meet is available for all users with video meetings enabled on their extension.
To conference in a third caller from a VOXO desk phone, press **Conference** while on a call. The caller is placed on hold; dial the number or extension you want to add, then press **Conference** again to connect all three parties. To conference more than three callers, use VOXO Meet instead.
### Starting a Meeting
1. **Starting a Meeting:**
* To start a meeting, click **Start meeting**.

### Providing Meeting Details
2. **Sharing a Meeting:**
* To share meeting details, click **Copy meeting info** and send these details to another party.
* To join the meeting yourself, click **Join Meeting**.

### Joining the Meeting
3. **Preparing to Join a Meeting:**
* Enter your name and select **Continue**.
* You will see a dialog box asking, "Are you ready to join?" Here, you can:
* Turn your camera on/off (Ctrl + E).
* Mute/unmute your microphone (Ctrl + D).
* Change background effects.
* Reduce mic noise.
* Adjust additional settings like changing your name before joining the meeting.
* These options are also available once you are in the meeting.

### Selecting Devices
4. **Selecting Audio and Video Devices:**
* **Camera**: Click the dropdown to select your camera.
* **Microphone**: Click the dropdown arrow to select your microphone and click **Test your mic**.
* **Speakers**: Click the dropdown to select your speakers and click **Play test sound**.
* Click **Join** to enter the meeting.

### Meeting Controls
5. **Managing Audio and Video During a Meeting:**
* **Turn your camera on/off**: Click the camera button or press (Ctrl + E).
* **Mute/unmute your microphone**: Click the microphone button or press (Ctrl + D).

### Additional Features
6. **Viewing Active Participants:**
* Click **People** to see all active participants.

7. **Sending a Chat Message:**
* Click **Chat** to send a chat message.

8. **Using Reactions:**
* Click **React** to pick an emoji, like a thumbs up.

9. **Raising Your Hand:**
* Click **Raise** to raise your hand, and click again to lower it.

10. **Sharing Your Screen:**
* Click **Share** to share your screen. Options include **Chrome Tab, Window,** or **Entire Screen**. You can also share tab audio.

### Recording and Network
11. **Recording the Meeting:**
* To record the meeting, click **Start recording**. Click **Stop recording** when done.

12. **Viewing Network Status:**
* Click **Network** to view your network status, including packet loss and download/upload rate.

### View Options
13. **Switching to Grid View:**
* Click **Grid View** to switch to the grid view.

14. **Switching to Speaker View:**
* Click **Speaker View** to switch to the speaker view.

15. **Using Picture-in-Picture View:**
* **Start Picture in Picture**: Click this to begin a picture-in-picture view.
* **Stop Picture in Picture**: Click this to end the picture-in-picture view.

### Ending the Meeting
16. **Leave the meeting**:
When finished, click **Leave**.

### Schedule Meeting
17. **Scheduling a Meeting:**
* Click **Schedule meeting**. A dialog box will open where you can enter meeting details.

18. **Entering the Meeting Title:**
* Enter the title in the **Enter title** field.

19. **Selecting the Calendar:**
* Select the calendar (**Google, Outlook,** or **Microsoft 365**) from the dropdown.

20. **Setting Up Recurring Meetings:**
* Check the **Recurring event** box for recurring meetings.
*Note: Non-recurring event rooms expire two weeks after the selected end date.*

21. **Setting the Date and Time:**
* Enter the date and time, then click **Schedule Meeting**.

22. **Copying Meeting Details:**
* Click **Copy Meeting Info** to copy the meeting details and send to recipients.

23. **Adding Meeting to Calendar:**
* Click **Add to Calendar** to add the meeting details to your selected calendar.

You can also schedule VOXO Meet calls with the Chrome plugin, available in the Chrome plugin store.
# Agent
Source: https://docs.voxo.co/pharmacy/agent
Monitor and configure the AI pharmacy agent that handles inbound patient calls, refill requests, and chat widget interactions.
The Agent page at [https://pharmacy.voxo.co/agent](https://pharmacy.voxo.co/agent) lets you manage the AI-powered pharmacy agent. The agent answers inbound patient calls, processes prescription refill requests, handles status checks, places outbound calls for [call campaigns](/pharmacy/outbound-campaigns) set to Assistant mode, and can operate as an embedded chat widget on your pharmacy website. The page has two tabs: **Conversations** and **Settings**.
Voice options and refill configuration settings vary depending on which pharmacy management system (PMS) you have connected. The available choices in those settings reflect what your PMS supports.
The agent recognizes touch-tone keypad input during calls. If a caller enters their prescription number on the keypad, the agent uses those digits to look up the prescription without asking for a name and date of birth. The agent allows a short pause between digits — useful when a caller is reading a number off a bottle — and a caller can press **#** to submit the number as soon as they finish entering it. A short entry, such as a four-digit birth year, isn't mistaken for a prescription number, and a caller can press **0** at any time to let the agent know they'd like to speak with a person.
The agent incorporates the verified patient's own medications into speech recognition during a session, improving accuracy when callers say their medications by name.
The agent matches hyphenated and multi-part names — such as "Ana Maria" or "Garcia-Lopez" — part by part, and tries alternate spellings when the first attempt finds no match. Accents are ignored, so "Núñez" on file matches a caller heard as "Nunez", and a name is compared against both the full name your PMS holds and the patient's first and last name, so a middle name on one side and not the other no longer prevents a match. Callers need to give both a first and a last name for a name lookup — a first name on its own is not enough to identify a profile.
The agent looks a caller up by the number they are calling from first. When that finds no profile, it asks for the patient's name and date of birth and searches on those. Name and date of birth lookup works on PioneerRx, Liberty RX, and BestRx and needs no setting turned on. A prescription number read off the label works at any point and resolves fastest.
Spoken dates of birth are read in US order — month, day, then year — so "one five ninety" is January 5, 1990. The agent normalizes ordinals, month names, and two-digit years, and treats a number the transcription rendered as a word in another language as that number. A date the transcription runs together into a single number — "10282" for October 2, 1982 — is split back into month, day, and year rather than being read as one number.
**Enable Search Patient Tool** may still appear under Voice Settings. It no longer changes what the agent does and is being removed from the dashboard.
For pharmacies on PioneerRx, the agent recognizes pet (animal) profiles, including pets that have no prescriptions on file, so callers asking about an animal's medications are matched to the right profile. It never asks for the pet's name: when the number the caller is calling from has one pet on it, the agent works from that profile, and when a household has several, it reports their prescriptions as one list. When no pet is on the number, it asks for a prescription number read off the label, which finds a pet profile the number isn't attached to. A caller who has already been identified as themselves can move on to a pet without starting over.
For pharmacies on PioneerRx, when more than one patient profile matches the name and date of birth a caller gives — for example, family members who share a phone number — the agent asks for the street address on file to identify the right profile before continuing. If the address still doesn't narrow it to a single profile, the agent transfers the call to pharmacy staff.
For pharmacies on PioneerRx, the agent matches only patients on file at your store. Profiles that belong to another location are not returned during patient lookup.
A caller who also needs help for someone else — a spouse or another family member — can ask on the same call. The agent clears the profile it was working from and identifies the new patient from scratch, verifying them the same way, so one person's prescriptions are never reported against another's.
If the agent can't reach your pharmacy management system during a call — for example, the connection to PioneerRx, Liberty RX, or BestRx is down — it recognizes the outage, lets the caller know, and transfers them to pharmacy staff instead of retrying or ending with a generic error. If the agent can't load your pharmacy's configuration at all when a call starts, it asks the caller to contact the pharmacy directly and ends the call rather than leaving them in silence.
When a caller asks for something the agent has no way to handle — a delivery, an insurance or billing question, medical or dosage advice, appointment or vaccine scheduling, a special order, or a message passed to staff — the agent hands the request off rather than improvising an answer. What happens next depends on the channel and your store hours:
* **On a call during business hours** — the agent connects the caller to pharmacy staff.
* **On a call outside business hours** — the agent explains that staff will need to help, and offers to take a voicemail on your after-hours box.
* **In chat and SMS** — with no call to transfer, the agent gives the caller your pharmacy's phone number and asks them to call during business hours.
Patients are never routed to the prescriber voicemail box. If the agent can't complete a transfer, it tells the caller so instead of announcing a hand-off that won't connect.
When a caller asks for several things at once and only some of them are out of scope, the agent finishes the requests it can handle first and hands off last, so a refill or status check asked for in the same breath isn't lost to the transfer.
When a caller goes quiet, the agent waits for the silence to settle before checking in, so it no longer talks over someone who is still thinking or reading a label. It checks in a couple of times, a short pause apart, then says a friendly goodbye and ends the call. The caller speaking at any point cancels the sequence. The goodbye names your pharmacy.
## Monitoring conversations
The Conversations tab provides a live view of patient interactions. A stats bar at the top shows session metrics for the current period.
Filter the session list with the controls above the table:
* **Type** — scope to **Voice**, **Web**, **SMS**, or **All**. **All** is the default and includes every session type.
* **Direction** — **Inbound**, **Outbound**, or **Both**.
* **Transferred** — show only sessions that were transferred to staff, only those that weren't, or both.
* **Date range** and **Search** for narrowing further. Search matches the caller's name as well as their phone number, so you can type either.
Your filters, search term, and page are kept while you work — open a conversation and come back and the list is where you left it.
### Session list
Below the stats, each row in the session list represents one patient interaction — either a phone call or a chat session. Select a row to open the conversation, or right-click it for **Open conversation** and **Open in new tab**. The conversation view shows:
* **Call recording playback** — an audio player for the recorded phone call, if applicable. Use the player controls to play, pause, and scrub through the recording.
* **Tool usage tracking** — a log of every action the agent took during the session, such as looking up a prescription, submitting a refill request, or transferring the caller. This lets you verify what the agent did and why. An action that finishes without a spoken reply — because the agent handled the request itself instead of reading a result back — is logged as successful, not as an error. A lookup that couldn't reach your pharmacy management system is logged as a failure with the error, so an outage reads as an outage rather than as a search that found nobody.
* **Quality metrics** — scores and indicators for how the agent handled the interaction, including whether the patient's question was resolved.
To print or save the full message-by-message transcript of a conversation, open the conversation first, then use your browser's print option from that view. The CSV export from the session list contains the table row only — it does not include the full transcript.
A conversation link carries the location the conversation belongs to, so it stands on its own when you copy it to a colleague. Opening a link for a location other than the one you are currently viewing switches the dashboard to that location.
## Configuring the agent
The Settings tab contains five sub-tabs: **General**, **Voice**, **Call Routing**, **Webchat**, and **Announcements**.
Store and contact details, refill settings, and the Who Is Calling plugin download were sub-tabs here until September 22, 2026. Store details now live on the [Store settings](/pharmacy/store-settings#store-information) page, and refill settings and the plugin download on the [PMS](/pharmacy/pms-tools) page. [Settings that moved](#settings-that-moved) below links to each one.
If your account can open the Settings tab but not change it, a banner at the top of the sub-tabs says you can view the settings without permission to edit them, and the fields are read-only. Ask an administrator at your pharmacy to grant the virtual receptionist update permission in [Store settings](/pharmacy/store-settings#managing-users).
When **Save Changes** is unavailable after you've edited something, the reason appears beneath the button — for example, "Choose a voice before saving."
**Reset to Defaults** clears every field on the agent config — greeting, voice and call behavior, store and contact details, hours, announcements, transfer and voicemail destinations, tools, and language — back to VOXO's defaults. Confirm the dialog to fill the form with the defaults, then review them and select **Save Changes** to apply. Nothing is saved until you do, so **Cancel Changes** still puts the form back the way you found it.
### General
The General sub-tab holds the agent's name and its language settings.
| Field | Description |
| ---------- | --------------------------------------------------------------------------------------------------------------------------------------------------- |
| Agent Name | The name the agent uses to identify itself to patients. Hover the info icon beside the label to see this agent's ID, which VOXO support may ask for |
Languages are configured on this same sub-tab — see [Language](#language) below.
### Voice Settings
The Voice sub-tab controls how the agent sounds on calls.
| Field | Description |
| ----------------------- | ------------------------------------------------------------------------------------------------------------------------------------------------------------------------------------------- |
| Voice Gender | The gender of the voice: Masculine or Feminine |
| Voice | The AI voice the agent uses, chosen from a searchable catalog of named voices. Each voice shows a short description of its persona, and the available choices depend on the selected gender |
| Greeting Message | The text the agent speaks when it answers a call. Write it in English — when a call runs in another language, the greeting is translated and spoken in that language |
| Preview Audio | Plays a text-to-speech preview of the current greeting message using the selected voice. Pick a language beside the button to hear the greeting as a caller in that language would |
| Enable Background Noise | When enabled, the agent plays subtle background noise during patient interactions |
If patients report hearing static or background noise on agent calls, turn off **Enable Background Noise** and have them try again.
### Call Routing
The Call Routing sub-tab sets the hours the agent works to and where it sends callers it can't finish with. Settings are grouped into four sections.
**Business hours** — Select the business hours schedule the agent uses when answering questions about when the pharmacy is open and when deciding whether a call is after hours. You can assign an existing hours schedule, create a new one, edit the current selection, or remove it.
**Transfer behavior**
| Field | Description |
| ------------------------------ | ---------------------------------------------------------------------------------------------------------------------------------------------------------------------------------------------------------------------------------------------------------------------------------------------------------------------------------------------------------------------------------------------------------------------------------------------------------------------------------------------------------------------------------------------------------------------------- |
| Offer help before transferring | When enabled, if a caller asks to be transferred early in the call the agent makes one brief offer to help them directly before connecting them to staff. If the caller declines or asks again, the agent transfers right away. The agent skips the offer when it was the one who proposed connecting the caller, when the caller has already used self-service such as a patient lookup, status check, or refill, when the destination is a voicemail box, and for requests it has no way to handle. Emergency, safety, and compliance transfers always connect immediately |
| Default Transfer Destination | The extension, queue, call group, or custom destination the agent transfers callers to by default |
| Alternate Destinations | Additional extensions, queues, call groups, or custom destinations the agent can transfer callers to in specific scenarios. Expand **Alternate destination instructions** to tell the agent when and how to use each one |
| Agent Transfer Ringtone | An alternate ringtone (1–10) that plays on the receiving deskphone for calls transferred from the agent. This corresponds to the alternate ringtone setting on your Yealink deskphone, so staff can tell agent transfers apart from regular inbound calls. Leave it on **Default ringtone** to keep the standard ring |
**After hours**
| Field | Description |
| --------------------- | -------------------------------------------------------------------------------------------------------------------------------------------------------------------------------------------------------- |
| After-Hours Voicemail | The voicemail box or custom destination where calls received outside business hours are sent. Expand **After-hours voicemail instructions** to add details the agent uses when routing after-hours calls |
**Special cases**
| Field | Description |
| ------------------------- | -------------------------------------------------------------------------------------------------------------------------------------------------------------------------------------------------------------- |
| Prescriber Voicemail | The voicemail box or custom destination where calls from prescribers are sent. Expand **Prescriber voicemail instructions** to add details the agent uses when routing prescriber calls |
| Auto Transfer Compounding | When enabled, the agent transfers compounding-related calls to a destination of your choice instead of attempting to handle the refill itself. Leave it off to let the agent handle compounding calls normally |
| Compounding Destination | Where compounding calls go when **Auto Transfer Compounding** is on. An extension, queue, call group, or custom destination. The agent config won't save with the toggle on and no destination chosen |
Custom destinations let you transfer calls to external phone numbers in addition to internal extensions, queues, and call groups. Use these when you need to route callers to an off-site location or external provider.
Business hours and [Time of Days](/omnia/admin/time-of-days) do different things. Business hours are recurring daily schedules the agent uses to answer "are you open?" and to route after-hours calls. Time of Days schedules continuous blocks — for example, today through next week with no breaks — and lets you pick where calls route during that block. Use Time of Days for one-off closures or overrides rather than editing your regular business hours.
### Language
On the **General** sub-tab, control which languages the agent speaks and how it switches between them.
| Setting | Description |
| ------------------------ | ----------------------------------------------------------------------------------------------------------------------------------------- |
| Primary Language | The default language the agent speaks. Every call starts in this language |
| Lock to primary language | When enabled, the agent will not switch languages under any circumstance. This disables additional languages |
| Additional Languages | Languages the agent is allowed to switch to, but only when the caller explicitly asks. Available when **Lock to primary language** is off |
Selecting additional languages lets callers request a different language mid-call. With **Lock to primary language** on, the agent always stays in the primary language regardless of what the caller asks.
When your primary language is something other than English, or additional languages are enabled, the agent transcribes calls with a multilingual model so it understands callers in any of the languages you have configured. A location set to English and locked to its primary language transcribes English only.
#### Sending callers to the agent in a chosen language
A phone menu can put a caller straight into the agent in a particular language. On the [IVR](/pharmacy/ivr#setting-up-key-press-options) page, point a menu key at **Pharmacy Agent (\)** — for example, a "para español, oprima dos" key at **Pharmacy Agent (Spanish)**. Calls that press that key run in that language from the start, regardless of the location's **Primary Language**.
Fifteen languages are available: English, Spanish, French, German, Portuguese, Italian, Dutch, Polish, Russian, Swedish, Turkish, Chinese, Japanese, Korean, and Hindi.
The agent speaks its fixed lines in the call's language rather than always in English — the greeting, "please hold while I connect you", what it says before handing the caller to staff, the [recording disclosure](/pharmacy/store-settings#playing-a-call-recording-disclosure), and its goodbye.
### Webchat
Configure an embedded chat widget that you can add to your pharmacy website. Patients who visit your site can use the widget to ask questions and submit refill requests without calling.
Available settings:
| Setting | Description |
| --------------- | --------------------------------------------------------------------------------------- |
| Widget name | The display name shown to patients in the chat window |
| Position | Where the widget appears on the page: bottom-right, bottom-left, top-right, or top-left |
| Auto-open | Whether the widget opens automatically when a patient visits the page |
| Auto-open delay | How many seconds to wait before the widget opens automatically, if auto-open is on |
| Appearance | Color and style options for the widget |
A live preview on the right side of the sub-tab updates as you change settings, so you can see how the widget will look on your site before deploying it.
See [Embedding the chat widget](#embedding-the-chat-widget) below for instructions on adding the widget to your website.
If webchat isn't included in your plan, the sub-tab still opens but a note says so and the settings are read-only.
### Announcements
Select which announcements the agent plays to callers at the start of an interaction. Announcements are managed separately on the [Announcements page](/pharmacy/announcements). Use this sub-tab to choose which of those announcements are active for the agent.
## Settings that moved
The September 22, 2026 settings reorganization moved several agent settings to other pages. The agent behaves the same way — only where you configure it changed.
### Location
Your store name, website, contact phone and email, and address are now on the **Store Information** tab of [Store settings](/pharmacy/store-settings#store-information). The agent references them when patients ask questions like "where are you located?" The business hours the agent works to moved the other way, onto the [Call Routing](#call-routing) sub-tab.
### Knowledge Base
The Knowledge Base sub-tab is no longer shown in the dashboard after the September 22, 2026 reorganization, so custom context sections can't currently be added or edited there. Knowledge base content saved before then is kept and the agent still reads it when generating responses. Contact VOXO support if you need a section changed.
The Knowledge Base is custom context the agent uses when answering patient questions, organized into named sections, each with a **Title** and a **Data** field. Separate sections cover distinct topics — for example, pharmacy policies, frequently asked questions, or notes about specific services — rather than combining everything into one block. The agent reads every section when generating responses.
When you save the agent configuration, the system still checks your knowledge base for content that could interfere with agent behavior — such as directives, capability claims, or prompt-like instructions. If flagged content is found, a warning dialog lists the specific issues and affected sections.
### Refill Config
Refill settings are now on the **PMS Config** tab of the [PMS](/pharmacy/pms-tools#pms-config) page. How the agent handles refill requests on a call is unchanged:
**Refills for reassigned prescriptions.** If your PMS reassigns Rx numbers, enable the corresponding option here so the agent accepts refills filed against the new number. Without it, the agent may tell callers to contact their prescriber for a prescription that's already filled and on hold. The available toggles depend on your connected PMS.
You can give refills a dedicated direct-dial number that routes callers straight to the refill agent, bypassing your main menu. Additional numbers used for this purpose aren't charged — ask your administrator or VOXO support to point a number at the refill agent.
On PioneerRx, Liberty RX, and BestRx, each of a patient's medications is listed on its own, with its strength, rather than every strength of the same drug being folded into one entry. If a caller names a medication that matches more than one of their prescriptions — including the same drug at two strengths — the agent names the strengths and asks which one they mean instead of choosing. A prescription number that a renewal has since replaced still resolves to the current prescription, so a number read off an older bottle refills the right one. When a medication has more than one prescription on file and one of them has been transferred, the agent reports and refills the one that wasn't transferred, even where the transferred prescription carries the newer number.
On PioneerRx, a prescription your pharmacy has not finished preparing is reported as not yet refillable, and the agent tells the caller it is still being prepared rather than filing a refill it cannot complete.
A prescription that comes back from your PMS without a prescription number can't be refilled or reported on. When a caller asks about one, the agent hands them to pharmacy staff instead of answering from the profile, filing a refill, or asking the caller to read out a number your system doesn't have.
On PioneerRx, BestRx, and LibertyRx, the agent submits refills in a single bulk request when a caller asks for several prescriptions at once. The agent confirms the list with the caller, files the refills together, and reports the outcome for each prescription in one summary instead of repeating the refill flow for every script.
A caller who asks to refill "everything" is asked which medications they mean rather than having their whole profile submitted. A caller who asks what they can refill hears the names of the prescriptions that are currently refillable, so they can pick from that list.
**Next fill date.** Where your PMS supplies one, the agent works the prescription's next fill date into what it says. On a prescription that can't be refilled yet, it gives the reason and tells the caller that date is when they can refill it next. On one that can be submitted, it says the pharmacy won't fill it until that date before asking whether the caller wants it submitted. On a status check it mentions the date whenever the prescription carries one, since that's the earliest the pharmacy will fill it. A date that has already passed isn't read back.
### Tools
**Auto Transfer Compounding** is now part of the [Call Routing](#call-routing) sub-tab.
**Who Is Calling** — Liberty RX locations only. The plugin download is now on the **Who is Calling** tab of the [PMS](/pharmacy/pms-tools#who-is-calling) page. See [Who Is Calling](/pharmacy/who-is-calling) for install and troubleshooting steps.
The agent can book vaccine appointments on outbound [Vaccine Scheduling campaigns](/pharmacy/outbound-campaigns#vaccine-scheduling-campaigns), against the calendars and event types you set up on the [Scheduling](/pharmacy/scheduling) page. Inbound callers who ask to schedule a vaccine or an appointment are still routed to pharmacy staff.
## Embedding the chat widget
After configuring the widget in Settings, copy the embed code and add it to your pharmacy website.
In the Settings tab, select **Webchat** from the sub-tab list.
Set the widget name, position, auto-open behavior, and appearance. The live preview on the right updates as you make changes.
Scroll down to the embed code section. Click the copy button to copy the code snippet to your clipboard.
Paste the embed code into the HTML of every page on your pharmacy website where you want the widget to appear. Place it just before the closing `` tag. If your site uses a tag manager, you can add the snippet there instead.